Перейти к основному содержанию
/
Мой рабочий стол для верстки руководств

Получите быстрый доступ к руководствам, запчастям и ответам касательно ваших устройств

iMac G5 17" Model A1058 Inverter Replacement

iMac G5 17" Model A1058 Inverter Replacement

Andrew Bookholt

Andrew Bookholt и 3 другие участники

Последнее обновление October 16, 2013

Нет оценки
Средне

Replace your inverter board with this guide.

Выберете то, что вам нужно

Запчасти

Инструменты

  • Phillips #1 Screwdriver
    Phillips #1 Screwdriver
  • Spudger
    Spudger

Показать больше…

iFixit получает комиссию, когда вы совершаете покупку по этим ссылкам.
  1. iMac G5 17" Model A1058 Inverter Replacement, Rear Panel: шаг 1, изображение 1 из 1
    • Lay the iMac display-side down on a flat surface.

    • Loosen the three Phillips screws securing the rear panel to the iMac.

    • These screws are captive in the iMac. The center screw will stop turning after about 3.5 turns and the outer screws will stop turning after about 5.5 turns. Do not try to remove these screws from your iMac.

  2. iMac G5 17" Model A1058 Inverter Replacement: шаг 2, изображение 1 из 3 iMac G5 17" Model A1058 Inverter Replacement: шаг 2, изображение 2 из 3 iMac G5 17" Model A1058 Inverter Replacement: шаг 2, изображение 3 из 3
    • Lift the rear panel slightly from the bottom edge of the iMac.

    • Pull the rear panel toward yourself and remove it from the iMac.

  3. iMac G5 17" Model A1058 Inverter Replacement, Optical Drive: шаг 3, изображение 1 из 1
    • Remove the three 8 mm brass Phillips screws securing the optical drive to the midplane.

  4. iMac G5 17" Model A1058 Inverter Replacement: шаг 4, изображение 1 из 3 iMac G5 17" Model A1058 Inverter Replacement: шаг 4, изображение 2 из 3 iMac G5 17" Model A1058 Inverter Replacement: шаг 4, изображение 3 из 3
    • Lift the optical drive near the connector to separate it from the logic board.

    • Lift the free end of the optical drive just enough to clear the fan cover. Lifting the free end of the optical drive too far may break the plastic positioning pins off the front bezel.

    • Lift the free end of the optical drive slightly, then pull it away from the edge of the rear case to clear the two plastic positioning pins.

    • Lift the optical drive out of your iMac.

    • When reinstalling your optical drive it may be necessary to set the bezel attached to the open end of the drive on the plastic positioning pins molded into the front bezel of the iMac and pull the connector side of the drive toward the edge of the rear case, bending it outward slightly, to properly seat the connector.

  5. iMac G5 17" Model A1058 Inverter Replacement, Inverter: шаг 5, изображение 1 из 1
    • Slide the inverter-to-display cable connector from under the metal clip on the midplane.

  6. iMac G5 17" Model A1058 Inverter Replacement: шаг 6, изображение 1 из 1
    • Disconnect the inverter-to-display cable connector by pulling it straight away from its socket.

  7. iMac G5 17" Model A1058 Inverter Replacement: шаг 7, изображение 1 из 2 iMac G5 17" Model A1058 Inverter Replacement: шаг 7, изображение 2 из 2
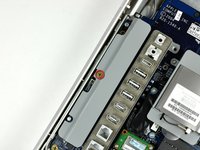
    • Remove the single Phillips screw securing the inverter to the logic board.

    • Lift the inverter straight up off the pins on the logic board.

    • Be sure to lift the inverter straight up off the logic board, as the connector pins are very long and easily bent. If the pins bend during removal, use the connector on the inverter as a guide to bend them straight.

  8. iMac G5 17" Model A1058 Inverter Replacement: шаг 8, изображение 1 из 1
    • De-route the inverter cable connector from the channel in the logic board.

  9. iMac G5 17" Model A1058 Inverter Replacement: шаг 9, изображение 1 из 1
    • Disconnect the inverter cable from the logic board by pulling it straight up from its socket.

    • Replacement note: it may be helpful to carefully reattach this connector before seating the midplane assembly, making sure the connector safely passes through the hole in the midplane assembly.

  10. iMac G5 17" Model A1058 Inverter Replacement, Inverter: шаг 10, изображение 1 из 2 iMac G5 17" Model A1058 Inverter Replacement, Inverter: шаг 10, изображение 2 из 2
    • Insert the flat end of a spudger between the plastic inverter cover and the inverter board.

    • Run the spudger along the edge of the inverter board to free all the tabs holding the plastic inverter cover to the inverter board.

  11. iMac G5 17" Model A1058 Inverter Replacement: шаг 11, изображение 1 из 1
    • Lift the plastic inverter cover off the inverter board.

Заключение

To reassemble your device, follow these instructions in reverse order.

3 человек успешно провели ремонт по этому руководству.

0 Комментариев

Добавить комментарий

Статистика просмотров:

За последние 24 час(ов): 0

За последние 7 дней: 0

За последние 30 дней: 2

За всё время: 11,272