Введение
iMac won't read disks? Use this guide to replace a non-functional optical drive.
Выберете то, что вам нужно
-
Инструмент, используемый на этом этапе:Heavy-Duty Suction Cups (Pair)$14.95
-
Stick a suction cup near each of the two top corners of the glass panel.
-
If your suction cups refuse to stick, try cleaning both the glass panel and the suction cup with a mild solvent.
-
-
-
Gently lift the glass panel perpendicular to the face of the LCD enough to clear the steel mounting pins attached along the underside of the top edge of the glass panel.
-
Pull the glass panel away from the lower edge of the iMac and carefully set it aside.
-
-
-
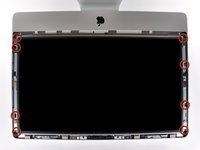
Remove the eight 8 mm T10 Torx screws securing the display to the outer case.
-
-
-
Pull the vertical sync ribbon cable out of its socket on the LED driver board near the top left corner of your iMac.
-
-
-
Rotate the display out of the outer case enough to disconnect the LED backlight power cable from the LED driver board.
-
-
-
-
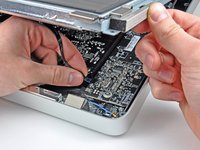
Squeeze the two display data cable connector arms together to unlock it from its socket on the logic board.
-
Pull the display data cable connector away from its socket on the logic board.
-
-
-
Disconnect the LCD thermal sensor cable connector from its socket on the logic board.
-
-
-
Carefully pull the display toward the top edge of your iMac and lift it out of the outer case, minding any cables that may get caught.
-
-
-
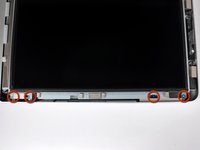
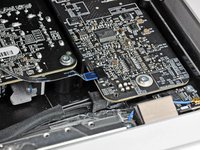
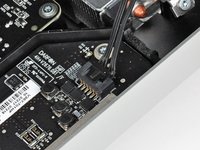
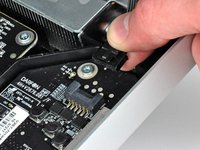
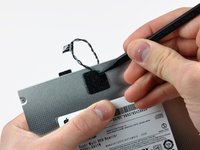
Pull the optical drive thermal sensor connector straight away from its socket on the logic board.
-
-
-
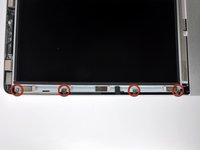
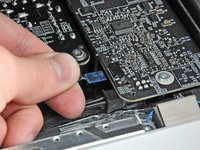
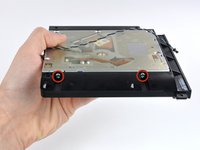
Remove the four 9 mm T10 Torx screws securing the optical drive to the outer case.
-
-
-
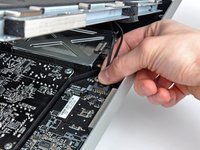
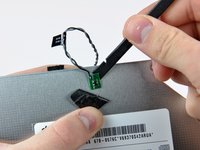
Lift the inner edge of the optical drive and maneuver its connector past the frame attached to the logic board.
-
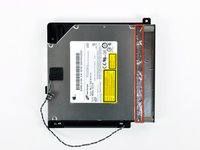
Carefully pull the optical drive off its mounting pins on the edge of the outer case to gain clearance for disconnecting the optical drive cable.
-
-
-
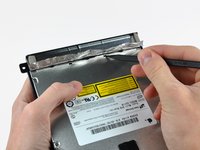
Peel back the portion of aluminum tape highlighted in red, leaving the rest attached to the black plastic optical drive bracket.
-
-
-
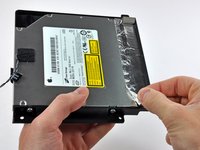
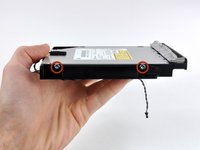
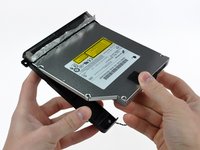
Remove the two T10 Torx screws from both sides of the optical drive (four screws total).
-
-
-
Rotate the optical drive bracket slightly away from the optical drive.
-
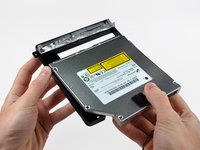
Pull the optical drive bracket away from the open end of the optical drive, minding any tabs that may get caught.
-
-
-
Use the tip of a spudger to peel back the piece of foam tape covering the optical drive thermal sensor.
-
Use the flat end of a spudger to carefully pry the thermal sensor up off the adhesive securing it to the optical drive.
-


To reassemble your device, follow these instructions in reverse order.
Отменить: Я не выполнил это руководство.
26 человек успешно провели ремонт по этому руководству.

3 Комментарии к руководству
A word of caution when reassembling. Be sure to replace the LCD thermal sensor connector and the optical drive thermal sensor connector with the contacts facing down. They are both very small and easy to overlook the contact points. If either or both are reinstalled wrong the iMac will not power up. You will get a white screen momentarily and then it will go black. I made that mistake and had to go back in and correctly insert them which solved the power up problem.
I successfully put an SSD (mounted in OWC data doubler) into the optical drive slot.
I got slightly thrown for a moment that at step 10, the iMac was apparently rotated 180 degrees. I didn't really want to change my work position, so I turned my iPad upside down to follow the pictures correctly. Not sure why the perspective changed at that point in the manual.
The other "interesting" task was reattaching the LCD, what with the nearby rare earth magnets trying to steal the screws. Having a heavily magnetized torx screwdriver was a big help; I just took a magnet of my own and stuck it on the handle end of the shaft, and then it held the screw enough to make the job possible.
I was quite relieved when my iMac booted after all this. :)
Per error se'm va introduir una targeta portadora de microSD tipus SD a traves de la ranura del lector de CD-DVD.
Seguint aquesta guia perfectament bé explicada i amb les eines adequades, T10 Torx, tornavís de rellotger tipus estrella o philips i en el meu cas dues ventoses solidaries tipus mànec d'enganxar a la paret de la dutxa per no caure; he aconseguit recuperar la microSD, el lector de CD-DVD i el iMAC continua sencer.
Mil gràcies Andrew Bookholt, ets un crack e indubtablement molt bona persona.