Введение
Remove the display to replace it or access the computer's internal components.
Выберете то, что вам нужно
-
Инструмент, используемый на этом этапе:Heavy-Duty Suction Cups (Pair)$16.95
-
Stick a heavy-duty suction cup near each of the two top corners of the glass panel.
-
While lightly holding the suction cup against the glass, raise the movable handle until it is parallel with the other handle (as indicated by the third picture).
-
-
-
Gently lift the glass panel perpendicular to the face of the LCD, enough to clear the steel mounting pins attached along the underside of the top edge of the glass panel.
-
Pull the glass panel away from the lower edge of the iMac and carefully set it aside.
-
-
Инструмент, используемый на этом этапе:Tweezers$3.99
-
Carefully lay the iMac stand-side down on a flat surface.
-
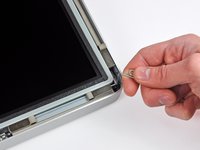
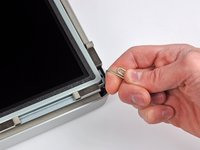
Use a thin hooked tool to lift one side of the top edge of the display by its steel outer frame.
-
Raise and hold the display high enough to access the cables.
-
-
-
-
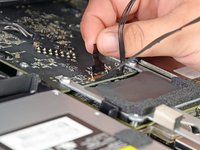
Disconnect the vertical sync cable in the upper left corner of the screen. Use the tip of a spudger to push on the connector's side tabs and gently walk it out of its socket.
-
-
-
Disconnect the LED backlight driver cable with your hand by pressing the tab down and sliding it towards the bottom of the display.
-
-
-
Pull the black tab straight up to disconnect the latch on the display data cable ZIF connector.
-
Continue to pull the black tab up toward the top of the device, to detach the display data cable.
-
-
-
Use the tip of a spudger to disconnect the display power cable next to the display data cable.
-
-
-
Carefully pull the display toward the top edge of your iMac and lift it out of the iMac case.
-
-
-
Lay the display face down on a flat, soft surface.
-
If there is a wire or cable underneath adhesive tape, always pull the tape off first. Do not pull on the cable directly.
-
If the cable is glued to the chassis, use a heated iOpener or a hair dryer to soften the adhesive first. You can then slide an opening pick underneath the cable to loosen it. Never pull on the delicate connectors.
-
Slide an opening pick underneath the foam cushion pieces to separate them from the display, and gently pull them off. You may need some double sided tape to re-attach them to the new display.
-


To reassemble your device, follow these instructions in reverse order.
Отменить: Я не выполнил это руководство.
45 человек успешно провели ремонт по этому руководству.

14 Комментарии к руководству
For starters, thanks for this great tutorial!
I have a small question though.
What is meant by "Carefully lay the iMac stand-side down on a flat surface."
If I lay the iMac on my desk, the mount is preventing it from going completely flat.
I find the 27" quite heavy to lift and was wondering if I was doing something wrong.
Anybody have any tricks to lift the LCD without too much lifting?
Thanks!
Where to buy a replacement lcd panel for a 2011 imac. Or jul.st the led with the conectors
BUYER BEWARE!!
Good review if you were provided all the necessary connector cables on your replacement part. I bought the replacement LCD online from ifixit.com and it’s missing all connectors except the LED Backdriver cable.
This is what I pulled off my iMac.
This is what I was shipped by ifixit.
Even missing foam cushioning that protects inside components from the back of the LCD. If you’re not going to include those connectors in shipped parts, then you need to include how to remove them from your old LCD and transfer them to the new one. Thanks for having me tear down my iMac for nothing. At least I could use it previously with an external monitor. Now I have to put it back together just to be able to do that again.
Hi cdowney! I’m sorry to hear about your experience. We try to let you know on the product page which components our parts come with, as stated in the product description: “The LVDS cable and temperature sensor are not included in the assembly and will need to be transferred from your original display.” This guide may not be 100% complete for the specific part we sell right now, parts often change based on source and time after original release, and can vary between providers. We try to keep up with changes but aren’t always successful.
That said, the cables on the old display are removable and can be fairly easily transferred to your new display. Simply peel up the black tape and disconnect the cables, and plug them into the new display. The foam pieces are not critical, but can also be transferred to the new display, the adhesive should enable re-sticking with no issue. If you have trouble, don’t hesitate to reach out to us!
here, have some wine