iPhone 4S Logic Board Replacement

Введение
Перейти к шагу 1Use this guide to replace your iPhone's logic board.
Выберете то, что вам нужно


-
-
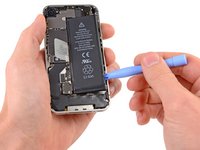
Power off your iPhone before beginning disassembly.
-
Remove the two 3.6 mm Pentalobe P2 screws next to the dock connector.
-
-
-
Pull the rear panel away from the back of the iPhone, being careful not to damage the plastic clips attached to the rear panel.
-
Remove the rear panel from the iPhone.
-
-
-
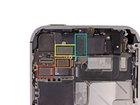
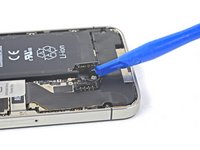
Remove the following screws securing the battery connector to the logic board:
-
One 1.7 mm Phillips screw
-
One 1.5 mm Phillips screw
-
-
-
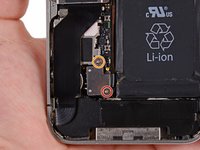
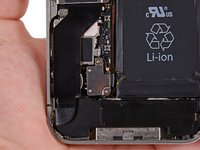
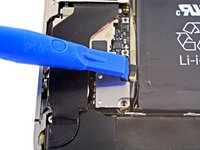
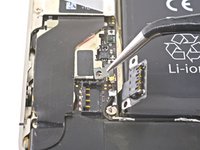
Carefully push the pressure contact away from the battery connector until it slides free from its position.
-
Remove the pressure contact.
-
-
-
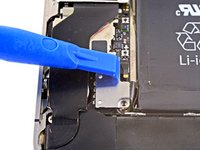
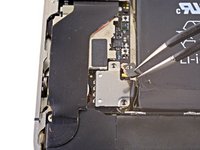
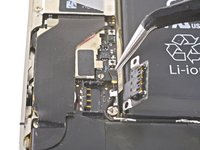
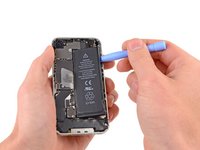
Use a plastic opening tool to gently pry up the battery connector from its socket on the logic board.
-
Place the tip of the tool between the loudspeaker enclosure and the metal cover of the connector, and lift the bottom edge of the connector first.
-
-
-
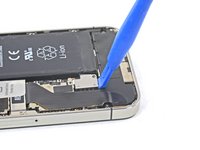
Insert the edge of a plastic opening tool between the battery and the outer case near the bottom of the iPhone.
-
Run the plastic opening tool along the right edge of the battery and pry up at several points to completely separate it from the adhesive securing it to the outer case.
-
Wait about one minute for the alcohol solution to weaken the adhesive.
-
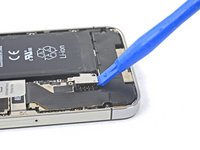
Use the flat end of a plastic opening tool to gently lift the battery.
-
-
-
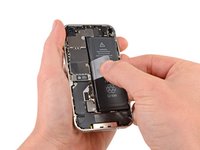
Use the exposed clear plastic pull tab to peel the battery off the adhesive securing it to the iPhone.
-
Remove the battery.
-
-
-
Remove the following screws securing the dock connector cable cover to the logic board:
-
One 1.5 mm Phillips screw
-
One 1.2 mm Phillips screw
-
Remove the metal dock connector cable cover.
-
-
-
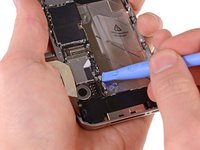
Use the edge of a plastic opening tool to pry the dock cable up from its socket on the logic board.
-
-
-
Peel the dock connector cable off the adhesive securing it to the logic board and the side of the speaker enclosure.
-
-
-
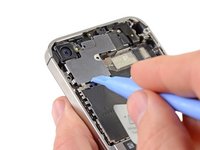
Use the edge of a plastic opening tool to pry the cellular antenna cable up from its socket on the logic board.
-
De-route the cellular antenna cable out from under the metal fingers attached to the logic board.
-
-
-
Remove the following four screws securing the cable cover to the logic board:
-
One 2.7 mm Phillips screw
-
One 2.6 mm Phillips screw
-
One 1.3 mm Phillips screw
-
One 1.2 mm Phillips screw
-
-
-
Use the edge of a plastic opening tool to pry the cable cover tabs out of their slots cut into the EMI shield on the logic board.
-
Lift the cable cover from its edge nearest the top and remove it from the iPhone.
-
-
-
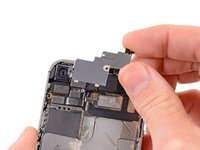
Use the edge of a plastic opening tool to pry the rear camera connector up from its socket on the logic board.
-
Remove the rear camera from the iPhone.
-
-
-
Use a SIM eject tool or a paperclip to eject the SIM and its tray.
-
Remove the SIM and its tray.
-
-
-
Remove the five cables near the top of the logic board in the following order:
-
Headphone jack/volume button cable
-
Front facing camera cable
-
Digitizer cable
-
Display data cable
-
Power button cable (located underneath the headphone jack/volume button cable as shown in the second picture.)
-
-
-
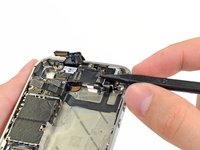
Remove the 1.5 mm Phillips screw securing the grounding clip to the logic board near the headphone jack.
-
-
-
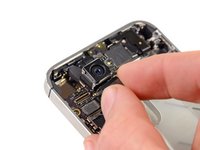
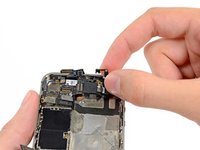
Use the tip of a spudger to pry the small grounding clip up off the logic board.
-
Carefully grasp the grounding clip and remove it from the iPhone.
-
-
Инструмент, используемый на этом этапе:Standoff Screwdriver for iPhones$5.49
-
Remove the 4.8 mm standoff screw near the headphone jack.
-
-
-
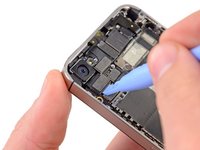
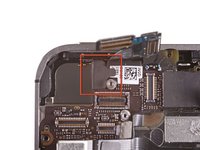
Use the edge of a plastic opening tool to disconnect the Wi-Fi antenna from the logic board.
-
-
-
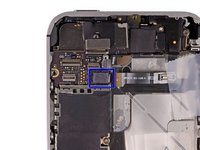
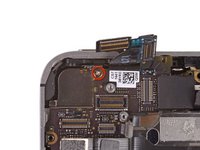
If present, peel the piece of black tape covering the hidden screw near the power button.
-
Remove the 2.6 mm Phillips screw securing the logic board near the power button.
-
-
-
Remove the following screws securing the logic board to the case:
-
One 2.5 mm Phillips screw near the vibrator motor
-
One 2.4 mm Phillips screw
-
One 3.6 mm standoff along the side of the logic board nearest the battery opening.
-
-
-
Carefully lift the logic board from the end closest to the speaker enclosure and slide it away from the top edge of the iPhone.
-
Remove the logic board.
-


To reassemble your device, follow these instructions in reverse order.
To reassemble your device, follow these instructions in reverse order.
Отменить: Я не выполнил это руководство.
256 человек успешно провели ремонт по этому руководству.

12 Комментариев
recently I tried to fix my wifi antenna and ended up disturbing something that made my touch unresponsive. Okay just to make sure that my Display unit was not damaged I plugged in another display set and still the touch was not working!
what could have possibly gone wrong?
What can I say but BRILLIANT!!!!
You have saved me a bomb - very easy and much appreciated!
I had 2 broken iPhones and thanks to this guide I have a working one and a load of pieces :-)
Thank you very much for these instructions, which are aircraft maintenance quality. I had 2 phone: one with broken front glass and bad battery but with 32G. Other one good conditions but only 16G, which left over after getting 5s. So I changed logic board assembly from 32G to other frame and left all the rest inside. Voila, there it is fixed 32G 4s phone ready to use after recharging battery.
Instructions are so good that it takes me about 1 1/2 hour to disassembly and reassembly 2 phones and I had´t done that ever before. I just read instructions first and then followed step by step and checked out comments.