Перейти к основному содержанию
/
Мой рабочий стол для верстки руководств

Получите быстрый доступ к руководствам, запчастям и ответам касательно ваших устройств

Sostituzione pannello LCD iPad Mini CDMA

Примечание: Вы редактируете необходимое руководство. Любые внесённые вами изменения влияют на все 38 руководства, которые включают этот шаг.

Английский
Итальянский
Шаг 2
iPad Mini CDMA LCD Replacement: шаг 0, изображение 1 из 3 iPad Mini CDMA LCD Replacement: шаг 0, изображение 2 из 3 iPad Mini CDMA LCD Replacement: шаг 0, изображение 3 из 3
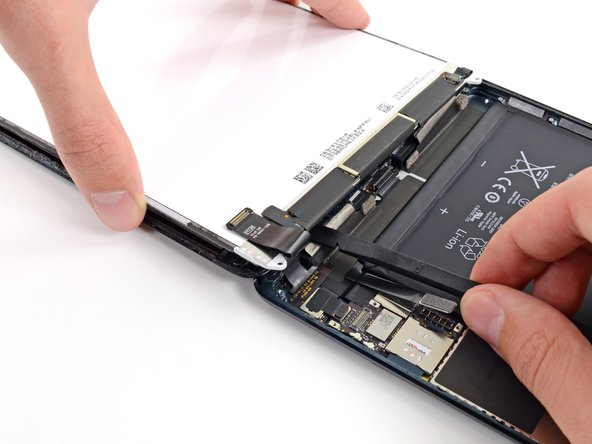
  • The LCD is still connected to the rest of the iPad by two wide strips of adhesive tape that run up from the inside of the rear case to the front bottom LCD frame.

  • While holding the LCD with one hand, insert the flat end of a spudger between the LCD and tape on the iPad's right side.

  • Slide the spudger outward, separating the tape, while gently lifting up on the LCD to pull it away from the tape.

  • It may help to twist the spudger, to spread the gap the rest of the way and separate the LCD from the tape.

Il pannello LCD è ancora unito all'iPad da due larghe strisce di nastro adesivo che vanno dall'interno del case posteriore alla parte frontale del bordo inferiore della cornice del pannello.

Mentre tieni il pannello LCD con una mano, infila la parte piatta di uno spudger tra il pannello LCD e il nastro sul bordo destro dell'iPad.

Fai scorrere lo spudger verso l'esterno per separare l'adesivo, mentre sollevi delicatamente il pannello LCD per staccarlo dal nastro.

Può essere utile torcere lo spudger per allargare la fessura e separare il pannello dal nastro.

Ваш вклад лицензируется под свободной лицензией Creative Commons .