Перейти к основному содержанию
/
Мой рабочий стол для верстки руководств

Получите быстрый доступ к руководствам, запчастям и ответам касательно ваших устройств

This guide will take you through partially disassembling the lens, allowing you to access whichever major part or assembly you need (ex: autofocus assembly, zoom assembly, etc). This guide will not include taking apart the zoom assembly.

A dust blower is recommended to blow dust off of any internal lens elements or parts during this process. Additionally, a clean microfiber cloth is good to have incase you accidentally touch any of the internal lens elements and need to clean off your fingerprint from the lens.

There will be many small screws that must be removed from the lens. Many of the screws will be of different sizes. Please be sure to keep the screws in a safe place and keep track of where each one came from.

The Phillips #000 screwdriver is marked as an optional tool as you can always use the JIS #000 screwdriver in its place (JIS screwdrivers won't damage Phillips head screws).

Выберете то, что вам нужно

Инструменты

Показать больше…

Это разборка для изучения а не руководство по ремонту. Чтобы отремонтировать Canon EF 100-300mm F4.5-5.6 USM, воспользуйтесь нашим сервисным руководством.

  1. Canon EF 100-300mm f/4.5-5.6 USM Teardown, Removing the Lens Mount: шаг 1, изображение 1 из 3 Canon EF 100-300mm f/4.5-5.6 USM Teardown, Removing the Lens Mount: шаг 1, изображение 2 из 3 Canon EF 100-300mm f/4.5-5.6 USM Teardown, Removing the Lens Mount: шаг 1, изображение 3 из 3
    • If possible, try to work in an environment with minimal dust. The goal is to try to avoid dust from getting inside of the lens as much as possible.

    • Remove the two Phillips #000 screws on the side of the lens mount, holding in the contact assembly.

    • Next, unscrew the four Phillips #000 screws holding the lens mount onto the lens.

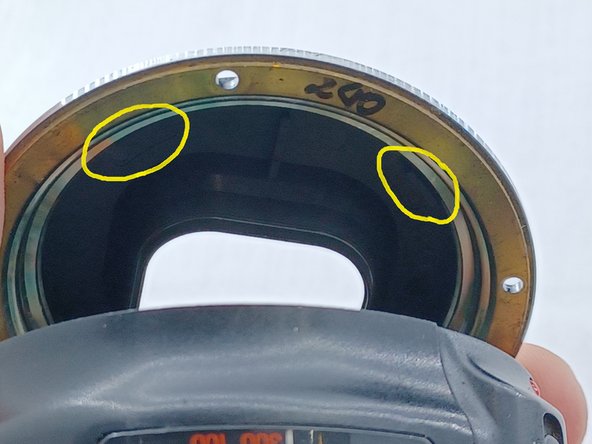
    • Carefully lift up one side of the lens mount (side opposite of the lens contact). Push the black plastic cover out of the lens mount. Take note that there are four plastic clips around the cover. These clips can break easily if you're not careful.

    • Be careful when lifting up the side of the lens mount. The lens contact is still attached to the lens mount with a ribbon cable that is attached to the main PCB board.

    • Push the lens contact off of the metal lens mount and set the lens mount to the side.

  2. Canon EF 100-300mm f/4.5-5.6 USM Teardown, Main PCB Assembly: шаг 2, изображение 1 из 2 Canon EF 100-300mm f/4.5-5.6 USM Teardown, Main PCB Assembly: шаг 2, изображение 2 из 2
    • There are two variable resisters on the PCB board. Do Not mess with these as doing so may inhibit the autofocus from working properly. They are for the pulse adjustment and USM reference frequency and cannot be easily readjusted without an official Canon service manual.

    • This step involves handling sensitive electronics. Avoid static discharge.

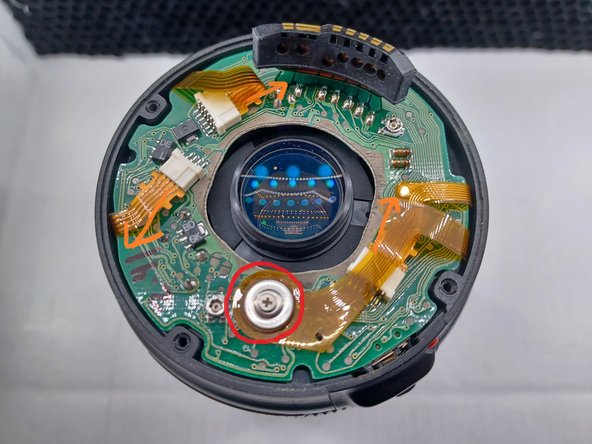
    • Unscrew the Phillips #000 screw that holds the ribbon cable to the main PCB board.

    • Use extreme care while handling ribbon cables and connectors as they can be easy to damage.

    • Disconnect the remaining three ribbon cables connected to the main PCB board.

    • iFixit connector guide

    • Remove the main PCB board and set it aside.

  3. Canon EF 100-300mm f/4.5-5.6 USM Teardown, Fixed Barrel: шаг 3, изображение 1 из 2 Canon EF 100-300mm f/4.5-5.6 USM Teardown, Fixed Barrel: шаг 3, изображение 2 из 2
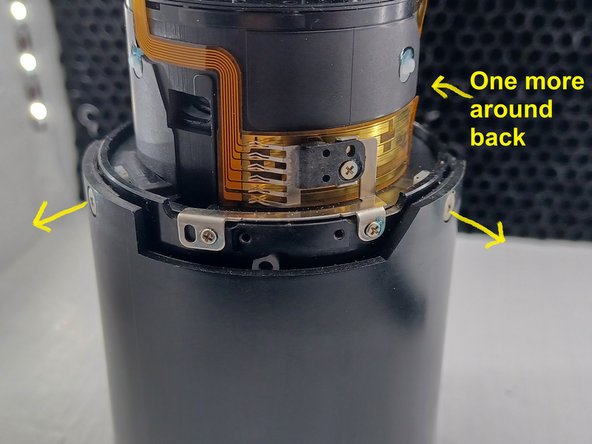
    • Unscrew the six Phillips #000 screws holding in the fixed barrel.

    • Remove the fixed barrel, being careful of the ribbon cables.

    • Pull off the focus ring.

  4. Canon EF 100-300mm f/4.5-5.6 USM Teardown, Autofocus Assembly: шаг 4, изображение 1 из 2 Canon EF 100-300mm f/4.5-5.6 USM Teardown, Autofocus Assembly: шаг 4, изображение 2 из 2
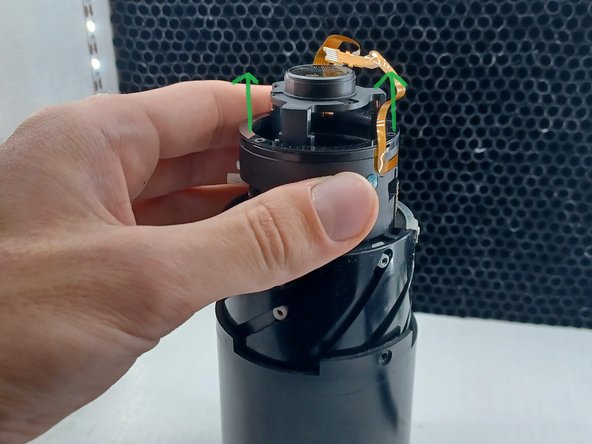
    • Take out the six Phillips #000 screws holding in the top of the autofocus assembly.

    • Unscrew the three Phillips #000 screws outside of the zoom ring.

    • Carefully pull off the autofocus assembly.

  5. Canon EF 100-300mm f/4.5-5.6 USM Teardown, Accessing the Zoom Assembly: шаг 5, изображение 1 из 3 Canon EF 100-300mm f/4.5-5.6 USM Teardown, Accessing the Zoom Assembly: шаг 5, изображение 2 из 3 Canon EF 100-300mm f/4.5-5.6 USM Teardown, Accessing the Zoom Assembly: шаг 5, изображение 3 из 3
    • Unscrew the two Phillips #000 screws holding on the zooming key.

    • Take off the zoom ring.

    • Unscrew the three JIS #000 screws holding in the zoom assembly.

    • Remove the zoom assembly from the front lens assembly.

    • Avoid touching the sides of the zoom assembly or the outside of other barrels inside of the zoom assembly. These parts are greased and you want to avoid rubbing off any of this grease to keep the lens zooming smoothly.

Zephosk

Участник с: 09/26/24

4 741 Репутация

Автор 29 руководств

Команду

LGBTQ Technicians Участник LGBTQ Technicians

Community

34 членов

Автор 98 руководств

0 Комментариев

Добавить комментарий

Статистика просмотров:

За последние 24 час(ов): 3

За последние 7 дней: 19

За последние 30 дней: 89

За всё время: 377