
HP ProBook 4540s Fan Replacement
Введение
Перейти к шагу 1This guide will show how to safely remove the fan. In order to get to the fan however, you will need to carefully remove the heat shield covering the fan.
Выберете то, что вам нужно
Инструменты

-
-
Slide the two release latches on either side of the battery.
-
Gently tilt the battery upward and remove it from its socket.
-
-
-
Turn the computer so the bottom is facing towards you.
-
Remove the one 3.0 mm Phillips PM2.0x3.0 security screw.
-
Slide the release latches then pull the door towards you. Lift the door away to completely remove it.
-
-
-
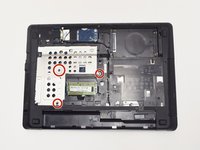
Remove the heat shield by unscrewing three 6.0 mm Phillips PM2.5x 6.0 screws securing it.
-
Slide the heat shield towards the innards of the computer.
-
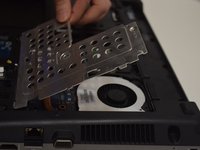
Gently lift the heat shield so it is at an angle then remove it from the computer.
-
-
-
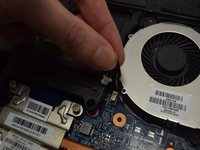
Disconnect the cable that connects to the system board.
-
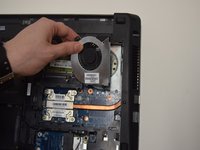
Remove two 5.0 mm Phillips PM2.5x5.0 screws securing the fan.
-
Lift and remove the fan from the computer.
-


To reassemble your device, follow these instructions in reverse order.
To reassemble your device, follow these instructions in reverse order.
Отменить: Я не выполнил это руководство.
6 человек успешно провели ремонт по этому руководству.
Команду

UW Tacoma, Team 1-5, Rose Fall 2016 Участник UW Tacoma, Team 1-5, Rose Fall 2016
UWT-ROSE-F16S1G5
4 членов
Автор 6 руководств
1Комментарий к руководству
If it still shows "cooling fan not working", how do i fix it?