
Lenovo ThinkPad X1 Carbon (2nd Gen) Battery Replacement

Введение
Перейти к шагу 1If your Lenovo ThinkPad X1 Carbon (2nd Gen) won’t turn on or last the full battery life, use this guide to replace the battery.
The battery stores the energy for your computer.
Before using this guide, check that your computer has been charged in a reliable outlet by trying multiple outlets. Also, try using multiple charging cords to make sure your cord isn’t broken.
Before you begin, make sure your computer is off and unplugged.
Выберете то, что вам нужно
Ремонтный комплект
Этот комплект содержит все детали и инструменты, используемые в руководстве.

Запчасти

Инструменты


Показать больше…
-
-
Using a Phillips #0 screwdriver, remove the seven 7mm screws holding the back cover onto your computer.
-
-
-
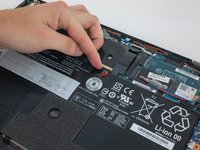
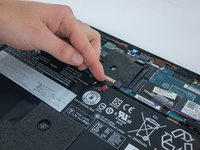
Using a Phillips #0 screwdriver, unscrew the five 4.3mm screws attaching the battery to the computer.
-


To reassemble your device, follow these instructions in reverse order.
To reassemble your device, follow these instructions in reverse order.
Отменить: Я не выполнил это руководство.
9 человек успешно провели ремонт по этому руководству.

Команду

Cal Poly, Team S18-G4, White Winter 2020 Участник Cal Poly, Team S18-G4, White Winter 2020
CPSU-WHITE-W20S18G4
4 членов
Автор 9 руководств
4 Комментариев
iFixit replacement battery is rejected by X1 Carbon gen2 chassis as not-genuine/unauthorized. Is there some additional step to getting the battery to be recognized/allowed? Something in the BIOS? Or is the battery faulty?
Any comments from @ifixit?
Hi there! Thanks for bringing this to our attention. @lenovo_battery, sorry to hear you're having trouble with your battery. Please reach out directly to our customer support team by emailing support@ifixit.com.
Hi,
Great guide. I found that my screw heads were a bit stripped and the #0 driver was too small and bounced too much. The #1 driver worked better for me. Thanks for promoting the repair revolution! - MiLo