Перейти к основному содержанию
/
Мой рабочий стол для верстки руководств

Получите быстрый доступ к руководствам, запчастям и ответам касательно ваших устройств

Lenovo Thinkpad X201 Tablet LCD Replacement

Lenovo Thinkpad X201 Tablet LCD Replacement

Peter Gachuki

Peter Gachuki и 4 другие участники

Последнее обновление January 17, 2025

25 - 30 минут
Средне
Нужны более качественные фото
Лучше введение

Use this guide to replace the screen of your Lenovo Thinkpad X201 Tablet.

Выберете то, что вам нужно

Инструменты

  • Spudger
    Spudger
  • Phillips #00 Screwdriver
    Phillips #00 Screwdriver
  1. Lenovo Thinkpad X201 Tablet LCD Replacement, LCD: шаг 1, изображение 1 из 1
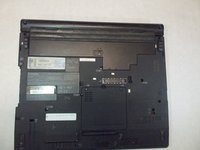
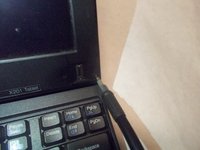
    • First you push the lock button on the back of the computer from lock to unlock

  2. Lenovo Thinkpad X201 Tablet LCD Replacement: шаг 2, изображение 1 из 1
    • Then you hold it on unlocked and slide the battery pack out

  3. Lenovo Thinkpad X201 Tablet LCD Replacement: шаг 3, изображение 1 из 3 Lenovo Thinkpad X201 Tablet LCD Replacement: шаг 3, изображение 2 из 3 Lenovo Thinkpad X201 Tablet LCD Replacement: шаг 3, изображение 3 из 3
    • remove all screw covers above hinges

  4. Lenovo Thinkpad X201 Tablet LCD Replacement: шаг 4, изображение 1 из 2 Lenovo Thinkpad X201 Tablet LCD Replacement: шаг 4, изображение 2 из 2
    • Unscrew the screws on the front of the LCD screen

  5. Lenovo Thinkpad X201 Tablet LCD Replacement: шаг 5, изображение 1 из 2 Lenovo Thinkpad X201 Tablet LCD Replacement: шаг 5, изображение 2 из 2
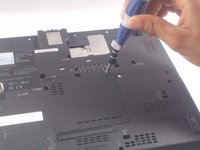
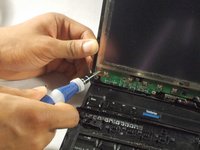
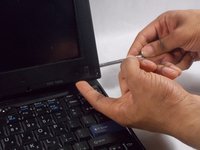
    • Remove additional two screws near bezel screws plus the single logic board screw in the center

  6. Lenovo Thinkpad X201 Tablet LCD Replacement: шаг 6, изображение 1 из 3 Lenovo Thinkpad X201 Tablet LCD Replacement: шаг 6, изображение 2 из 3 Lenovo Thinkpad X201 Tablet LCD Replacement: шаг 6, изображение 3 из 3
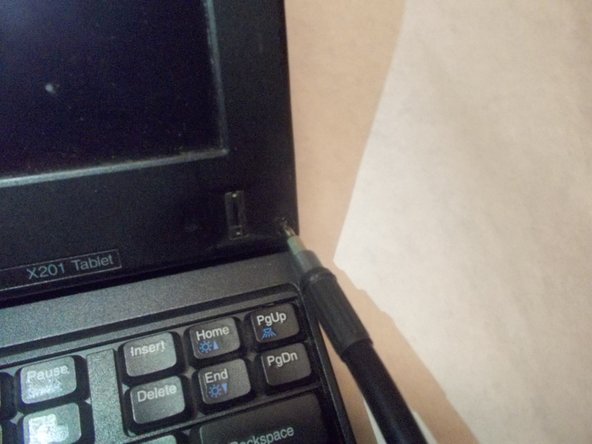
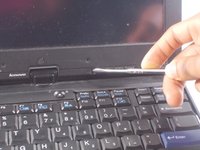
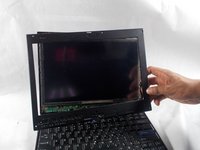
    • Gently pry the LCD cover with a flat head screwdriver, and pivot it over the signal cable near the LCD hinges. Pivot over all four corners

  7. Lenovo Thinkpad X201 Tablet LCD Replacement: шаг 7, изображение 1 из 2 Lenovo Thinkpad X201 Tablet LCD Replacement: шаг 7, изображение 2 из 2
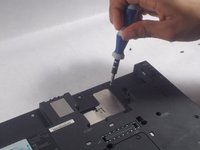
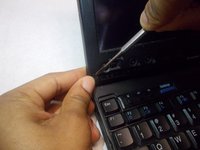
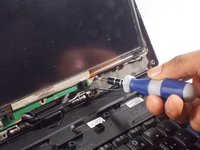
    • Continue to remove screens in front of the LCD cover, make sure all screws in the front are removed

  8. Lenovo Thinkpad X201 Tablet LCD Replacement: шаг 8, изображение 1 из 1
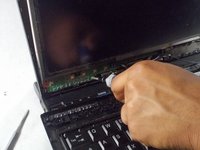
    • Once all screws are removed, remove the LCD Display but gently peeling back line a sticker

Заключение

To reassemble your device, follow these instructions in reverse order.

3 человек успешно провели ремонт по этому руководству.

Peter Gachuki

Участник с: 03/26/18

666 Репутация

Автор 4 руководств

Команду

UMass Dartmouth, Team S5-G7, Peak Spring 2018 Участник UMass Dartmouth, Team S5-G7, Peak Spring 2018

UMASSD-PEAK-S18S5G7

3 членов

Автор 12 руководств

Один комментарий

Is there any other screen that can be used?

Darren Lewis - Ответить

Добавить комментарий

Статистика просмотров:

За последние 24 час(ов): 0

За последние 7 дней: 6

За последние 30 дней: 29

За всё время: 3,413