
MacBook Pro 15" Unibody 2.53 GHz Mid 2009 Hard Drive Replacement

Введение
Перейти к шагу 1Upgrade your hard drive for more storage space!
Выберете то, что вам нужно
Наборы для ремонта
Эти комплекты содержат все детали и инструменты, используемые в руководстве.


Запчасти


Инструменты


Показать больше…
-
-
Remove the following ten screws securing the lower case to the upper case:
-
Seven 3 mm Phillips screws.
-
Three 13.5 mm Phillips screws.
-
-
-
Using both hands, lift the lower case near the vent to pop it off two clips securing it to the upper case.
-
Remove the lower case and set it aside.
-
-
Инструмент, используемый на этом этапе:P6 Pentalobe Screwdriver 2009 15" MacBook Pro Battery$5.49
-
Three Pentalobe screws secure the battery to the upper case. They can be removed with this special driver.
-
-
-
Remove the two exposed five-point Pentalobe screws along the top edge of the battery.
-
-
-
Use the tip of a spudger to bend back the finger of the "Warning: Do not remove the battery" sticker while you remove the five-point Pentalobe screw hidden underneath.
-
-
-
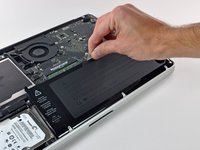
Lift the battery by its plastic pull tab and slide it away from the long edge of the upper case.
-
-
-
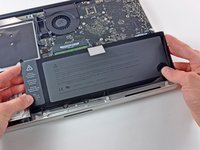
Tilt the battery back enough to access the battery cable connector.
-
Pull the battery cable connector away from its socket on the logic board and remove the battery from the upper case.
-
-
-
Remove two Phillips screws securing the hard drive bracket to the upper case.
-
Lift the the retaining bracket out of the upper case.
-
-
-
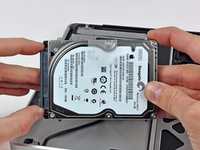
Lift the hard drive by its pull tab and pull it out of the chassis, minding the cable attaching it to the computer.
-
-
-
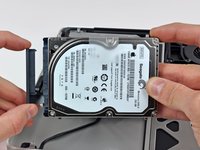
Remove the hard drive cable by pulling its connector straight away from the hard drive.
-
-
-
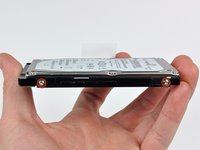
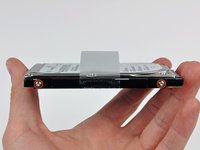
Remove two T6 Torx screws from each side of the hard drive (four screws total).
-


To reassemble your device, follow these instructions in reverse order.
To reassemble your device, follow these instructions in reverse order.
Отменить: Я не выполнил это руководство.
143 человек успешно провели ремонт по этому руководству.

6 Комментариев
The guide states you must remove the battery in order to replace the hard drive. This is incorrect- it is merely a safety precaution. If you do not have the specific pentalobe screwdriver, DO NOT ATTEMPT THIS. I just replaced a hard-drive in one of these macs, that someone had already stripped the screw head. The screws are tapered too, so no getting it out once stripped.
The battery does not interfere with this repair, so simply remove the two screws on the hard-drive bracket (step 8), replace the drive then put the mac back together.
If you have problems when installing Mavericks after the battery has been removed maybe your Mac has the wrong date and time.
In Mavericks installscreen, start the terminal, type "date" and enter...if the wrong date is displayed type:
date {month}{day}{hour}{minute}{year}
Every bracket should be replaced with a two-digit number. For example, March 18th 2013 12:50 would become the following command:
date 0318125013 + enter
Thanks for the guide. I honestly feel like I got a new Mac. I installed one of iFixit's hybrid 1TB SSD (SSD with backing HD). My Mac was unusable and painful to use it was so slow. Now it's like brand new.
Removing the battery connector was hard to do with finger force alone, I had to entice it with a flat head screw driver. Getting the full iFixIt toolkit gives you all of the tools except the spudger which really could be improvised with something else.