
Nintendo 3DS Power Button Replacement

Введение
Перейти к шагу 1Can't turn your 3DS on or off? Your power button may be malfunctioning.
Выберете то, что вам нужно


-
Инструмент, используемый на этом этапе:Phillips #00 Screwdriver$5.49
-
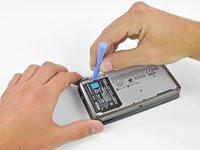
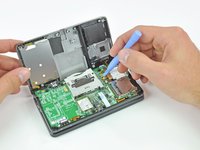
Use a Phillips PH00 screwdriver to loosen the four screws along the top of the back cover.
-
-
-
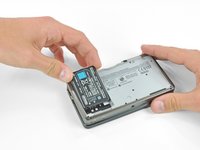
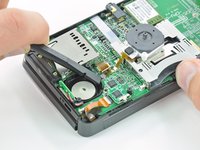
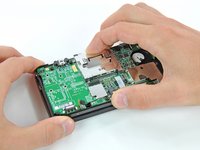
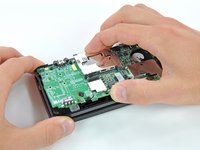
Grab the top edge of the back cover with your opposite hand so that the cover does not fall back into place.
-
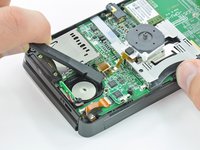
Pull the back cover up and away from the rest of the device to remove it.
-
-
-
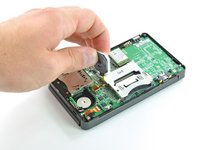
Insert a plastic opening tool into the notch in the lower case above the battery.
-
Pry the battery up with the plastic opening tool.
-
Grab the top edge of the battery and lift it out of the lower case.
-
-
-
Use a JIS #00 screwdriver to remove the nine 6.3 mm black screws from the lower case.
-
Use a JIS #00 screwdriver to remove the 2.4 mm silver screw above the game cartridge slot.
Stuck at the same spot, those screws are in there really tight.
I had so much trouble with these screws, I gave up. Unfortunately, I can't accept failure so tried again. I figured out if you turn it right before you loosen it worked. Maybe it was just me, but I turned it right then kept pressure as I turned to loosen. I was surprised I hadn't stripped any screws out.
Does anyone have any idea of how to remove these screws. I've pretty badly stripped the screws and I've gone to 20+ pages trying to figure this. I'm considering just prying the !@#$ thing.
use a dremil and make it a flat head
ruined my screws here too...what the !@#$ nintendo?
trying to survive a nuclear meltdown inside the !@#$ thing
More like trying to subtly enforce planned obsolescence by not allowing you to make repairs to your device.
Ullyssys -
I used a #00 Philips 1/8" bit with no problem; however, the narrow diameter of the counter sunk hole can inhibit making secure contact with the screw head. You can be using the right bit (#00) but if the diameter of the bit shaft is too big you won't get proper contact.
I found this to be an excellent guide. Thanks
The screws didn't strip but the philips screw driver did? @__@
These are rough either way.
I used a "Whia 273 - PH000x40" screwdriver and held it firmly pushing the palm of my hand on the yellow end of the screwdriver and rocked the screw slightly (counter clockwise and clockwise) until it started to move. Then, without letting up on the pressure I carefully backed it out. The screwdriver is excellent because it is hardened (unlike some cheapo's out there) and the very tip is blunt not sharp. If the tip is too sharp, the point will bottom out in the screw and the sides that do all the work, won't be able to fully contact the inside of the screw. This screwdriver fits so well that the screws actually stick to it once they are removed. If the screwdriver moves AT ALL when you initially try it in the screw, STOP and find a better one. Also, start with the screws in the center, somehow they seem a little easier until you get the feel for it.
Paul -
Had the exact same problem, even tried the #000 screw driver too. Stripped the screws due to how tightly they are screwed in there and how easy they strip. I am now unsure what to do from here or if all I can do is give up.
I second the one who suggested the Whia 273 PH000x40 screwdriver. I had a terrible time unscrewing these screws, and almost stripped them using a cheaper #000 screwdriver. Also tried a 3/16" flathead and destroyed the screwdriver. I bought the Whia and glad I did. It fit perfectly and did not slip at all. DEFINITELY recommend purchasing this high-quality screwdriver. Cost about $10 but well worth it to avoid the hassle.
The best way I found that works quite well, if you find a screwdriver or bit that is good enough: hold the screwdriver or bit with tons of pressure, and rotate the 3DS clockwise! It will come out in 5-6 rotations, you can do this step in about 10 minutes this way (put down a cloth first, don't scratch the front!)
I HAVE A WAY TO GET OUT THE STRIPED SCREW. Like you, I had screwed up and tried everything to get the screw out. Do NOT try the glue in that tiny hole, you will get the screw glued permanently in there. The rubber band doesn't work in that tight space either. As desperate as I was, I was trying anything from nail polish to cramming the screw driver in as hard as I possible could. Until I realized that I had a drill. Yes, with the smallest head, I drilled into the screw a little bit, messed with the part I was trying to get out, drilled a little more, messed around, and then finally on my last attempt, I had successfully drilled off the top of the screw rendering the part free. It doesn't matter which drill you use as long as you can fit the head into the hole. Then drill forward like you are trying to drill a hole through wood. Now the only problem is that the remainder of the screw will be stuck in its place. All you really have to do is get a set of pliers and twist that puppy out. And there you go!
Got a brand new #00 screw drive and it striped the first time used it. So now I'm using eyeglass repair kit screw driver and it lasts longer that the one I got of of eBay.
And I tried all of those tactics that people have been giving and none of them are working.
Oh god, someone help i can’t get them out.
omg everyone is struggling in here smh. I used my PH000 screwdriver made sure it went in aligned to the screws and applied pressure while turning counterclockwise. once it started the screw started lifting i stopped applying pressure and they lifted beautifully. saved damaging my screws with this technique. I also used the same screwdriver size to remove the orange screw where the game slot is. Yall are welcome lol
USE A DIFFERENT SCREWDRIVER.
I was stuck on this for an hour. If your screwdriver is very thin, you won't get the grip necessary if your screws are on tight. I thought my screws were stripped but I switched to a bigger screwdriver and it was effortless. Just MAKE SURE IT IS A 00 PHILLIPS HEAD.
Lmao I've been using a Philips #00 for years and not known it was the wrong type. I ended up being fine here every time, a magnetic head helps. It's actually almost satisfying getting these ones out.
-
-
-
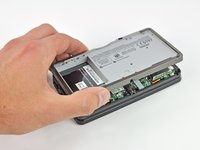
Lift the bottom edge of the lower case off the rest of the 3DS.
-
Use a plastic opening tool to pry the shoulder button ribbon cables off their sockets on the motherboard.
-
Remove the lower case from the device.
When assembling, make sure that L ribbon is inside the case and R ribbon is not under the aluminium battery case. I got them both cut accidentally and had to replace :(
-
-
-
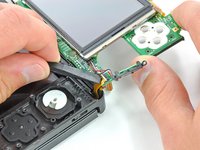
Remove the two 7.7 mm Phillips screws securing the back of the Circle Pad to the motherboard.
my screws wont stop spining what to i do? i have the same problem with other screws and this leavs my joystick very loss and it is dificult to muve it becuase it is aganst the case not lifted up? any sugestions? (sorry for my bad speling jaja im very bad at speling..)
I think you stripped your screws. I think the best solution is to change the upper cover of the lower assembly and the screws. The fastest, but temporarily is to stick in some way the joystick housing to the cover, but it won’t last long, so do this only if you have to use your console while you wait the cover to come. Anyway, so not overtighten the new screws, or you will be in the same situation once again.
-
-
-
Use the flat end of a spudger to pry the back of the Circle Pad off the motherboard.
-
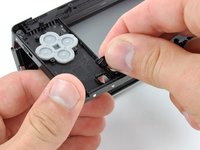
Lift the Circle Pad joystick off the motherboard and lay it on its back so that the ribbon cable connector is accessible.
When reassembling verify that the circle pad control is oriented right. I had to go back in after completion when I realized it wasn't centered.
I would not disable the back side all the way because it could really mess up your 3DS.
From this step, follow this video https://youtu.be/XGdRim2Mvrk?t=627
you can skipp from step 8 to 20
lots of unnecessary steps
-
-
-
Use the flat end of a spudger or your fingernail to flip up the retaining flap on the Circle Pad ribbon cable ZIF socket.
-
Lift the Circle Pad joystick off the motherboard.
Can you replace a zif socket? The little metal pieces on mine broke off...
YOUR &&^&@@ HAHAHAAHA, no you cant you would have to purchase a new motherboard i feek you bro happened in my first time
you might want to find someone who is skilled in component level microsoldering for that
The retaining flap on mine broke off, is there any way to fix it?
Skip steps 8 through 20. It will save a lot of time. Thanks S Maduras for the warning.
Thanks S Maduras! Your tip
made this super easy. No need for steps 8-20.
OH MY GOD THANK YOU SO MUCH!!!! I'm sure I would have destroyed my ds if I did all that
Skip steps 8-20 like they said!! Doing all those unnecessary steps wasted so so much time and frustrated me hugely by causing me to damage my microphone ribbon cable…
What do you mean by skipping 8-20? Do I not need to remove the screws in order to replace the lower LCD?
-
-
-
Use a spudger or screwdriver to lift the pads up and remove them from the device.
When reassembling, you can use the pointy end of the spudger to align the hold again with the joystick. It’ll probably have bounced around while you’re moving other things.
-
-
-
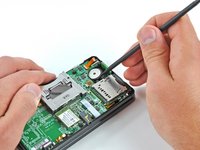
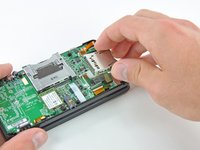
Remove the two 4.5 mm Phillips screws securing the SD board to the motherboard.
-
-
-
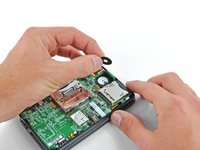
Use the flat end of a spudger to pry the SD board ribbon cable connector off its socket on the motherboard.
-
-
-
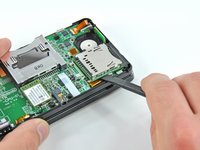
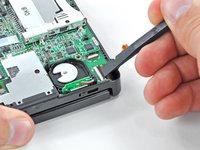
Insert the flat end of a spudger between the SD board and the motherboard.
-
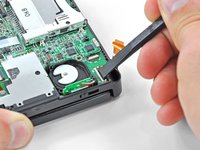
Pry up slowly to loosen the SD board from the RF shield underneath it. If you pry too quickly, you may tear the shield or break its solder points.
-
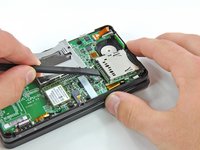
Run the spudger along the sides of the SD board to free it from the adhesive holding it in place.
-
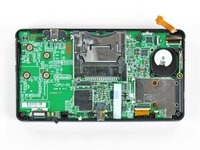
Once completely freed, lift the SD board straight off the motherboard.
be careful on this step, the sd card board is adhered to the rf shield below it, and bay result in the shield becoming bent as it is only soldered on one side. pry from the side of the board facing the cartridge slot.
I didnt notice that and I broke the solders here :(
mine came off will this make the system not power on or make somthing not work? what do i do know?
What did come off? the sd card reader board, or the shield mentioned in the above comment?
-
-
-
Slide the flat end of a spudger under the corner of the Wi-Fi board, and lift it away from the motherboard.
-
-
-
Use the flat end of a spudger to pry the Wi-Fi antenna cable connector off its socket on the Wi-Fi board.
-
Remove the Wi-Fi board from the device.
That moment you bought all your supplies and realise while removing the wifi chip the antenna is not plugged in because you forgot to plug it in last time……… Scew me…
-
-
Инструмент, используемый на этом этапе:Tweezers$4.99
-
Grasp the microphone ribbon cable near the microphone with a pair of tweezers.
-
Pull the microphone straight up out of the upper case.
-
-
-
Use the flat end of a spudger or your fingernail to flip up the retaining flap on the speaker assembly ribbon cable ZIF socket.
-
Disconnect the speaker assembly ribbon cable with a pair of tweezers.
Can there be a guide on how to replace this part? I pry on the socket accidentally.
I don't even know where they sell a new socket for this, but you'd need to have a soldering station and know how to micro solder. assuming no pads where ripped off then you'd just solder it back down. if a pad broke then you'd need to run jumpers to fix it. in short its very difficult and expensive to fix unless you have the know how and the tools already.
-
-
-
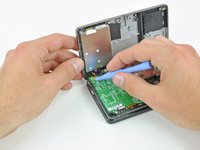
Use the flat end of a spudger or your fingernail to flip up the retaining flap on the camera ribbon cable ZIF socket.
Be sure to fit the motherboard inbetween the joystick and volume slider in properly (you can double check by seeing if the volume slider on the outside goes up and down smoothly). When I closed it the first time it was stuck on full volume so I needed to go back in and readjust!
When putting the cable back I recommend to open the 3ds while keeping it face down so the cable has more room to fit.
Thank you so much, opening the 3ds is needed to fit the cable back easily.
Halefall -
-
-
-
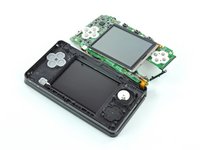
Remove seven Phillips screws securing the motherboard to the upper case:
-
Four 2.5 mm gold screws
-
Two 3.5 mm black screws
-
One 2.5 mm silver screw
-
Lift the side of the motherboard that sits along the bottom edge of the 3DS.
Do yourself a favor and DON'T remove the 2.5 mm silver screw (yellow circle). It just holds in a little plastic bit under the volume control. The board comes out just fine with the screw still in. If you remove it, the plastic bit will fall out at random when you turn over the case.
First time I took mine apart, I noticed something fall out later, tracked it down and then puzzled over what it was and where it came from.
There is some adhesive where the AC adapter plugs in so I recommend watching out for that
LISTEN TO CHUPI seriously that is such a pain to get back in
-
-
-
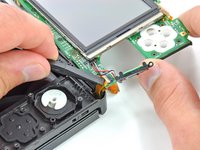
Use the flat end of a spudger or your fingernail to flip up the retaining flap on the LCD ribbon cable ZIF socket.
Reinserting this ribbon cable is quite difficult. I found opening the case so that it sits upright at a 90 degree angle helps. The first two times I tried reassembling the top display did not work. Turned out that I was not inserting the ribbon cable in enough. I used tweezers to push this in by gently grabbing the ribbon cable. I was continually inspecting the cable for damage but apparently did not damage it. If anyone has a better idea on how to reinsert this cable I think others would greatly appreciate it.
Putting the cable back in is the hardest part out of all of this (if you can get past the screws near the beginning). If you have a friend that you trust very much and is very gentle, another pair of hands here really will help. If you're without a friend, make sure to use some flat, angled precision tweezers to push the ribbon in with one hand (pointed tweezers will do in a pinch but you'll have to be careful - I put a small dent in the ribbon and thought I'd broke it), and then use a spudge or something in the other to push the flap down.
Also worth noting is that the ribbon for the top screen also handles the 3D - if you complete the guide and find you are unable to turn the 3D effect off, you didn't insert the ribbon enough, as I had the problem and re-inserting the ribbon fully fixed it.
Careful when reassembling -- watch the position of the black wifi antenna wire! I got mine most of the way back together and noticed it wouldn't close all the way. This wire had come out of the little posts holding it in place and was wedged between the screen and motherboard. Now I have to take it all apart again to fix this.
Also if you're taking the board out of a working unit to get at the CLK signal to backup the NAND chip ("hardmod"), you don't need to remove the difficult ribbon cable in this step, or the other two wide ones at the top right from earlier. Leave them attached and swing the board out. It won't rotate a full 180 degrees to sit flat outside the unit, but you can open the screen 90 degrees to prop the rest up while having the board out on your table.
I am having problems re-inserting the three ribbon cables (3DS XL). Do you need to flip up the retaining flaps first? (I just pulled them out of the slots when removing them.
if the flap for the ribbon cable breaks what do you do
who else felt really proud after finally reinserting the cable
The easiest way to get that ribbon back in is to hold it with some reverse tweezers that I fix it sells and use it to grab the ribbon and hold it while you fiddle with getting the ribbon in the slot. It’s super easy this way. You’ll have it installed in 36 seconds. Try it. (Reverse tweezers…press to release ones)
-
-
-
Remove the motherboard assembly from the rest of the device.
Make sure when putting the motherboard back onto the bottom part of the casing that the antenna wire is where it should be - the first time I put this back together the wire got loose and was smooshed in between the casing and the Y and Power buttons, causing them to be stiff/not work. Using the spudge should help in pushing the wire back into the slots along the inside of the case.
when reassembling, watch out for the wireless on/off slider - i had started screwing things back in when i realized the slider had slipped to the wrong side, making the slider non functional. by the same token, watch out for the volume slider on the other side.
-
-
-
Use your finger to push the power button up through the upper case and remove it.
-


To reassemble your device, follow these instructions in reverse order.
To reassemble your device, follow these instructions in reverse order.

#00 screwdriver is too big... probably need a #000
thomascroguennec - Ответить
#00 will work - but you must press down firmly and sort of jerk the screw out a few degrees at a time. If you don't press firmly, the screws strip very easily. Using #000 will strip the screws more easily.
Tai -
I used a #0 without any issues and 0 stripped. I used the #0 for all screws internally and externally. The head was sharp and I applied adequate amounts of pressure when loosening the screw.
Ben Kevan -
The correct screwdriver should be a JIS, or you can get a screwdriver specific for the 3DS from other sites for less than $2
Oscar - Ответить
do you have to buy it
deeznuts -
Where would I buy a screwdriver specifically for the 3DS? Also would it work on the DS? I need to replace the battery for my DS.
Caitlin Lumsden -
I used Phillips #000 and it worked like a charm, i need to order a new SD board or do you guys think i should send it. What happened is that it got water damaged and everything works fine when i opened it everything looked fine no signs of water corrosion everything on the 3DS works exept it always give me a message saying the SD card is locked and i know for a fact it isnt locked i already tried using 3 different SD cards and none of them are lock protected and yes they are formatted as well. I need help
Leo Torres - Ответить
there's a switch on the SD card, switch it and it will be unlocked again. it happened to me once too.
Bagel -
david hodson you are incredible. literally all you need to do is heat the screen up and pry it off and you make them take apart the whole thing
melody - Ответить
You've done this?
magykmaster -
I have to ask the same question. If just the glass display is broken, and you're heating it up to remove the glass, is it really necessary to remove everything? Doesn't like like it is necessary
Wade -
I just did it your way and it went fine. didnt even have to remove the battery. This is incredible misstep on the authors part.
patrick -
only take out the screen for a motherboard removal? Are you using the wrong guide or was this guide used for two different repairs?
Reed Deemer -
I used a PH0x50, but it wasn't easy.
John - Ответить
This may be a dumb question but where do I buy the 3DS upper screen?
John - Ответить
eBay... Just do a search for the 3DS Upper screen. $9.49 & it comes with the tools.
Gary Darnell -
The LCD screen I ordered came with all the tools I needed except a pair of tweezers. All in all it was about $14.00 and a little bit of my time.
Gary Darnell - Ответить
Does anyone know where I can find the right bumper button for a 3ds? I can't find it on ebay must of damaged it playing smash bros.
Steven Castro Parrilla - Ответить
Really wish I had read the comments first... How about instead of the warning saying to press down hardly and go slow, you say to use the correct screwdriver size like others mentioned in the comments. I not only stripped multiple screws, even after putting a glove on for more pressure, I bent my screwdriver from pressing down so hard. Granted it's a cheap jeweler's kit screwdriver, but it still would've been nice to not have that problem and be informed of the right size in the first place.
hockeymorgan35 - Ответить
Got my tools one day after ordering, as I live a couple hours away from the supplier, Will post again when i try guide.
nintendokakashi - Ответить
I tried doing this with a #00 Philips but it just didn't turn
Acrobatic Mars01 - Ответить
Hello there, I need some assistance I have done a full housing replacement I have everything working except the 3d slider . The 3D option is always on can someone let me know which flex it is or what I am forgetting . Thanks guys !
Noe Ibarra - Ответить
The 3D light lets you know there is a 3D option available for the current game you’re playing. Usually, it is always on, except when you’re playing a game that doesn’t support 3D. Turning the 3D slider off does not turn off the 3D LED.
Scott D -
I've always been lucky with these four, and at the time it was my first disassembly so I didn't know what stripping a screw was!
FarmYard Gaming - Ответить
These screws don't strip easily, however, the screws at step 4 do.
TheBlueInkling -
It's JIS #00
It's not the same thing
Alstein Einbert - Ответить
To all the people that seem to think it's ok to tell people to use a phillips
A PHILLIPS WILL damage the head of a JIS screw.
The middle is thicker, which breaks the inner corners and the angle is less extreme causing it to slip out
The extra pressure you add is to break that screw into a "phillips-ier" shape
A newbie will still slip out and risk stipping the scew
Btw you don't need to press hard with a JIS driver in a JIS screw
If you don't know what you are doing, please refrain from editing this
Alstein Einbert - Ответить
"All screws in this device are JIS screws. All official iFixit Phillips screwdrivers are designed to be compatible with JIS screws, so they are safe to use. Using a screwdriver other than an official iFixit screwdriver or a JIS screwdriver may result in stripped screws."
- dude who doesn't know anything
Alstein Einbert - Ответить
Hi Alstein!
You're right about most Phillips screwdrivers damaging JIS screws, but our Phillips bits (#000–1) are designed to be compatible with JIS of that size. We can't guarantee that Phillips drivers from other manufacturers are also cross compatible. We added the aforementioned bullet as a clarifier for this difference.
Alex Diaz-Kokaisl -
Hi Alex
The bit still slips out easier due to the less extreme vertical angle, causing someone inexperienced to damage their screws.
I and the Nintendo Homebrew community (talking about the hardware repair part of it) believe that even if it's true that the bit is shaped to cause less damage its completly wrong to tell someone to use the wrong bit as we get both people who ask "this bit is JIS friendly right" on normal phillips screwdrivers and people who come crying that they stripped their screws and have 0 idea why everyday so we know for a fact people are taking these kind of messages the wrong way.
I believe the message i am putting is important as it tells the user the bits are different, tells them what to do if they don't have a JIS screwdriver and the damage its gonna cause.
I'd agree to add a bullet that clarifies that ifixit phillips screwdrivers are designed to cause less damage under our disclaimer, not to just say phillips is fine to use on JIS
Alstein Einbert -
why is this guide telling you to use a Phillips screwdriver on a JIS
this is just wrong
"All screws in this device are JIS Screws, Official iFixit PH000-PH1 Phillips screwdrivers are designed to be compatible with JIS screw" wtf is this
so you are saying that
1. ifixit's phillips bit is a JIS because yes a JIS will work fine in a phillips screw, not vice versa.
2. "use a ifixit phillips screwdriver that's the right screwdriver" instead of the jis one they might already have EVEN MAYBE FROM IFIXIT.
yeah you mention in passing "or you could use a JIS Screwdriver but you should be mentioning in passing that ifixits phillips is ji-... ahem... i mean is compatible with jis screws
this is absolutely stupid. Add that with the lack of care for looking for selling long lasting products like batteries and the lower quality of the recent bits i think ifixit is at its end.
Daninator - Ответить
"i think ifixit is at its end." not in any way overdramatic at all
FarmYard Gaming -