
Samsung Galaxy S8 Battery Replacement

Введение
Перейти к шагу 1Use this guide to replace the worn-out battery in your Samsung Galaxy S8.
Before disassembling your phone, discharge the battery below 25%. A charged lithium-ion battery can catch fire and/or explode if accidentally punctured.
If your battery is swollen, take appropriate precautions. Do not heat your phone. If needed, you can use a dropper or syringe to inject isopropyl alcohol (90+%) around the edges of the back cover to weaken the adhesive. Swollen batteries can be very dangerous, so wear eye protection and exercise due caution, or take it to a professional if you’re not sure how to proceed.
Выберете то, что вам нужно
Ремонтный комплект
Этот комплект содержит все детали и инструменты, используемые в руководстве.

Запчасти


Инструменты


Показать больше…
Видео обзор
-
-
Heat the iOpener for thirty seconds.
-
Throughout the repair procedure, as the iOpener cools, reheat it in the microwave for an additional thirty seconds at a time.
-
-
-
Remove the iOpener from the microwave, holding it by one of the two flat ends to avoid the hot center.
-
-
-
Fill a pot or pan with enough water to fully submerge an iOpener.
-
Heat the water to a boil. Turn off the heat.
-
Place an iOpener into the hot water for 2-3 minutes. Make sure the iOpener is fully submerged in the water.
-
Use tongs to extract the heated iOpener from the hot water.
-
Thoroughly dry the iOpener with a towel.
-
Your iOpener is ready for use! If you need to reheat the iOpener, heat the water to a boil, turn off the heat, and place the iOpener in the water for 2-3 minutes.
-
-
-
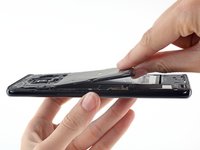
Heat an iOpener and apply it to a long edge of the S8 for about 2 minutes.
-
-
-
In the following steps you will be cutting through the adhesive around the edge of the rear glass panel.
-
The adhesive on the rear case is laid out as seen in the first image.
-
The prying pattern as seen from the outside of the phone is as follows:
-
Thick portions of adhesive
-
Thin areas of adhesive
-
Avoid prying here, to protect the fingerprint sensor.
-
-
-
Once the back panel is warm to the touch, apply a suction cup as close to the heated edge of the phone as you can while avoiding the curved edge.
-
Lift on the suction cup, and insert an opening pick under the rear glass.
-
-
-
Once you have the tool firmly inserted into the glass, reheat and reapply the iOpener to soften the adhesive.
-
-
-
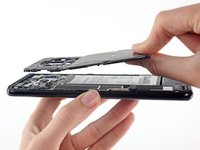
Repeat the previous heating and cutting procedure for the remaining three sides of the phone.
-
Leave an opening pick on each side as you continue to the next to prevent the adhesive from resealing.
-
-
-
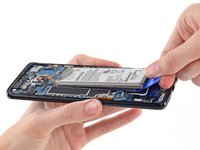
Use the opening picks to slice through any remaining adhesive and open the phone slightly.
-
Remove the glass from the phone.
-
-
Инструмент, используемый на этом этапе:Tweezers$4.99
-
Use tweezers to peel away any remaining adhesive from the phone's chassis. Then clean the adhesion areas with high concentration isopropyl alcohol (at least 90%) and a lint-free cloth to prep the surface for the new adhesive.
-
Peel the adhesive backing off of the new rear glass, carefully line up one edge of the glass against the phone chassis, and firmly press the glass onto the phone.
-
-
-
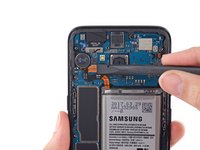
Remove eleven 3.7 mm screws using a Phillips #000 screwdriver.
-
-
-
Apply 1-2 drops of high-concentration (>90%) isopropyl alcohol under each corner of the battery and allow it to penetrate for several minutes to help weaken the adhesive.
-
Alternatively, prepare an iOpener and apply it directly to the battery for at least two minutes. Reheat and reapply the iOpener as needed.
-
-
-
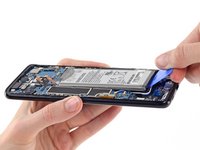
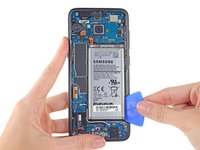
Use an opening pick to pry up the battery from the bottom using firm, constant pressure.
-
-
-
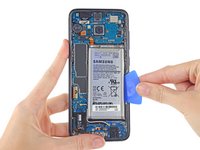
Slide the opening pick up the side of the battery to break apart remaining adhesive.
-
Lift the battery out of the case.
-
If you used isopropyl alcohol, wait ten minutes before installing the new battery to allow the alcohol to completely evaporate.
-


After reapplying adhesive, follow these instructions in reverse order to reassemble your device.
For optimal performance, calibrate your newly installed battery after completing this guide.
After reapplying adhesive, follow these instructions in reverse order to reassemble your device.
For optimal performance, calibrate your newly installed battery after completing this guide.
Отменить: Я не выполнил это руководство.
182 человек успешно провели ремонт по этому руководству.

44 Комментариев
Who are these geniuses that engineer a cell phone that requires complicated surgery in order to replace a faulty or dead battery? Really? And this POS costs the yuppified zombies how much?
Mate, check a term “planned obsolescence” on wikipedia. Even if 1/50 of people won't replace a battery but buy a new Samsung, it is a 1 extra cellphone sold. It was designed on purpose hard to remove.
Slavomir -
to make phone sistant and if you take how much thinks are in new phones of course they are complicated its same as new cars sorry but new technology is more sophisticated
Mine was stolen, it would be gone forever if they were able to pull out battery right away. But since I was calling and sending “play alert" commands through find my phone server, thieves were tired of it and left it on a sidewalk wrapped in paper and a t-shirt.
sen-q -
waterproofing?