Перейти к основному содержанию
/
Мой рабочий стол для верстки руководств

Получите быстрый доступ к руководствам, запчастям и ответам касательно ваших устройств

Sony WH-1000XM4 Right Ear Pad Replacement

Sony WH-1000XM4 Right Ear Pad Replacement

Carsten Frauenheim

Carsten Frauenheim

Последнее обновление September 23, 2024

10 - 20 минут
Средне
Абсолютно необходимое руководство
Это руководство предназначено только для использования в качестве обязательного условия для других руководств. Оно не полностью само по себе.

Prerequisite-only guide! This guide is part of another procedure and is not meant to be used alone.

Follow this guide to remove or replace the right ear pad on the Sony WH-1000XM4 wireless headphones.

The procedure to remove the left ear pad is the same, but the standalone guide can be found here.

Выберете то, что вам нужно

Инструменты

  • Spudger
    Spudger
  1. Sony WH-1000XM4 Right Ear Pad Replacement, Place the headphones speakers-up: шаг 1, изображение 1 из 1
    • Before beginning any repairs, press and hold the power button on the left ear cup for about 2 seconds until the blue light turns off.

    • Place your headphones onto a work surface, ear pads facing up.

  2. Sony WH-1000XM4 Right Ear Pad Replacement, Create a gap: шаг 2, изображение 1 из 2 Sony WH-1000XM4 Right Ear Pad Replacement, Create a gap: шаг 2, изображение 2 из 2
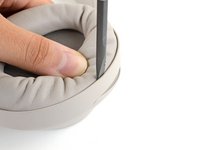
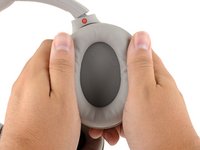
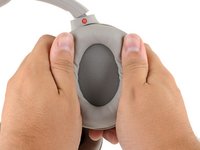
    • Use your thumb to depress the RIGHT ear pad near the long outer edge, creating a gap between the cushion and the frame.

  3. Sony WH-1000XM4 Right Ear Pad Replacement, Unclip the ear cup: шаг 3, изображение 1 из 3 Sony WH-1000XM4 Right Ear Pad Replacement, Unclip the ear cup: шаг 3, изображение 2 из 3 Sony WH-1000XM4 Right Ear Pad Replacement, Unclip the ear cup: шаг 3, изображение 3 из 3
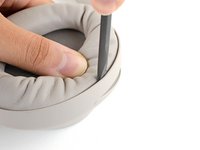
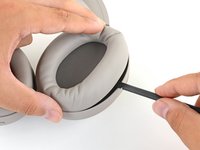
    • Insert the flat end of a spudger into the gap you've created, between the edge of the cushion and the frame.

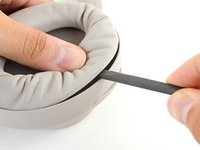
    • Pivot the spudger down to unclip the long edge of the ear pad.

    • When the first clip disconnects, you'll hear an audible clicking sound.

    • This may take a considerable amount of force. If the cushion won't click out of place, move your spudger to different points along the long edge.

  4. Sony WH-1000XM4 Right Ear Pad Replacement: шаг 4, изображение 1 из 3 Sony WH-1000XM4 Right Ear Pad Replacement: шаг 4, изображение 2 из 3 Sony WH-1000XM4 Right Ear Pad Replacement: шаг 4, изображение 3 из 3
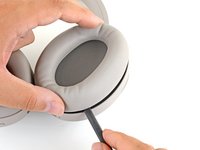
    • Repeat the previous step around the perimeter of the ear cup to disconnect the remaining clips.

  5. Sony WH-1000XM4 Right Ear Pad Replacement, Remove the ear pad: шаг 5, изображение 1 из 2 Sony WH-1000XM4 Right Ear Pad Replacement, Remove the ear pad: шаг 5, изображение 2 из 2
    • Remove the right ear pad.

  6. Sony WH-1000XM4 Right Ear Pad Replacement, Reassembly tip: шаг 6, изображение 1 из 2 Sony WH-1000XM4 Right Ear Pad Replacement, Reassembly tip: шаг 6, изображение 2 из 2
    • When installing a replacement right ear pad:

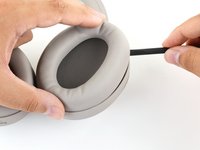
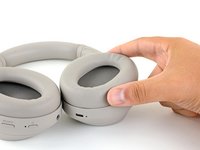
    • Align the cushion over the speaker and press them firmly together to snap it into place.

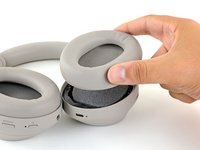
    • Press around the entire edge of the cushion, making sure all the clips have engaged.

Заключение

Compare your new replacement part to the original part—you may need to transfer remaining components or remove adhesive backings from the new part before installing.

To reassemble your device, follow the above steps in reverse order.

Repair didn’t go as planned? Try some basic troubleshooting or search our Answers community for help.

Еще один человек закончил это руководство.

Carsten Frauenheim

Участник с: 03/10/20

135 594 Репутация

Автор 371 руководств

Команду

iFixit Участник iFixit

Staff

118 членов

Автор 19 430 руководств

Один комментарий

Bonjour,

Pourrais je savoir où me procurer des coussinets de rechanges fiables ?

Merci d’avance :)

Maxence - Ответить

Добавить комментарий

Статистика просмотров:

За последние 24 час(ов): 3

За последние 7 дней: 9

За последние 30 дней: 9

За всё время: 210