Перейти к основному содержанию
/
Мой рабочий стол для верстки руководств

Получите быстрый доступ к руководствам, запчастям и ответам касательно ваших устройств

iPhone 16 Pro Max Charge Port Removal

iPhone 16 Pro Max Charge Port Removal

Arthur Shi

Arthur Shi

Последнее обновление March 6, 2025

1 - 3 часы
Средне
Абсолютно необходимое руководство
Это руководство предназначено только для использования в качестве обязательного условия для других руководств. Оно не полностью само по себе.

Removal steps for the charge port in the iPhone 16 Pro Max.

Выберете то, что вам нужно

Инструменты

Показать больше…

  1. iPhone 16 Pro Max Charge Port Removal, Remove the charge port: шаг 1, изображение 1 из 3 iPhone 16 Pro Max Charge Port Removal, Remove the charge port: шаг 1, изображение 2 из 3 iPhone 16 Pro Max Charge Port Removal, Remove the charge port: шаг 1, изображение 3 из 3
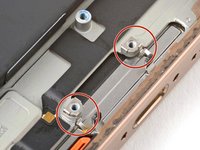
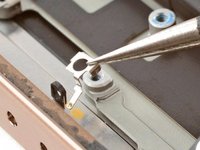
    • Use a Phillips screwdriver to remove the two 3.3 mm‑long screws securing the charge port to the frame.

    • These screws are tight and can be difficult to reach. Angle your screwdriver at as shallow of an angle as you can, but be careful not to press against the battery.

  2. iPhone 16 Pro Max Charge Port Removal: шаг 2, изображение 1 из 3 iPhone 16 Pro Max Charge Port Removal: шаг 2, изображение 2 из 3 iPhone 16 Pro Max Charge Port Removal: шаг 2, изображение 3 из 3
    • The charge port has an adhesive gasket that seals it against the bottom of the frame. It's also tucked behind two prongs, which prevents you from pulling the port away from the frame.

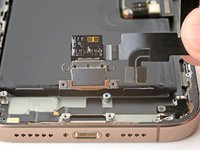
    • Insert the point of a spudger under one side of the charge port.

    • Pry up gently to separate the gasket and lift the port up.

    • Repeat on the other side to fully loosen the port.

  3. iPhone 16 Pro Max Charge Port Removal: шаг 3, изображение 1 из 3 iPhone 16 Pro Max Charge Port Removal: шаг 3, изображение 2 из 3 iPhone 16 Pro Max Charge Port Removal: шаг 3, изображение 3 из 3
    • Remove the charge port.

    • The two screw posts underneath the charge port have grounding clips on them. If the clips fell off, be sure to place them back onto their posts. The clips should face towards the bottom of the iPhone.

Финишная черта

Arthur Shi

Участник с: 01/03/18

282 218 Репутация

Автор 585 руководств

Команду

iFixit Участник iFixit

Staff

118 членов

Автор 19 446 руководств

0 Комментариев

Добавить комментарий

Статистика просмотров:

За последние 24 час(ов): 2

За последние 7 дней: 22

За последние 30 дней: 25

За всё время: 39