Перейти к основному содержанию
/
Мой рабочий стол для верстки руководств

Получите быстрый доступ к руководствам, запчастям и ответам касательно ваших устройств

Reemplazo del ensamblaje de pantalla del iPhone XR.

Примечание: Вы редактируете необходимое руководство. Любые внесённые вами изменения влияют на все 9 руководства, которые включают этот шаг.

Английский
Испанский
Шаг 4
iPhone XR Display Assembly Replacement, Disconnect the digitizer: шаг 0, изображение 1 из 2 iPhone XR Display Assembly Replacement, Disconnect the digitizer: шаг 0, изображение 2 из 2
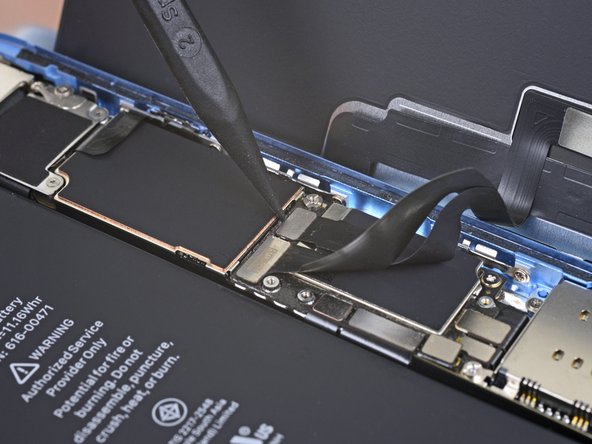
Disconnect the digitizer
  • Use the tip of a spudger to pry up and disconnect the digitizer cable.

  • To re-attach press connectors like this one, carefully align and press down on one side until it clicks into place, then repeat on the other side. Do not press down on the middle. If the connector is misaligned, the pins can bend, causing permanent damage.

  • If any part of your screen doesn't respond to touch after your repair, disconnect the battery and then re-seat this connector, making sure it clicks fully into place and that there's no dust or other obstruction in the socket.

Usa la punta de un spudger para levantar y desconectar le cable del digitalizador.

Para volver a colocar los conectores de presión como este, alinea cuidadosamente y presiona hacia abajo en un lado hasta que encaje en su lugar, luego repite en el otro lado. No presiones hacia abajo en el medio. Si el conector está desalineado, los pasadores pueden doblarse y causar daños permanentes.

Si alguna parte de tu pantalla no responde al toque después de tu reparación, desconecta la batería y vuelve a colocar este conector, asegurándote de que encaje en su lugar y de que no haya polvo u otra obstrucción en el zócalo.

Ваш вклад лицензируется под свободной лицензией Creative Commons .