Перейти к основному содержанию
/
Мой рабочий стол для верстки руководств

Получите быстрый доступ к руководствам, запчастям и ответам касательно ваших устройств

Remplacement de l'écran complet de l'iPhone XR

Примечание: Вы редактируете необходимое руководство. Любые внесённые вами изменения влияют на все 9 руководства, которые включают этот шаг.

Английский
Французский
Шаг 6
iPhone XR Display Assembly Replacement, Unscrew the logic board connector cover: шаг 0, изображение 1 из 2 iPhone XR Display Assembly Replacement, Unscrew the logic board connector cover: шаг 0, изображение 2 из 2
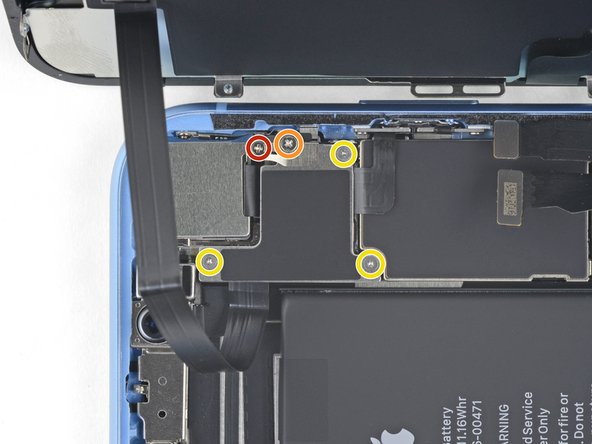
Unscrew the logic board connector cover
  • Remove the five screws securing the logic board connector bracket to the rear case:

  • One 1.3 mm Phillips #000 screw

  • One 1.5 mm Phillips #000 screw

  • Three 1.2 mm Y000 screws

  • Remove the bracket.

  • Be careful not to lose the smaller bracket clipped onto the edge. It's secured with a small clip and is easy to accidentally knock off of the larger bracket.

Dévissez les cinq vis qui fixent le cache du connecteur de la carte mère à la coque arrière :

Une vis cruciforme #000 de 1,3 mm

Une vis cruciforme #000 de 1,5 mm

Trois vis Y000 de 1,2 mm

Veillez à ne pas perdre la petite fixation attachée au cache du connecteur. Elle est fixée par un petit clip et un petit choc a vite fait de la faire tomber du cache.

Ваш вклад лицензируется под свободной лицензией Creative Commons .