Перейти к основному содержанию
/
Мой рабочий стол для верстки руководств

Получите быстрый доступ к руководствам, запчастям и ответам касательно ваших устройств

Sostituzione gruppo LCD iPad Mini CDMA

Примечание: Вы редактируете необходимое руководство. Любые внесённые вами изменения влияют на все 42 руководства, которые включают этот шаг.

Английский
Итальянский
Шаг 5
iPad Mini CDMA LCD Assembly Replacement: шаг 0, изображение 1 из 3 iPad Mini CDMA LCD Assembly Replacement: шаг 0, изображение 2 из 3 iPad Mini CDMA LCD Assembly Replacement: шаг 0, изображение 3 из 3
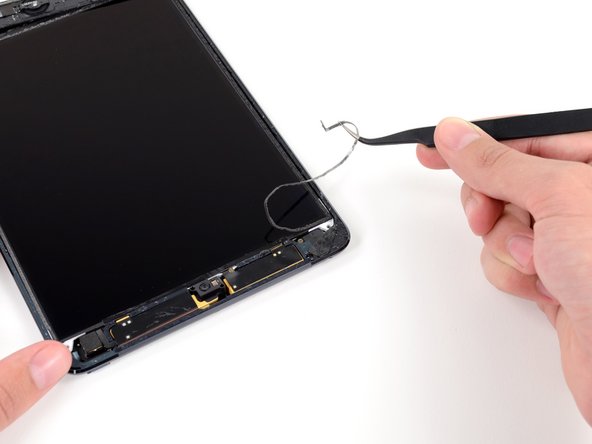
  • A thin strip of foam tape on the LCD frame is covering a piece of tape connecting the LCD to the panel beneath it. To proceed, you'll have to break and peel up some of the foam tape to expose the tape hidden beneath.

  • Use a pair of thin tweezers to pull up the top of the foam tape surrounding the LCD.

  • Be careful not to touch the LCD with the tweezers, as you may damage the display.

  • Use the tweezers to peel the foam tape up to expose the top of the LCD.

Un sottile pezzo di schiuma adesiva sulla cornice del pannello LCD copre un pezzo di nastro adesivo che unisce la cornice del pannello LCD al pannello sottostante. Per procedere dovrai rompere e rimuovere parte della schiuma per scoprire il nastro nascosto sotto.

Usa un paio di pinzette per sollevare la schiuma adesiva attorno al pannello LCD.

Stai attento a non toccare il pannello LCD con le pinzette: potresti danneggiarlo.

Usa un paio di pinzette per sollevare la schiuma adesiva per scoprire la parte superiore del pannello LCD.

Ваш вклад лицензируется под свободной лицензией Creative Commons .