
Huawei Mate 20 Pro Daughterboard Cover Replacement

Введение
Перейти к шагу 1Use this guide to remove or replace the daughterboard cover in your Huawei Mate 20 Pro.
Opening the Huawei Mate 20 Pro will damage the waterproof sealing on the device. If you do not replace the adhesive seals, your phone will function normally but will lose its water-protection.
You’ll need replacement adhesive to reattach components when reassembling the device.
Выберете то, что вам нужно


-
-
Before you begin, switch off your phone.
-
Apply a heated iOpener to the back of the phone to loosen the adhesive beneath the back cover. Apply the iOpener for at least two minutes.
-
-
-
Secure a suction handle to the bottom of the back cover, as close to the edge as possible.
-
Lift the back cover with the suction handle to create a small gap between the cover and the frame.
-
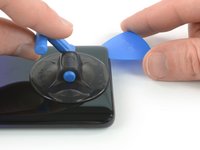
Insert an opening pick into the gap.
-
Slide the opening pick to the bottom right corner.
-
-
-
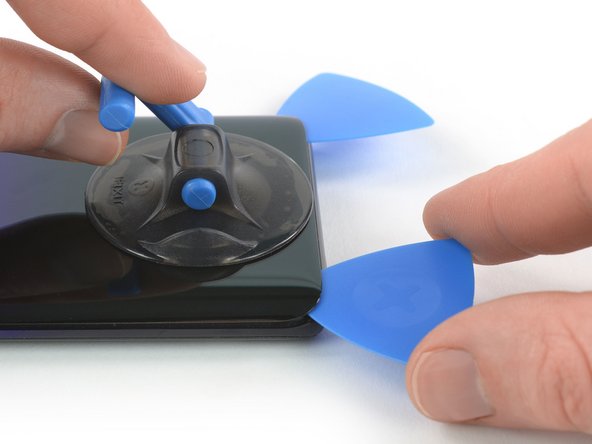
Insert a second opening pick and slide it to the bottom left corner to cut the adhesive.
-
Leave the opening picks in place to prevent the adhesive from resealing.
-
-
-
Insert a third opening pick at the bottom left corner.
-
Slide the tip of the opening pick from the bottom left corner along the side of the phone to cut the adhesive.
-
Leave the opening pick in its place at the top left corner to prevent the adhesive from resealing.
-
-
-
If the adhesive becomes hard to cut, it has most likely cooled down. Use your iOpener to reheat it.
-
Insert a fourth opening pick under the top left corner of the back cover.
-
Slide the opening pick along the top edge of the phone to cut the adhesive.
-
Leave the opening pick in the top right corner to prevent the adhesive from resealing.
-
-
-
Insert a fifth opening pick at the top right corner of the phone.
-
Slide the opening pick along the right side to cut the remaining adhesive.
-
-
-
Remove the eight Phillips #00 screws (4.3 mm length).
-
-
-
Slide an opening pick under the black adhesive at the bottom left of the charging coil.
-
Carefully slide the opening from the left to the right side to loosen the adhesive.
-
-
-
Insert an opening pick under the bottom left corner of the motherboard cover.
-
Use the opening pick to pry up the motherboard cover.
-
-
-
Use a spudger to pry up and disconnect the flash assembly flex cable.
-
Remove the motherboard cover including the NFC and charging coil.
-
-
-
Use a spudger to pry up and disconnect the battery connector.
-
-
-
Remove the three Phillips #00 screws (4.3 mm length).
-
If you want to remove or replace the loudspeaker, daughterboard, battery, or the OLED screen, remove the four Phillips #00 screws (4.3 mm length) which hold down the loudspeaker assembly.
-
-
Инструмент, используемый на этом этапе:Tweezers$4.99
-
Slide an opening pick under the top right corner of the daughterboard cover.
-
Use the opening pick to pry up the daughterboard cover. Remove the daughterboard cover with tweezers.
-


To reassemble your device, follow these instructions in reverse order. Apply new adhesive where necessary after cleaning the relevant areas with isopropyl alcohol (>90%).
Take your e-waste to an R2 or e-Stewards certified recycler.
Repair didn’t go as planned? Check out our Answers community for troubleshooting help.
Отменить: Я не выполнил это руководство.
Еще один человек закончил это руководство.


Один комментарий
Hi there.... My huawei mate 20 pro was water damaged!!! After a while its LCD was displaying green lines and in no time it went blank, but surprisingly the phone works and still receives notifications and incoming calls. I could even answer calls in a blank screen by pretending to swipe as if its on. My question before i buy a replacement screen . Is the LCD really damaged or its the logic board ? This might help me decide on how to proceed with it.