
Lenovo Yoga 720 Battery Replacement

Введение
Перейти к шагу 1This guide will show you how to replace your laptop's battery.
Выберете то, что вам нужно
Ремонтный комплект
Этот комплект содержит все детали и инструменты, используемые в руководстве.

Запчасти

Инструменты


Показать больше…
-
-
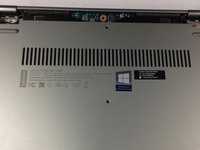
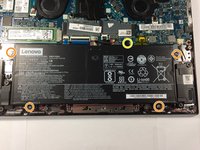
Remove seven Torx T5 short screws.
-
Remove three Torx T5 long screws.
-
-
Инструмент, используемый на этом этапе:iFixit Opening Tool$1.99
-
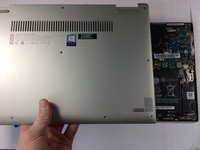
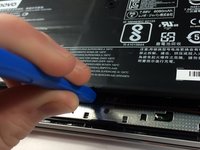
Starting from the USB port, use your opening tool to gently pry up the case.
-
Pry along the laptop in the order shown by the arrows.
-
-
-
-
Lift the case from the bottom side. NOT the side with the hinges.
-
Once you feel resistance, gently pull the case towards you. (away from the hinges.)
-
Remove the case.
-
-
-
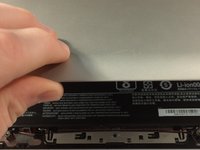
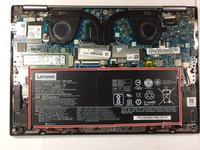
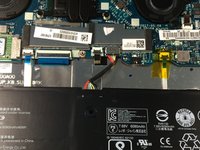
This is the battery. For guides that are for other parts, the battery is removed for the reason of it being a pain to connect or disconnect while screwed in.
-
Remove four J1 Philips screws.
-
Remove one J1 philips screw.
-
Lift the battery slightly using your plastic opening tool.
-
-
-
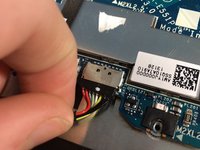
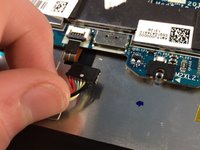
Pull the battery towards you until the wire is accessible.
-
gently tug and wiggle on the wire until it pops out.
-
Remove the battery.
-


To reassemble your device, follow these instructions in reverse order.
For optimal performance, after completing this guide, calibrate your newly installed battery.
Take your e-waste to an R2 or e-Stewards certified recycler.
Repair didn’t go as planned? Try some basic troubleshooting, or ask our Answers community for help.
Отменить: Я не выполнил это руководство.
19 человек успешно провели ремонт по этому руководству.

6 Комментариев
Hi Aiden. I have the Lenovo yoga 720-12ikb. Is a bit smaller. Do you know if the same instructions will work on this unit? Thanks
I just would like to let people know that when reassembling you need to push the connector firmly all the way otherwise battery will not be properly connected. Make sure to note the position of the switch when unplugging.
This worked great, my yoga should keep on chugging for years to cone.
On my Yoga 720-131KB, there were only four J1 Philips screws securing the battery in Step 4. There was no longer screw marked in yellow, nor was there a screw attachment point on the battery.
Thank you for preparing this guide!
Great instructions, as usual. This was my second battery replacement (two separate computers: 720 and 730). They look similar, but screws are placed differently, and case comes apart in the opposite direction. Battery is the same though. Since they were 3 and 4 years old, the batteries were totally shot, and computers would shut down suddenly, even when apparently at 100% charge. I'm hoping this replacement will keep them going a few more years.
That battery connection is really small, it's hard to get much leverage to reconnect the new battery. Still, as others have said, pay attention to the orientation of the connector, make sure it's aligned, and be patient. If you line it up just right, it'll glide in. Make sure it goes in all the way.