Перейти к основному содержанию
/
Мой рабочий стол для верстки руководств

Получите быстрый доступ к руководствам, запчастям и ответам касательно ваших устройств

Lenovo Yoga 720-13IKB Fan Replacement

Lenovo Yoga 720-13IKB Fan Replacement

Benjamin Porter Lesesne

Benjamin Porter Lesesne и 3 другие участники

Последнее обновление March 25, 2024

20 мин.
Средне
Руководство, предоставленное сообществом

It is important that your Lenovo Yoga 720-13IKB’s fan is running efficiently because it is essential to the cooling system that maintains proper laptop functionality. Over time, a laptop’s fan can accumulate dust or experience wear which typically results in the fan lasting for around three years on the lower estimates. Some symptoms that might warrant a fan replacement include abnormally loud fan noises, performance problems, overheating, and abrupt changes in fan speeds. This guide will provide steps to replacing your fan, which will aid in maintaining your laptop’s performance.

Выберете то, что вам нужно

Запчасти

Инструменты

Показать больше…

  1. Lenovo Yoga 720-13IKB Fan Replacement, Bottom Cover: шаг 1, изображение 1 из 3 Lenovo Yoga 720-13IKB Fan Replacement, Bottom Cover: шаг 1, изображение 2 из 3 Lenovo Yoga 720-13IKB Fan Replacement, Bottom Cover: шаг 1, изображение 3 из 3
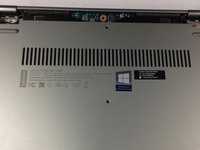
    • Before you begin, be sure to turn off your laptop and discharge the battery down to 25%.

    • Start by flipping the device over so that you see the screws.

    • Remove seven Torx T5 short screws.

    • Remove three Torx T5 long screws.

  2. Lenovo Yoga 720-13IKB Fan Replacement: шаг 2, изображение 1 из 3 Lenovo Yoga 720-13IKB Fan Replacement: шаг 2, изображение 2 из 3 Lenovo Yoga 720-13IKB Fan Replacement: шаг 2, изображение 3 из 3
    Инструмент, используемый на этом этапе:
    iFixit Opening Tool
    $1.99
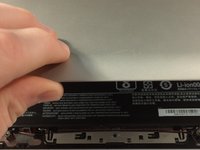
    • Starting from the USB port, use your opening tool to gently pry up the case.

    • Make sure you are prying on the cover itself, not the metal shield around the USB port.

    • Pry along the laptop in the order shown by the arrows.

    • Do NOT pry along the top side, or you risk damaging the casing. Stay with the arrows.

  3. Lenovo Yoga 720-13IKB Fan Replacement: шаг 3, изображение 1 из 3 Lenovo Yoga 720-13IKB Fan Replacement: шаг 3, изображение 2 из 3 Lenovo Yoga 720-13IKB Fan Replacement: шаг 3, изображение 3 из 3
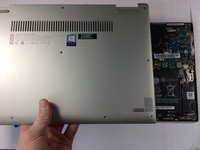
    • Lift the case from the bottom side. NOT the side with the hinges.

    • When you feel resistance, do NOT keep lifting or you will damage the housing.

    • Once you feel resistance, gently pull the case towards you. (away from the hinges.)

    • Remove the case.

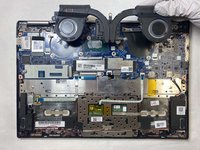
  4. Lenovo Yoga 720-13IKB Fan Replacement, Fan: шаг 4, изображение 1 из 2 Lenovo Yoga 720-13IKB Fan Replacement, Fan: шаг 4, изображение 2 из 2
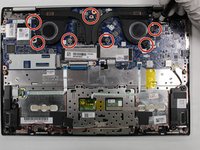
    • Use a JIS #000 screwdriver to unscrew and remove the seven 2.5mm screws that secure the fan to the motherboard.

    • Remove the fan from the laptop.

    • Follow the instructions found here to reapply new thermal paste. If your replacement heat sink and fan assembly has thermal paste pre-applied, you'll simply need to remove the old thermal paste from the laptop.

Заключение

To reassemble your device, follow these instructions in reverse order.

Benjamin Porter Lesesne

Участник с: 10/04/22

283 Репутация

Автор 2 руководств

Команду

0 Комментариев

Добавить комментарий

Статистика просмотров:

За последние 24 час(ов): 2

За последние 7 дней: 14

За последние 30 дней: 39

За всё время: 1,181