Перейти к основному содержанию
/
Мой рабочий стол для верстки руководств

Получите быстрый доступ к руководствам, запчастям и ответам касательно ваших устройств

iMac G5 20" Model A1076 RAM Replacement

iMac G5 20" Model A1076 RAM Replacement

Walter Galan

Walter Galan и 6 другие участники

Последнее обновление April 25, 2024

Нет оценки
Легко
Предлагаемое руководство

Instantly increase the speed of your iMac by upgrading the RAM.

Выберете то, что вам нужно

Запчасти

Инструменты

Показать больше…

iFixit получает комиссию, когда вы совершаете покупку по этим ссылкам.
  1. iMac G5 20" Model A1076 RAM Replacement, Rear Panel: шаг 1, изображение 1 из 1
    • Lay the iMac display-side down on a flat surface (putting a cloth under the screen to protect it from bumps).

    • Loosen the three Phillips screws securing the rear panel to the iMac.

    • These screws are captive in the iMac. The center screw will stop turning after about 3.5 turns and the outer screws will stop turning after about 5.5 turns. Do not try to remove these screws from your iMac.

    Some models (with light sensor) have only the two outboard screws.

    Robert Huber - Ответить

  2. iMac G5 20" Model A1076 RAM Replacement: шаг 2, изображение 1 из 2 iMac G5 20" Model A1076 RAM Replacement: шаг 2, изображение 2 из 2
    • Lift the rear panel slightly near the bottom of the iMac.

    • Pull the rear panel toward yourself and remove it from the iMac.

  3. iMac G5 20" Model A1076 RAM Replacement, RAM: шаг 3, изображение 1 из 2 iMac G5 20" Model A1076 RAM Replacement, RAM: шаг 3, изображение 2 из 2
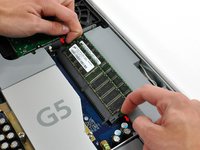
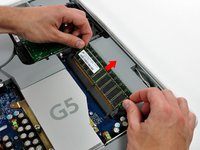
    • Rotate each of the two RAM retaining arms away from the RAM chip.

    • The chip will partially pop out at the same time as the arms are pulled out to either side.

    • Pull the RAM chip straight away from its socket.

    • Repeat this process for the other RAM chip.

    • Be sure the RAM arms are rotated fully outward before installing new RAM chips.

Заключение

To reassemble your device, follow these instructions in reverse order.

31 человек успешно провели ремонт по этому руководству.

2 Комментариев

como se llama la cajita blanca que esta debajo de las memorias y que funcion tiene?

max sanchez - Ответить

Easy as pie, instructions were right to the point, thank you.

Hemi Andersen - Ответить

Добавить комментарий

Статистика просмотров:

За последние 24 час(ов): 0

За последние 7 дней: 4

За последние 30 дней: 18

За всё время: 23,475