Введение
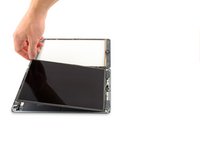
Use this guide to replace the LCD on an iPad 5 LTE.
Parts of this guide were shot with a Wi-Fi model and as such the internals may look slightly different from the LTE model. The procedure is the same for both models except where noted.
Warning: the battery isolation method in this guide is outdated, and may result in irreversible damage to the battery pins of the logic board, effectively destroying it. If you choose to isolate the battery this way, heed all warnings and work extremely carefully. If you choose to complete the guide without isolating the battery, avoid using metal tools except when completely necessary (like when removing screws) to prevent shorting the battery and damaging sensitive circuit components.
Выберете то, что вам нужно
-
-
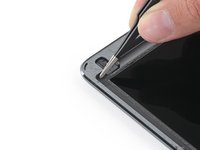
Heat an iOpener and apply it to the left edge of the device for two minutes.
-
-
-
While you're waiting for the adhesive to loosen, note the following areas that are sensitive to prying:
-
Front camera
-
Antennas
-
Display cables
-
-
Инструмент, используемый на этом этапе:Clampy - Anti-Clamp$24.95
-
Pull the blue handle backwards to unlock the Anti-Clamp's arms.
-
Place an object under your iPad so it rests level between the suction cups.
-
Position the suction cups near the middle of the left edge—one on the top, and one on the bottom.
-
Hold the bottom of the Anti-Clamp steady and firmly press down on the top cup to apply suction.
-
-
-
Pull the blue handle forward to lock the arms.
-
Turn the handle clockwise 360 degrees or until the cups start to stretch.
-
Make sure the suction cups remain aligned with each other. If they begin to slip out of alignment, loosen the suction cups slightly and realign the arms.
-
-
-
Wait one minute to give the adhesive a chance to release and present an opening gap.
-
If your screen isn't getting hot enough, you can use a hair dryer to heat along the left edge of the iPad.
-
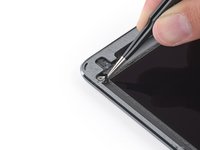
Insert an opening pick under the digitizer when the Anti-Clamp creates a large enough gap.
-
Skip the next step.
-
-
-
Once the screen is warm to touch, apply a suction handle to the left edge of the screen and as close to the edge as possible.
-
Lift the screen with the suction handle to create a small gap between the digitizer and the frame.
-
Insert an opening pick into the gap between the digitizer and the frame.
I had a screen that was lightly cracked, and when I pulled up on the glass it cracked even further and made a mess of my removal. So, I would recommend taping cracks even if you can get suction so that you don’t induce even more cracks.
I actually had a really badly cracked digitizer. Using the suction cup did nothing but shatter the digitizer more. I intentionally drove a flat head screw driver into the digitizer to reveal the recess in the body where they are showing the opening-pick. Working around the edge, the glass shattered. You still need to be careful at all of spots noted in step 2.
Do not go under the digitizer more than the 1 mm along the sides or 3-4 mm at the corners as shown in step 29 using the flat grey ring around the edge for a reference. Direct all of your tool force into the body to prevent slipping into critical parts.
The antennas at either side of the home button were the trickiest part as they were thin and slightly attached to the digitizer. I would recommend using a plastic tool for these parts if you are having to 'scrape' the glass off of the tabs of the antenna.
-
-
-
Insert a second opening pick into the gap you just created.
-
Slide the pick toward the bottom-left corner of the device to separate the adhesive.
-
Leave the pick in the bottom-left corner to prevent the adhesive from re-sealing.
-
-
-
If the opening pick gets stuck in the adhesive, "roll" the pick along the side of the iPad to continue separating the adhesive.
-
-
-
Slide the first opening pick towards the top-left corner of the device to separate the adhesive.
-
Leave the pick in the top-left corner to prevent the adhesive from re-sealing.
-
-
-
Heat an iOpener and apply it to the top edge of the device for two minutes.
-
-
-
Rotate the pick around the top-left corner of the device to separate the adhesive.
-
-
-
Slide the opening pick along the top edge of the device, stopping just before you reach the front camera.
-
-
-
-
Pull the pick out until only the tip is between the digitizer and the frame.
-
Slide the pick above the front camera to separate the adhesive.
-
Leave the pick near the right side of the front camera before continuing.
-
-
-
Re-insert the pick and slide it towards the top-right corner of the device to completely separate the top adhesive.
-
Leave the pick in the top-right corner to prevent the adhesive from re-sealing.
-
-
-
Heat an iOpener and apply it to the right edge of the device for two minutes.
-
-
-
Rotate the pick around the top-right corner of the device to separate the adhesive.
-
-
-
Insert a new opening pick and slide it to the middle of the iPad's right edge.
There are sensitive display/digitizer cables no less than five inches from the bottom edge of the iPad. Insert the pick further down than this, or deeper than 1mm beyond this point and you risk irreparably damaging these cables.
Three inches is much too far down this side of the iPad to use picks.
-
-
-
Heat an iOpener and apply it to the bottom edge of the device for two minutes.
-
-
-
Slide the bottom-left pick to the bottom-left corner to separate the adhesive.
-
Leave the pick in the bottom-left corner before moving to the next step.
-
-
-
Insert a new opening pick into the gap you just created on the bottom edge of the iPad.
-
Slide the pick over the antenna, stopping just before the home button.
-
Leave the pick to the left of the home button before continuing.
-
-
-
Insert an opening pick into the gap you just created.
-
Slide the pick underneath the home button and towards the bottom-right corner, making sure only the tip is between the digitizer and the frame.
-
-
-
Re-insert the pick and slide it towards the home button to completely separate the bottom adhesive.
-
Leave the pick to the right of the home button before continuing.
-
-
-
Heat an iOpener and apply it to the right edge of the device for two minutes.
-
-
-
Twist the two opening picks on the left corners of the iPad to lift the digitizer slightly, separating the the last of the adhesive in the process.
-
-
-
Lift the left edge of the digitizer upwards to further separate the adhesive along the right edge of the iPad.
-
-
-
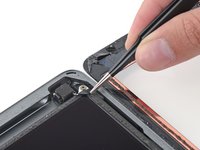
While supporting the digitizer, slide an opening pick between the two display cables to separate the last of the adhesive.
-
-
-
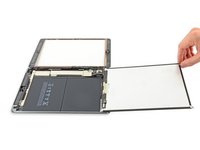
Once all of the adhesive has been separated, open the digitizer like a book and rest it parallel to the iPad.
While reassembling, REALLY make sure the display cables and the home button cable won't be folded / bent while closing the digitizer. I'm not exactly sure what I did, but I broke the home button and touch ID since I bent the home button cable to the point that it broke. These ribbon cables are SUPER fragile.
-
-
-
Remove the four Phillips screws securing the LCD:
-
Three 4.0 mm screws
-
One 4.8 mm screw
-
-
-
Use the flat end of a spudger to pry the LCD out of its recess just enough to grab it with your fingers.
-
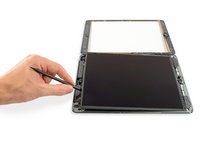
Flip the iPad LCD like a page in a book, lifting near the camera and turning it over the home button end of the rear case.
-
Lay the LCD on its face to allow access to the display cables.
Pictures that better indicate the difference between the remaining adhesive and the two mylar cables (the very cables you are trying to avoid damaging!) would be much appreciated. On my unit the two were very hard to distinguish
-
-
-
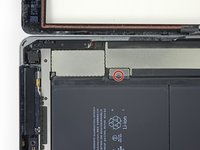
Remove the single 2.3 mm Phillips screw securing the battery connector to the logic board.
-
Leave the blocker there to prevent the battery connector leads from making contact until you have completed your repairs.
The could recommend me since I did not put the wedge first in the connection of the battery and it heated the logic card a couple of minutes, q´l recommend to solve it since it does not turn on
The battery isolation pick didn’t come with my kit. I made my own using one of the regular picks and a pair of scissors.
Would it not be important to note that you are not really “disconnecting” the conduit of the battery from the logic board, but rather isolating the connection?
@dlcatftwin I’m not sure I understand the distinction you’re making. You are fully disconnecting the battery, by opening the circuit and wedging a big insulator in there to keep it from closing again accidentally.
Hello Jeff,
Thank you for responding. one may regard “disconnecting” as actually unplugging or unsocketing a cable connection as actually disconnecting, like in step 37. I could picture a person tugging on the pick thinking that the battery connector actually had to be lifted away from the board.
Probably over-thinking it! ;-)
Regards,
DLC
@dlcatftwin 100% on point. That’s exactly why I’m reading this comment right now. I’ve never heard of a “Battery Isolation Pick” and I was trying to get the connector loose, before realizing it wasn’t coming easy and therefore reading the comments for more info.
Ergo, there is some confusion here that should be noted in the primary instructions.
-
-
-
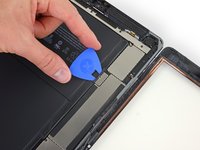
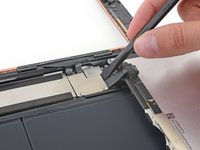
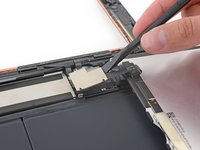
Remove the three 1.4 mm Phillips screws securing the display cable bracket.
-
-
-
Use the flat end of a spudger to gently pry the display cable bracket straight up from the logic board.
My iPad Air2 is configured differently from that in these photos. The battery connector is next to the display cable connection, and the LCD/glass panel are integral, so that they lift out of the frame together.
-


To reassemble your device, follow these instructions in reverse order.
To reassemble your device, follow these instructions in reverse order.
Отменить: Я не выполнил это руководство.
Еще один человек закончил это руководство.


2 Комментариев
Also this is a great tutorial!