Введение
iPhone batteries are rated to hold 80% of their capacity for up to 500 charge cycles, which lasts roughly 18-24 months for most users. After that, your iPhone may need to be charged far more frequently, and iOS may warn you that performance is affected (in other words, your phone will run slower). Use this guide to replace your battery and restore your iPhone to like-new performance.
If your battery is swollen, take appropriate precautions.
Note: On iOS 17.6 and earlier, your iPhone may display a warning about the “genuineness” of the battery after the repair, even when using original Apple parts. If your iPhone functions normally, you can safely ignore the warning. On iOS 18 and newer, authenticate your new battery using Apple's Repair Assistant.
You’ll need replacement adhesive to reattach components when reassembling the device.
Выберете то, что вам нужно
-
-
Power off your iPhone before beginning disassembly.
-
Remove the two 6.7 mm-long pentalobe screws at the bottom edge of the iPhone.
-
-
-
Measure 3 mm from the tip and mark the opening pick with a permanent marker.
Got to step 2 and realized the fix kit doesn't include an opening pick! Looks like a guitar pick, and I have those lying around. Is that expected? Looks like the pick is used in many steps below. There's a little blue crowbar that isn't mentioned in the instructions. Perhaps that replaces the opening pick?
Hi! I can't see which guide you were using when writing this comment. Can you reply here with which guide and fix kit you used?
I see you posted this in Meta. I hope it's resolved soon! In the meantime, a guitar pick may work well enough for your repair.
what fix kit?
My fix kit didn't include an opening pick either
My AliExpress refurbished screen came with a pick that has a coin-like circle that pops out, so no modification was necessary
It's not an Ifixit KIT if it doesn't include everything. You'll need to order the opening pic separately. Or head to Walmart like myself and look for guitar pics. Hopefully, this will work just as well.
No pick in mine as well. It’s really not clear that you have to order this separately when ordering an IPhone SE 202/2022 screen repair kit. Is this the case?
Frustrated, I ordered a compact package where everything was encapsulated. Useless suction tools could not separate the screen. If it is unable to decouple the screen, then why sucking suction tools you have provided.
For my kit the triangle pick was stuck inside the box with the screen not with the other tools maybe it's also there for you
Y’all are getting far, FAR too detailed with some of this stuff…. Measuring and marking the pick that you won’t actually use to open the device?!? lol that’s kinda funny. Just heat it up, grab a spudger, and the back just pops right off! The iFixit tech need to stick to the KISS method more often, you know KEEP IT SIMPLE STUPID!!! Like l, for reals, I’ve been doing this stuff for YEARS and using iFixit guides regularly and this is just ridiculous at this point!
Will the phone still work if the sensor assembly on the back of the screen is damaged?
-
-
-
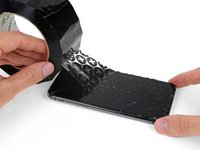
Lay overlapping strips of clear packing tape over the iPhone's screen until the whole face is covered.
-
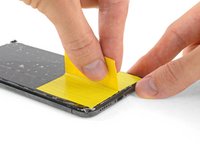
If you can't get the suction cup to stick in the next few steps, fold a strong piece of tape (such as duct tape) into a handle and lift the screen with that instead.
-
-
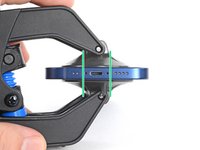
Инструмент, используемый на этом этапе:Clampy - Anti-Clamp$24.95
-
Pull the blue handle backwards to unlock the Anti-Clamp's arms.
-
Slide the arms over either the left or right edge of your iPhone.
-
Position the suction cups near the bottom edge of the iPhone—one on the front, and one on the back.
-
Squeeze the cups together to apply suction to the desired area.
-
-
-
Pull the blue handle forwards to lock the arms.
-
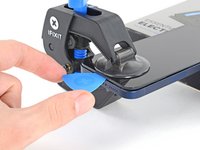
Turn the handle clockwise 360 degrees or until the cups start to stretch.
-
Make sure the suction cups remain aligned with each other. If they begin to slip out of alignment, loosen the suction cups slightly and realign the arms.
-
-
-
Support your iPhone on something sturdy such as a hardcover book so it rests hands-free and parallel to the ground; this makes it easier to work with in the following steps.
-
Use a hair dryer to heat along the bottom edge of the iPhone. The screen should feel slightly too hot to touch.
-
Wait one minute to give the adhesive a chance to release and present an opening gap.
-
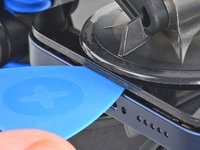
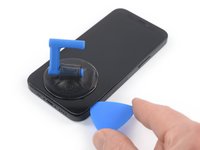
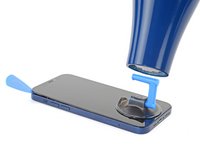
Insert an opening pick under the screen's plastic bezel when the Anti-Clamp creates a large enough gap.
-
Skip the next three steps.
-
-
-
Use a hair dryer or a heat gun to heat the bottom edge of the iPhone for 90 seconds or until the screen is slightly too hot to touch.
you need to clarify that you're heating the metal frame, not the glass. I gently heated the glass front with a heat gun and proceeded to pull the display apart, destroying it. :-(
-
-
-
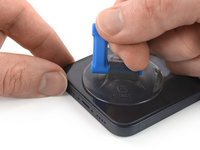
If you're using a single suction handle, apply it to the bottom edge of the phone, as close to the edge as possible.
-
If your display is badly cracked, covering it with a layer of clear packing tape may allow the suction cup to adhere. Alternatively, very strong tape may be used instead of the suction cup. If all else fails, you can superglue the suction cup to the broken screen.
I would recommend starting with a bottom corner, not the bottom middle. If the adhesive isn't softened enough, you will pull the middle out but the sides will still be stuck on, causing extreme flex to the panel and damage to the panel down the middle (white bars down the middle in a worst case). I did this to my phone.
-
-
-
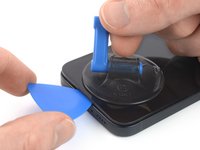
Pull up on the suction cup with firm, constant pressure to create a slight gap between the screen and the metal frame.
-
Insert an opening pick into the gap under the screen's plastic bezel.
I ended up separating my screen rather than getting under the scren casing.. BE CAREFUL TO MAKE SURE YOU ARE UNDER THE PLASTIC PART - otherwise you just ruin your screen... No mention of this precaution here and as a result, my phone is more broken than when I started
Hi, I don’t get it. Should the plastic part stay with the display or with the phone?
The plastic frame should stay with the display.
Broke the screen. Too bad. I've done maybe 5 battery replacements before. But this one is very very tight. Got a new phone. :P
Same thing, I broke my screen too. I think the warning should be in all caps and show more clearly where is the right place to put the pick and where is not — without the need to click on the link.
Judging by amount of people who reported it here (and should also account for those who didn't bother to report), I'd say that there is a problem with instructions.
It is honestly not so hard if you know what does mistake looks like and that it is possible to separate the screen so easily from the frame. I repaired more than a dozen phones — screens and batteries — and this is the first time I made such a mistake that costs 100+euros.
-
-
-
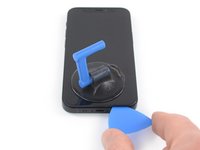
Use a hair dryer to heat the right edge of the iPhone (the edge with the power button) for 90 seconds or until the screen is slightly too hot to touch.
The pictures show the left side. I know that the left side is the correct one to heat, but for others it might be confusing. 😊
@dviosz You mean the right edge! The picture shows the left edge but the right edge is the correct one to heat. As described in the text next to it. Opening the phone from the left will damage it!
Yeah, sorry, you are right! (tried to make something less confusing and created more confusion by accident… 😃 )
THIS ONE HERE (lolz)
weebeast -
-
-
-
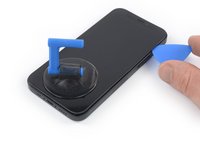
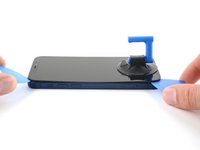
Slide the opening pick around the bottom right corner and along the right edge of the iPhone, slicing through the adhesive holding the display in place.
Be very careful your tool does NOT go in between the screen and the screen frame but rather in between the screen frame and the phone frame. If not you will damage the screen and need a new one. This has happened to MANY people. The screen is attached to the screen frame with an adhesive that can also be accidentally pried apart if not done carefully. This is probably more likely if your tool is too thin, if you dont heat enough, or dont suction and pull enough to create a big enough separation between the screen frame and the phone frame.
Yes, this happens to me, too. It took a long time until I could remove the screen using a heat gun with a heat gun set to 120°C (after trying first with 90° and 100°). Now the right side of the display shows white stripes and the touch doesn't react. -> New display necessary...
-
-
-
-
Use a hair dryer to heat the top edge of the iPhone for 90 seconds or until the screen is slightly too hot to touch.
-
-
-
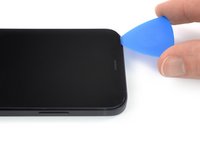
Insert your pick underneath the top-right corner of the display panel.
-
Slide the pick around the top right corner. Because of the clips you might encounter some resistance.
-
Slide the pick along the top edge and cut any remaining adhesive securing the display.
-
-
-
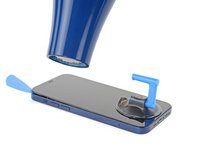
Use a hair dryer to heat the left edge of the iPhone for 90 seconds or until the screen is slightly too hot to touch.
-
-
Welches Ersatzteil benötige ich, wenn die obere Verbindung gerissen ist?
I accidentally tore the cables off. What can I do?
The display flexy is in the middle of the left side, please update the picture showing the flexy connected and highlight in red, so other users don't damage it as I did :(
Updated -- thank you! Does this look better?
-
-
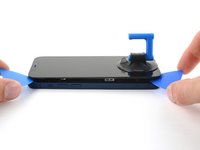
Insert a second opening pick in the bottom left corner of the iPhone.
-
Twist both picks simultaneously until the left edge clips release.
Don't go from just one corner (like on the right side). I've done that (forgot this step) and broke my screen.
-
-
-
Rotate your iPhone so the right edge faces you.
-
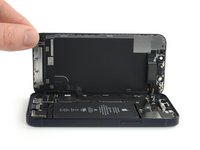
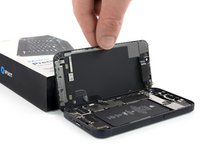
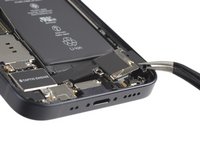
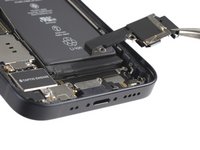
Open the iPhone by swinging the display up from the right side, like the front cover of a book.
-
Lean the display against something to keep it propped up while you're working on the phone.
-
-
Инструмент, используемый на этом этапе:Magnetic Project Mat$19.95
-
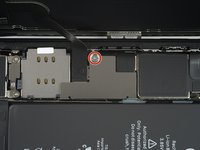
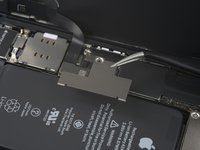
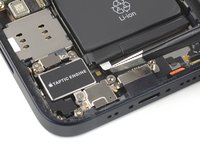
Remove the 1.25 mm-long Y000 screw securing the battery & display connector cover bracket.
hallo, ich sehe in Schritt 17 nur EINE markierte Schraube... (?)
This Shield is garbage and once it's taken out it's next to impossible to get back in. I'm not even going to put the shield back in I'm just going to put kapton tape over it and call it good.
-
-
Инструмент, используемый на этом этапе:Tweezers$4.99
-
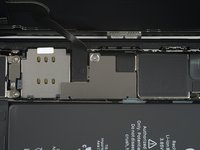
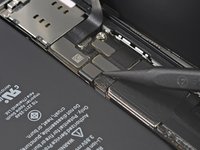
Use a pair of tweezers to remove the battery & display connector bracket.
-
-
-
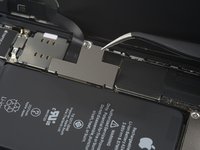
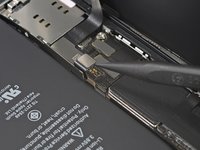
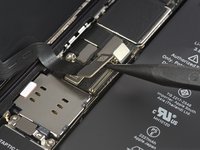
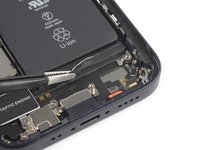
Use a spudger or a clean fingernail to pry the battery connector up from its socket on the logic board.
-
Bend the connector slightly away from the logic board to prevent it from accidentally making contact with the socket and providing power to the phone during your repair.
-
-
-
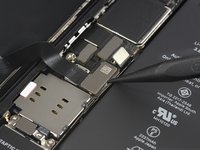
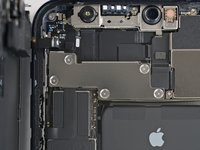
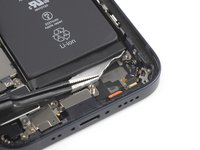
Use a spudger or a clean fingernail to pry the OLED panel cable connector up from its socket on the logic board.
-
-
-
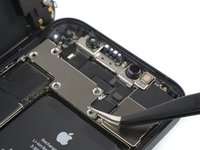
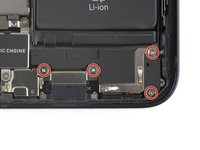
Remove the five 1 mm-long Y000 screws securing the front sensor assembly cover bracket.
what 3 are the small ones? I don't know anymore
in case anyone else reads this, the 3 small ones screw directly onto the board. the two longer ones screw into standoffs (the two top screws, based on the picture above)
Skyejobs -
-
-
-
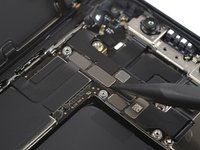
Use a spudger or a clean fingernail to disconnect the front sensor assembly cable connector.
-
-
-
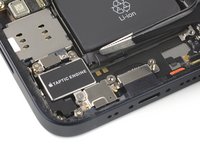
Remove the four 1.5 mm-long Phillips #000 screws securing the speaker.
-
-
Инструмент, используемый на этом этапе:Tweezers$4.99
-
Use a pair of tweezers to remove the speaker.
-
-
-
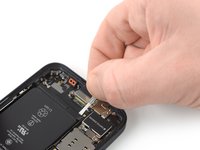
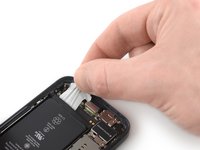
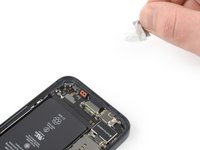
Peel down the first battery adhesive pull-tab to un-stick it from the bottom edge of the battery.
-
-
Инструмент, используемый на этом этапе:Tweezers$4.99
-
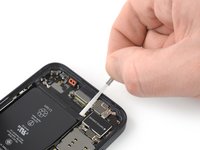
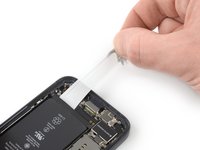
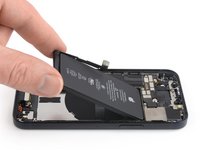
Grab the pull tab with your fingers and slowly pull it away from the battery, toward the bottom of the iPhone.
-
Pull hard enough to maintain tension on the strip, but don't force it. Give it plenty of time to stretch and un-stick from under the battery.
-
Don't press down on the battery. Hold the iPhone firmly by its sides.
-
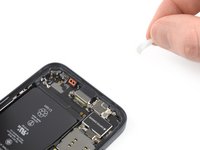
Keep the strip flat and unwrinkled. Try to pull evenly on the whole strip, rather than pulling mainly in the middle or on one side.
-
Pull at a low angle so the strip doesn't snag on the edge of the battery.
-
If the adhesive strip breaks off, try to retrieve it using your fingers or blunt tweezers, and continue pulling—but do not pry under the battery.
-
-
-
Grab the wide pull tab with your fingers and slowly pull it away from the battery, toward the bottom of the iPhone.
-
-
-
Grab the pull tab with your fingers and slowly pull it away from the battery, toward the bottom of the iPhone.
-
Repeat the previous procedure on the two remaining pull tabs.
-
Wait about one minute for the alcohol solution to weaken the adhesive.
-
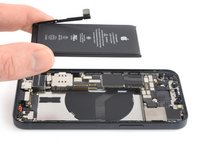
Use the flat end of a spudger to gently lift the battery.
-
-
-
Remove the battery.
-
If there's any alcohol solution remaining in the phone, carefully wipe it off or allow it to air dry before installing your new battery.
I just buy this phone 5 months ago..and the battery health is 90%, why? I need to change the battery or not?
**before you install the new battery, plug the battery into the port, making it much easier to do than after you adhere the new battery into the phone. I found that the aftermarket battery terminal was longer than the factory batt, which complicated plugging it into the power terminal.
Soooo absolutely dont do this yourself🙌🏽 unless your a mechanic because first of all they didnt send me all of the right tools🤗 and secondly the battery they gave me has an overly large component so it wont fit into my phone. And the absolute HASSEL i had to go through to even just get the package was insane it was a whole month of struggling just for the stuff to not even be right, in conclusion will NEVER order from here again..🤗
-


If possible, turn on your device and test your repair before installing new adhesive and resealing.
Secure the new battery with pre-cut adhesive or double-sided adhesive tape. In order to position it correctly, apply the new adhesive into the device at the places where the old adhesive was located, not directly onto the battery. Press the new battery firmly into place.
To reassemble your device, follow the above steps in reverse order. Apply new adhesive where necessary after cleaning the relevant areas with isopropyl alcohol (>90%).
After your repair, depending on the replacement part, you may be able to calibrate it using Apple's Repair Assistant, available as of iOS 18. Update your device, navigate to Settings → General →About → Parts & Service History, tap Restart & Finish Repair, and follow the onscreen prompts.
For optimal performance, after completing this guide, calibrate your newly installed battery.
Take your e-waste to an R2 or e-Stewards certified recycler.
Repair didn’t go as planned? Try some basic troubleshooting, or ask our iPhone 12 mini Answers community for help.
Отменить: Я не выполнил это руководство.
78 человек успешно провели ремонт по этому руководству.


19 Комментариев
If you replace the battery (even with a first party one) you will need to go to Apple, unfortunately, as is for the new iPhone 13 models.
Since iOS 17, I believe, they have a self-registering mechanism. OS will start a wizard to register replaced first-party battery without going to the store
rbhbokka -
I don't think it's stated clearly enough that the display adhesive is VERY strong and you might think you've gotton a big enough gap when sticking in a pick will actually separate the layers of the screen and break it (defintely not speaking from experience). Make sure the phone is totally, thoroughly heated and be very, very careful.
+1
Tried it without the clamp for two hours and couldn‘t get it open. With clamp, it was opened within 30 minutes.
Overall battery replacement worked well, the instructions were clear enough to follow along. Would do this again… but with the clamp. ;)
same pried in between layer and then realized after after i separated the bottom corners that needed to go deeper
This comment should be pinned to the top of this article / this scenario pinned in bright red... I've replaced previous iphone screens and it was nothing like this. I also ruined my screen by prying in between the screen layers and not underneath as I could not comprehend just how insanely strong the adhesive is even after many rounds of heating. Give the ~100$ cost of apple repair and the 50$ cost of this kit, i would NOT risk doing this repair, no way.
Hi karim,
the batteries that you can buy for iPhones in our shop are not OEM.
you should always ask the shop where you go if you will receive a warning message saying the battery was not changed by apple. unless the shop knows how to properly install the right batteries, you will get that message.
I have a problem every time I soldered the cell to the new battery it no longer works could you help me with a tip!!! I've been watching the video more than 100 times I'm interested in learning, but even so the original flex burns
Ich habe bereits einige Akkus getauscht. Aber das Display vom 12 mini ist wirklich heftig verklebt. Ich habe kaputt gemacht.. keine Chance. Durch das erwärmen hat sich das Glas von der Platine gelöst oder ich habe es durchs hebeln getrennt.. Jedenfalls zeigt das Display nichts mehr an. Also nochmal der Hinweis. Überlegt es euch gut! evtl sind 99€ für einen Akkutausch bei Apple besser investiert.
Don't do this repair, just don't. The battery adhesive is very strong, but that's not the problem. When you finally get the battery replaced, you will have a permanent badge notification on your settings app that indicates that you are not using an OEM battery. But that's not even the problem. When I did this repair, I was connecting the new battery and sparks and smoke came out, and now my screen has a line across it. Obviously this is user error to an extent, but I have replaced iphone batteries around 15 times, no exageration, and I've been WAY rougher than I was in this case and nothing bad happened. I still have no idea what I did to make this happen, I can guarantee the battery connector only touched the area on the board where it was supposed to connect. I couldn't tell you if this is because it's not an OEM battery, or if Apple is making these phones more fragile on the inside (though I suspect it's a bit of both), but ultimately it's just not worth it do attempt this repair, go to an Apple store.
This is a solid guide. I was able to replace my battery with the fix kit and these instructions. Unfortunately, I destroyed my display in the process. Probably the same issue that Wesley pointed out here.
I'm guessing I didn't have the adhesive loosened enough along the right-hand side. I was sliding the pick up along that edge, apparently hulked out on it, and a crack shot across the screen. I applied more heat and carried on from there. Once everything was reconnected, I hit the power button and could feel the haptic feedback from the phone booting up, but there was nothing on the display.
Learn from my mistake and be absolutely sure the adhesive is softened enough that you don't have to apply much force to separate the screen from the body (and maybe pick up the Anti-Clamp, I think I would have had a better time with that thing).
I performed this repair twice. First time, I damaged the screen slightly before realizing the thin plastic frame around the screen was not coming up. If you are not sure you are getting the pick under the plastic, then don’t proceed. Take more time to heat and suction. On the second iPhone I pulled out the infrared thermometer, turned my hairdryer to max and kept the iPhone at a nice toasty 140 degrees Fahrenheit while letting the Anti-Clamp do it's work. Still took slightly over 30 minutes to get the screen off. The extra heat also seemed to help keep the screen adhesive stay in good shape and attached to the base. I did not feel the need to replace it which saved me an hour.
First time success. Display damage can be caused only if you are not patient enough and apply force uneven, screen glass is as strong as the adhesive, if adhesive is warm enough, screen will come out with just constant tension.
Tricky part is to remove all leftovers of adhesive, in my case most of it left inside of the case and needed a lot of alcohol to clean it fully.
iFixit, you need to update this tutorial with better warnings. Kinda feel like you glossed over the difficulty to sell your kit.
Like others have said, this is REALLY tough. Do not recommend. Busted my screen — I believe I didn't get the pick under the plastic, so it tore some parts when I opened it. I'd recommend ONLY trying this if you're willing to break your phone.
I think they should include the whole process of taking apart AND PUTTING BACK TOGETHER. The cleaning of the old gasket took almost 2HOURS TO REMOVE, THIS IS THE SECOND IPHONE I HAVE WORKED ON WITH IFIXIT. PART OF THE PROCESS SHOULD BE PUTTING BACK TOGETHER AND WAY TO CLEAN OLD SCREEN GASKET, IF THIS KEEPS UP I WILL START USING YOU TUBE ONLY FROM NOW ON!!!!!
is it oem apple battery, because at some photo shows(Ifixit) and another shows (apple) ... wait your answer?
karim - Ответить
BEWARE! This screen isn’t the same as older iPhone models’ screens. The iPhone mini 12-screen comes with a thin plastic frame around the screen on its back. Thus, make sure you don’t insert the pick in between the screen and its plastic frame, as you’ll seperate the screen and leave the plastic frame still sitting in the phone’s metal housing (this cost me 100 dollars…). Carefully heat the sides of the metal housing and do not heat directly on the glass, as doing so will potentially loosen the glue from the plastic frame stuck to the screen. My suggestion is that you watch a video of this repair as this step-by-step-guide is undercooked.
Dan - Ответить
This is an excellent comment. Following this step-by-step guide to the letter will break your screen; it's by far the worst iFixit guide I've seen to date.
Dormouse -
Ive finished mine and Soooo absolutely dont do this yourself🙌🏽 unless your a mechanic because first of all they didnt send me all of the right tools🤗 and secondly the battery they gave me has an overly large component so it wont fit into my phone. And the absolute HASSEL i had to go through to even just get the package was insane it was a whole month of struggling just for the stuff to not even be right, in conclusion will NEVER order from here again..🤗
Chanell - Ответить