
iPod Nano 6th Generation Front Panel Assembly Replacement

Введение
Перейти к шагу 1Use this guide to replace your Nano's front panel assembly. A new front panel assembly will provide a new front glass panel, digitizer, and LCD. The LCD is non-separable from the digitizer.
Выберете то, что вам нужно
Запчасти

Инструменты


Показать больше…
-
-
Use a heat gun or hair dryer to soften the adhesive securing the perimeter of the front panel assembly to the outer case.
-
-
-
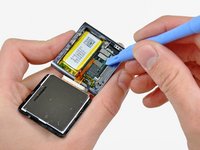
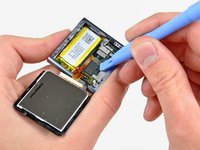
While the front panel is still warm, use the edge of an opening tool to pry it from the headphone jack side of the front panel assembly out of the Nano.
-
Continue prying the perimeter of the front panel assembly out of the outer casing, being careful not to damage the display data cable held under its left edge.
I strongly recommend using a Small Suction Cup (IF145-019-1) instead of a plastic opening tool.
After half an hour of various heating times, trying to use a plastic opening tool, I overheated the LCD, which caused it to discolour. Now I need to buy a new screen. I wish I'd thought to use a suction cup earlier; it seems so obvious in retrospect.
We have a temperature controlled testing oven at work. I set the oven for 50 degrees C, let it absorb heat for half an hour, then took it out. I had zero luck with either the plastic pry tool or the suction cup, so I carefully pried up the indicated side with the sharp pointed tip of a dental pick until I could get the plastic tool into the crack opening.
-
-
-
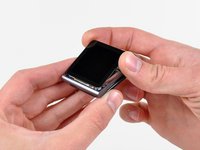
Lift the front panel assembly from the headphone jack side of the Nano.
-
Pull the front panel assembly slightly away from the left side of the Nano to clear the display data cable.
-
-
-
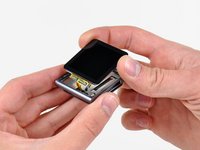
Lay the front panel assembly next to the Nano.
-
Remove the following two screws:
-
One 2.3 mm Phillips screw
-
One 2.6 mm shouldered Phillips screw
-
-
-
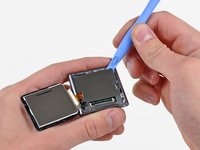
Use an opening tool to pry the steel shield out of the Nano by its upper right corner.
-
Remove the steel shield from the Nano.
-
-
-
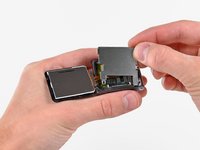
Use an opening tool to disconnect the display data and digitizer cable connectors up from their sockets on the logic board.
-
-
-
Remove the front panel assembly, minding its two cables that may get caught.
How come you did not put back the metal plate that goes between the iPod and the display?
-


To reassemble your device, follow these instructions in reverse order.
To reassemble your device, follow these instructions in reverse order.
Отменить: Я не выполнил это руководство.
120 человек успешно провели ремонт по этому руководству.

10 Комментариев
Don't forget to include in your repair the adhesive to hold the new screen on. It does not come with the new display. I as unable to find it at iFixit's site but was able to get it here for $10 incl p&p: http://www.badgizmorepair.com/product/ip...
By the time I paid for the screen, opening tool and glue it turned out to be more economical and less hassle to take it to the Apple store (albeit less satisfying than doing it yourself). I suggest you forego the opening tool if you have a good flat blade jewelers screwdriver. A fine temporary fix for not having the correct screen glue is a piece of packing tape. It leaves the iPod open to the elements though, so I highly recommend the correct glue in order to avoid water leaking in around the edge of the screen.
You will also need a very small jewellers or electronics screwdriver for the two screws. I just managed it with an oversized flathead driver.
i had bought these part and succeeded in repair my drown ipod using these guides (luckily only the lcd that didnt work). and it work nicely. thanks
Thanks for the guide. Very useful and easy to follow.
Had some issues with getting the screen off initially, but that was due to the glass along the headphone jack side being cracked into several small little shards (hence the reason for following the guide ;)
Used a replacement screen (incl. toolkit and replacement precut adhesive) that I purchased from ebay for around US$10 (free shipping).
Simple as that? You know what sucks about an incomplete repair description - is the incomplete thinker that posted it. There is nothing on here about what insulators remain, nothing about sequencing the reassembly, nothing about adhesive, etc...
Get your $@$* together and compete your how-to you half ass.
This guide is useless. I removed the screen but cant get the flex / IC cable from the LCD back in place with these adhesive.
Yeah, took about ten minutes, really easy
Followed directions, used iFixit tools I had previously purchased, worked flawlessly. One bit of struggle while reattaching the larger of the two ribbon cables (the orange/brown one): took a bit of work to get it aligned properly to the tiny socket. Old eyes and fat fingers most likely. I used thin black tape I had purchased for another screen replacement (I believe it is referenced and may be sold on this site). Did a great job of reattaching the screen without using glue. Glad I could salvage this iPod Nano 6th gen. Apple doesn’t repair them anymore and it is a terrific form factor for music and FM radio on the go. Now let’s see how long the battery will hold out. That replacement might be beyond my skillset.
Do I need new adhesive to reassemble?
David Wallin - Ответить
Make sure to not break this cable even if your backlight is out, there can be internal corrosion that prevents the backlight from working. It may still work with the old display.
Matthew Borgholthaus - Ответить