Введение
Перейти к шагу 1There are many small parts to this tear-down and are specific to they way they are positioned. Make sure you remember how they are set before you remove them.
Выберете то, что вам нужно
Инструменты

-
-
There are four screws located on the bottom of the controller. Located right above the bottom left screw is a reset switch, in case you need to re-sync the device to your PlayStation console.
-
-
-
There is one ribbon cable connecting the two trigger buttons to the main board. It is easily removed with a little tug.
-
-
-
There is one more ribbon cable connecting the d-pad and can be unplugged the same as the first.
-
The battery is easily removed and is the same type used in the PlayStation Move Wand.
-
-
-
There are four more screws which hold the joystick in place and white ribbon cable that is soldered in place on both sides, which allows for some flexibility, but cannot be removed without the rest of the board.
-
Note the seperated button off to the side, which is the plunger for the reset button directly to the right of it.
-
-
-
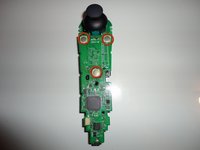
This is the main board separated from the casing the plastic head on the joystick is removable but the control is soldered to the board.
-
The base charging input is detachable, but the USB circuit is part of the main board.
-
On the second included picture you can see the three points that are the contacts for the X, O and PlayStation buttons.
-
-
-
The casing reveals the primary buttons for the navigation controller.
-
The top two buttons are for the X and O which only have a piece of white plastic covering the buttons.
-
Just below is the cover for the d-pad. It will reveal underneath a the same type of plastic with a ribbon circuit sandwiched in between the hard plastic and the d-pad buttons on protruding from the casing.
-
In the middle is the PlayStation button, and like the X and O buttons. Only has the white plastic piece in between that and the board.
-
Finally, at the very bottom is the piece that extends the red power light to the outside of the case. the joiner is removable and can easily fall out so try not to lose it.
-
-
-
When putting back together, do not forget the reset switch button.
-
Make sure You Put it in correctly, since it may seem like the device is dead if you put it back in wrong.
-
-
-
This is the full tear-down view if you need a reference to the parts in case you might be missing or have an extra part when you are done.
-


2 Комментариев
The d'pad on my pa move navigation ins't working, someone could know what issue is?