
Lenovo ThinkPad X1 Carbon 7th Gen Battery Replacement

Введение
Перейти к шагу 1Use this guide to replace the battery in your Lenovo ThinkPad X1 Carbon 7th Gen Laptop.
For your safety, discharge the battery below 25% before disassembling your device. This reduces the risk of fire if the battery is accidentally damaged during the repair. If your battery is swollen, take appropriate precautions.
Выберете то, что вам нужно
Ремонтный комплект
Этот комплект содержит все детали и инструменты, используемые в руководстве.

Запчасти

Инструменты


Показать больше…
-
-
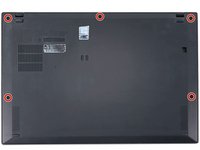
Use a Phillips #1 screwdriver to loosen the five captive screws securing the back cover.
-
-
-
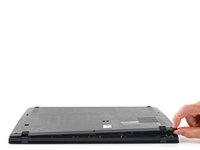
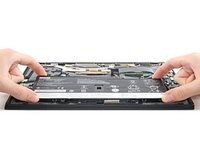
Insert an opening pick at a 45˚ angle between the back cover and frame near the rear middle screw.
-
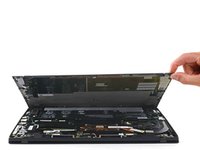
Pry up on the pick to release the clips securing the back cover to the frame.
-
-
Инструмент, используемый на этом этапе:Tweezers$4.99
-
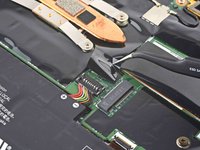
Use tweezers or your fingers to peel back the plastic shield covering the battery connector.
-
-
-
Use the flat end of a spudger to pry up on and disconnect the battery cable.
-
-
-
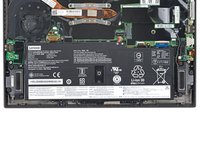
Use a Phillips #0 screwdriver to remove the six 4.9 mm-long screws securing the battery.
-


To reassemble your device, follow these instructions in reverse order.
For optimal performance, calibrate your newly installed battery after completing this guide.
Take your e-waste to an R2 or e-Stewards certified recycler.
Repair didn’t go as planned? Try some basic troubleshooting, or ask our Answers community for help.
Отменить: Я не выполнил это руководство.
20 человек успешно провели ремонт по этому руководству.


10 Комментариев
Thank you for the post! My laptop battery is totally dead, not charging at all at 0%, so I cannot disable the built-in battery. Since it immediately dies if unplugged, the built-in battery is automatically enabled while it’s turned on and plugged. Can I just let it unplugged and proceed?
You should still be able to access BIOS with the laptop plugged into its charger to disable the battery before unplugging it and removing it. However, if that does not work, just be careful not to bridge any of the pins the battery connects to on the motherboard and everything should still be fine.
The X1 g.7 has a known bug where internal battery stops working (won’t charge, or says battery not detected in windows). I have personally solved this problem on 4-5 laptops by disconnecting the battery (follow this guide until step 4) and then plugging it back in after ten seconds. In 90% of the cases this has solved the problem without battery replacement.
Yeah it's a hardware connection issue at least in my case. A light kick to the back of the laptop also works usually.
Thanks! This has been very helpful. Just followed the steps until removing the battery connector and putting it back. Issue sorted!
kj_only1 -