Перейти к основному содержанию
Присоединяйся к сообществу ремонтников - Создай аккаунт

Nintendo Switch Heat Sink Replacement

Выберете то, что вам нужно

  1. Nintendo Switch Heat Sink Replacement, Release the Joy Con controller locking tabs: шаг 1, изображение 1 из 3 Nintendo Switch Heat Sink Replacement, Release the Joy Con controller locking tabs: шаг 1, изображение 2 из 3 Nintendo Switch Heat Sink Replacement, Release the Joy Con controller locking tabs: шаг 1, изображение 3 из 3
    • Before you begin this repair, make sure the device is completely powered off.

    • Press and hold down the small round button on the back of the Joy Con controller.

    • While you hold down the button, slide the controller upward.

    Спросите у FixBot

    Добавить комментарий

  2. Nintendo Switch Heat Sink Replacement, Remove the Joy Con controllers: шаг 2, изображение 1 из 3 Nintendo Switch Heat Sink Replacement, Remove the Joy Con controllers: шаг 2, изображение 2 из 3 Nintendo Switch Heat Sink Replacement, Remove the Joy Con controllers: шаг 2, изображение 3 из 3
    • Continue sliding the Joy Con upward until it's completely removed from the console.

    • Repeat this same process for the other Joy Con.

    Спросите у FixBot

    Добавить комментарий

  3. Nintendo Switch Heat Sink Replacement, Remove the back-side screws: шаг 3, изображение 1 из 1
    Инструмент, используемый на этом этапе:
    Magnetic Project Mat
    $16.96
    • Use a Y00 screwdriver to remove the four 6.3 mm-long screws securing the rear panel.

    • Throughout this repair, keep track of each screw and make sure it goes back exactly where it came from.

    • If you do happen to strip one of the four 6.3 mm-long Y00 screws, If you are lucky and careful, you may be able to use a Y0 bit to remove the screw(s). Please note that if you do attempt this, a bit of extra pressure will need to be applied to the screwdriver so that the screwdriver bit catches the screw.

    • If you do end up removing the stripped screw with this method, PLEASE do not reuse the screw again and instead replace the screw.

    Спросите у FixBot

    Добавить комментарий

  4. Nintendo Switch Heat Sink Replacement, Remove the top and bottom screws: шаг 4, изображение 1 из 2 Nintendo Switch Heat Sink Replacement, Remove the top and bottom screws: шаг 4, изображение 2 из 2
    • Use a JIS 00 driver to remove the following screws securing the rear panel:

    • One 2.5 mm-long screw on the top edge of the device

    • Two 2.5 mm-long screws on the bottom edge of the device

    • To prevent these tight screws from stripping, apply firm downward force, work slowly, and try another JIS 00 driver if the screws won't come out. Make sure the driver is fully inserted.

    • You can use a Phillips #000 screwdriver in a pinch, but you risk damaging or stripping the screws. Push down firmly on the screwdriver and twist slowly. Often, switching drivers may help, even if they are the same size.

    Спросите у FixBot

    Добавить комментарий

  5. Nintendo Switch Heat Sink Replacement, Remove the center side screws: шаг 5, изображение 1 из 2 Nintendo Switch Heat Sink Replacement, Remove the center side screws: шаг 5, изображение 2 из 2
    • Use a JIS 00 driver to remove the two 3.8 mm center screws on the sides of the device (one on each side).

    Спросите у FixBot

    Добавить комментарий

  6. Nintendo Switch Heat Sink Replacement: шаг 6, изображение 1 из 2 Nintendo Switch Heat Sink Replacement: шаг 6, изображение 2 из 2
    • Use your finger to flip up the kickstand on the back of the device.

    • If there's a microSD card in the microSD card slot, remove it now before you continue to the next step.

    Спросите у FixBot

    Добавить комментарий

  7. Nintendo Switch Heat Sink Replacement, Remove the kickstand well screw: шаг 7, изображение 1 из 1
    • Use a JIS 00 driver to remove the 1.6 mm screw in the kickstand well.

    • Close the kickstand.

    Спросите у FixBot

    Добавить комментарий

  8. Nintendo Switch Heat Sink Replacement, Remove the rear panel: шаг 8, изображение 1 из 3 Nintendo Switch Heat Sink Replacement, Remove the rear panel: шаг 8, изображение 2 из 3 Nintendo Switch Heat Sink Replacement, Remove the rear panel: шаг 8, изображение 3 из 3
    • Open the game card cartridge flap.

    • The game card cartridge flap attaches to the other half of the plastic shell, preventing you from completely lifting up the rear panel if it's closed.

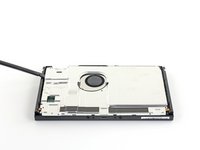
    • Lift the rear panel straight up from the bottom of the device and remove it.

    • Don't tilt it upwards while opening or else you risk breaking the plastic tabs on the top edge of the panel.

    Спросите у FixBot

    Добавить комментарий

  9. Nintendo Switch Heat Sink Replacement, Remove the microSD card reader: шаг 9, изображение 1 из 1
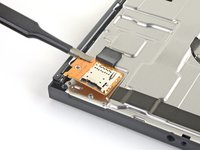
    • Use a JIS 00 driver to remove the 3.1 mm screw securing the microSD card reader to the device.

    Спросите у FixBot

    Добавить комментарий

  10. Nintendo Switch Heat Sink Replacement: шаг 10, изображение 1 из 2 Nintendo Switch Heat Sink Replacement: шаг 10, изображение 2 из 2
    Инструмент, используемый на этом этапе:
    Tweezers
    $4.99
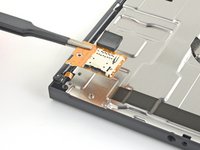
    • Use your fingers or a pair of tweezers to lift the microSD card reader straight up from the device to disconnect and remove it.

    • During reassembly, remove the foam pad before connecting the press connector to the motherboard. Set the foam pad back in place after you verify it's connected.

    Спросите у FixBot

    Добавить комментарий

  11. Nintendo Switch Heat Sink Replacement, Remove the shield plate: шаг 11, изображение 1 из 1
    • Use a JIS 00 driver to remove the six 3 mm screws securing the shield plate to the device.

    Спросите у FixBot

    Добавить комментарий

  12. Nintendo Switch Heat Sink Replacement: шаг 12, изображение 1 из 2 Nintendo Switch Heat Sink Replacement: шаг 12, изображение 2 из 2
    Инструмент, используемый на этом этапе:
    Tweezers
    $4.99
    • If the console doesn't have this foam, skip this step.

    • Use your fingers or a pair of tweezers to peel back the piece of foam on the top edge of the device near the fan exhaust port.

    • If the foam doesn't easily peel away, don't force it as it might end up tearing. Carefully peel at different spots to pull back the foam.

    Спросите у FixBot

    Добавить комментарий

  13. Nintendo Switch Heat Sink Replacement: шаг 13, изображение 1 из 3 Nintendo Switch Heat Sink Replacement: шаг 13, изображение 2 из 3 Nintendo Switch Heat Sink Replacement: шаг 13, изображение 3 из 3
    Инструмент, используемый на этом этапе:
    iFixit Thermal Putty
    $9.95
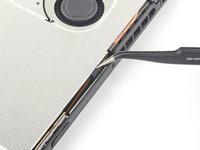
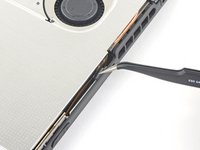
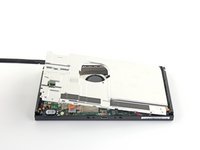
    • Insert a spudger underneath the shield plate along the edge of the device.

    • Pry up to lift the shield plate and remove it from the device.

    • You may feel a bit of resistance. This is normal, since the shield plate is slightly bonded to the heat sink with thermal paste.

    • A thick pink thermal compound bridges the gap between the shield plate and the copper heat sink underneath. This helps prevent the Switch from overheating.

    • During reassembly, if you don't have replacement thermal compound, use the flat end of a spudger to distribute the old compound evenly across the heat pipe, as thick as possible to ensure proper contact. Repeat this process on the shield plate.

    • If you need to replace it, refer to our thermal paste guide to remove the old thermal compound and replace it with an appropriate compound, such as thermal putty or K5 Pro, during reassembly.

    Спросите у FixBot

    Добавить комментарий

  14. Nintendo Switch Heat Sink Replacement, Disconnect the battery: шаг 14, изображение 1 из 2 Nintendo Switch Heat Sink Replacement, Disconnect the battery: шаг 14, изображение 2 из 2
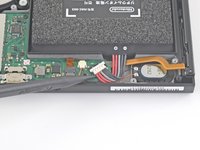
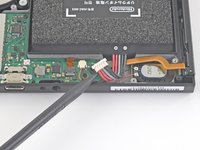
    • Use the point of a spudger to pry the battery connector straight up and out of its socket on the motherboard.

    Спросите у FixBot

    Добавить комментарий

  15. Nintendo Switch Heat Sink Replacement, Remove the heat sink: шаг 15, изображение 1 из 1
    • Use a JIS 00 driver to remove the three 3 mm screws securing the heat sink to the motherboard.

    Спросите у FixBot

    Добавить комментарий

  16. Инструмент, используемый на этом этапе:
    iFixit Adhesive Remover
    $19.99
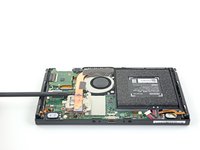
    • Carefully peel the two foam pieces stuck over both the heatsink and the fan away from the fan.

    • The foam only needs to be peeled back enough to clear the fan.

    • The foam is really delicate and tears easily. Use the following technique to peel the foam:

    • If you have some, dip the point of a spudger in adhesive remover or isopropyl alcohol (90% or greater).

    • Insert the point of a spudger underneath a part of the foam that isn't stuck to anything.

    • Press the top of the foam with your finger to hold it in place.

    • Roll the spudger tip underneath the foam all the way to the other end of the foam to release it.

    Спросите у FixBot

    Добавить комментарий

  17. Nintendo Switch Heat Sink Replacement: шаг 17, изображение 1 из 3 Nintendo Switch Heat Sink Replacement: шаг 17, изображение 2 из 3 Nintendo Switch Heat Sink Replacement: шаг 17, изображение 3 из 3
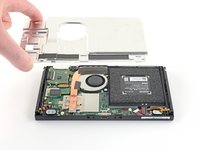
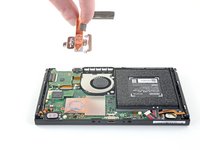
    • Use a spudger or your fingers to lift the heatsink up and off the motherboard to remove it.

    • You may feel a bit of resistance. This is normal, since the heat sink is slightly bonded to the CPU with thermal paste.

    • Clean off the old thermal paste from the heat sink and CPU using high-concentration (90% or higher) isopropyl alcohol and a microfiber cloth. Apply new thermal paste to the CPU before reassembly. Don't reuse the old thermal paste.

    • Apply thermal paste to all surfaces that had thermal paste applied previously. This includes between the heatpipe and aluminum shield, which the Switch uses as additional heatsinking.

    Спросите у FixBot

    Добавить комментарий

Заключение

Compare your new replacement part to the original part. You may need to transfer remaining components or remove adhesive backings from the new part before installing.

To reassemble your device, follow these instructions in reverse order.

Take your e-waste to an R2 or e-Stewards certified recycler.

Repair didn’t go as planned? Try some basic troubleshooting, or ask our Nintendo Switch Answers community for help.

Отменить: Я не выполнил это руководство.

69 человек успешно провели ремонт по этому руководству.

Craig Lloyd

Участник с: 02/10/16

42 836 Репутация

Автор 82 руководств

10 Комментарии к руководству

I couldn’t even get past the first step because my screws were in so tight I made them threadbare trying to get them out. I did use the iFixit toolkit so I was using the right head but taking the screws out is not as easy as demonstrated lol

Nate Topical - Ответить Поделиться

same mines are stripped

Luigi Igii - Ответить Поделиться

Same happened to me :( I was able to file down the screwdriver I was given and it worked on three of the screws before they’d stripped too much. The fourth screw I couldn’t remove so I was able to slightly bend and turn the backing enough to access the fan. I also wasn’t able to peel the tape back without it completely disintegrating. Haha guess I don’t have the magic touch.

Angela Evans - Ответить Поделиться

Do you need the K5 thermal peas or is the Arctic silver 5 thermal paste enough?

Carlos O - Ответить Поделиться

You just need a good thermal paste

Daniele Carminati - Ответить Поделиться

Добавить комментарий

Статистика просмотров:

За последние 24 часов: 21

За последние 7 дней: 231

За последние 30 дней: 1,088

За всё время: 109,152