Перейти к основному содержанию

Steam Deck Heatsink Replacement

Выберете то, что вам нужно

  1. Steam Deck Heatsink Replacement, Prepare your Steam Deck for disassembly: шаг 1, изображение 1 из 3 Steam Deck Heatsink Replacement, Prepare your Steam Deck for disassembly: шаг 1, изображение 2 из 3 Steam Deck Heatsink Replacement, Prepare your Steam Deck for disassembly: шаг 1, изображение 3 из 3
    • Turn on your Steam Deck and allow the battery to discharge below 25% before starting your repairs, as a charged lithium-ion polymer battery can be dangerous if accidentally punctured.

    • As an extra precaution, Valve recommends putting your Steam Deck into battery storage mode within the BIOS before starting any internal repairs. Read how to do that here.

    • Power down your Steam Deck and unplug any cables.

    • If you have a microSD card installed, make sure to remove it before opening the Steam Deck. If you attempt to remove the back cover with it still installed, it could snap right in half.

    • During your repair, it can be helpful at times to lay the Steam Deck face-down into its case to protect the thumbsticks and prevent wobble.

  2. Steam Deck Heatsink Replacement, Remove the back cover screws: шаг 2, изображение 1 из 1
    Инструмент, используемый на этом этапе:
    FixMat
    $36.95
    Купить
    • Use a Phillips driver to remove the eight screws securing the back cover:

    • Four coarse thread 9.5 mm-long screws

    • Four fine thread 5.8 mm-long screws

    • Despite the standards, Phillips screwdrivers can vary in size and shape—two drivers labeled as the same size may fit differently in the same screw. Use the size that fits the snuggest into the screw head.

    • Throughout this repair, keep track of each screw and make sure it goes back exactly where it came from to avoid damaging your Steam Deck.

  3. Steam Deck Heatsink Replacement, Unclip the back cover: шаг 3, изображение 1 из 2 Steam Deck Heatsink Replacement, Unclip the back cover: шаг 3, изображение 2 из 2
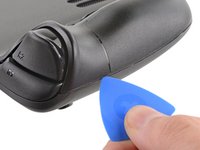
    • Insert an opening pick into the thin gap between the back cover and the front shell, along the edge of the right grip.

    • If you're having trouble inserting your pick at the grip seam, try starting at either the top or bottom long edges first, then slide the pick towards the grip.

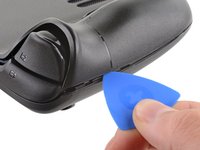
    • Pry up on the back cover to release it from the locking clips.

  4. Steam Deck Heatsink Replacement, Remove the back cover: шаг 4, изображение 1 из 3 Steam Deck Heatsink Replacement, Remove the back cover: шаг 4, изображение 2 из 3 Steam Deck Heatsink Replacement, Remove the back cover: шаг 4, изображение 3 из 3
    • Once the clips are disconnected from one edge, the rest disconnect easily.

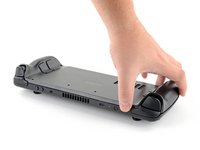
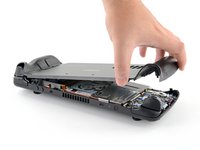
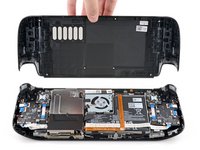
    • Grip the back cover at the opening you just created and pull it up and away from the device to unclip the long edges.

    • Remove the back cover.

  5. Steam Deck Heatsink Replacement, Uncover the hidden shield screw: шаг 5, изображение 1 из 2 Steam Deck Heatsink Replacement, Uncover the hidden shield screw: шаг 5, изображение 2 из 2
    • If you have a refreshed Steam Deck version with the black motherboard cover, skip this step.

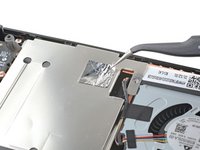
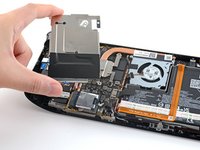
    • Use a pair of tweezers to remove the piece of foil tape covering the hidden screw on the board shield.

    • If possible, try not to rip or tear this tape so it can be reused. If necessary, you can fashion a replacement by cutting a piece of aluminum foil tape to fit.

  6. Steam Deck Heatsink Replacement, Remove the shield screws: шаг 6, изображение 1 из 2 Steam Deck Heatsink Replacement, Remove the shield screws: шаг 6, изображение 2 из 2
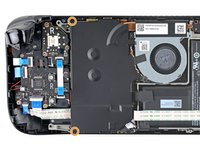
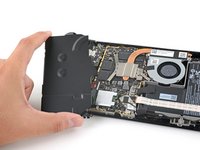
    • Use a Phillips driver to remove the three screws securing the board shield:

    • One 3.4 mm screw

    • Two 3.7 mm screws

    • Only the two 3.7 mm screws along the left edge are present in refreshed Steam Decks.

  7. Steam Deck Heatsink Replacement, Remove the shield: шаг 7, изображение 1 из 3 Steam Deck Heatsink Replacement, Remove the shield: шаг 7, изображение 2 из 3 Steam Deck Heatsink Replacement, Remove the shield: шаг 7, изображение 3 из 3
    • Remove the board shield.

    • Depending on the age of your Steam Deck, this shield may stick to the thermal pads underneath.

    • During reassembly, ensure that the fan cable lays on the side of the board shield and isn't pinched underneath.

  8. Steam Deck Heatsink Replacement, Disconnect the battery: шаг 8, изображение 1 из 3 Steam Deck Heatsink Replacement, Disconnect the battery: шаг 8, изображение 2 из 3 Steam Deck Heatsink Replacement, Disconnect the battery: шаг 8, изображение 3 из 3
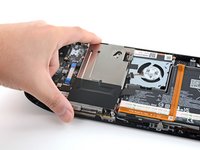
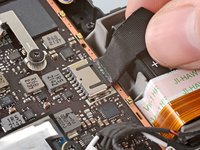
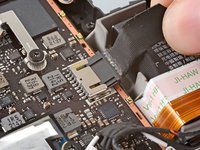
    • Grip the battery cable by its pull tab and pull it directly away from the motherboard to disconnect it.

    • Alternatively, use the flat end of a spudger or a clean fingernail to gently push the connector out of its socket, then disconnect it completely by hand.

  9. Steam Deck Heatsink Replacement, Remove the heatsink sticker: шаг 9, изображение 1 из 3 Steam Deck Heatsink Replacement, Remove the heatsink sticker: шаг 9, изображение 2 из 3 Steam Deck Heatsink Replacement, Remove the heatsink sticker: шаг 9, изображение 3 из 3
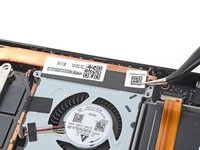
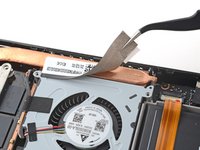
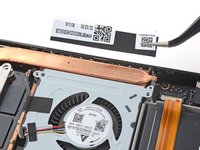
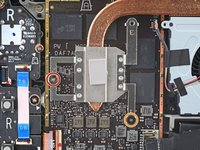
    • Use a pair of tweezers to remove the sticker from the top edge of the fan.

    • If possible, try not to rip or tear this sticker so it can be reused. Use a little bit of heat if necessary to soften the adhesive.

    • If the sticker feels like it might tear, use tweezers to peel up one edge just until you can grip it with your fingers, then remove the rest by hand.

  10. Steam Deck Heatsink Replacement, Remove the heatsink screws: шаг 10, изображение 1 из 2 Steam Deck Heatsink Replacement, Remove the heatsink screws: шаг 10, изображение 2 из 2
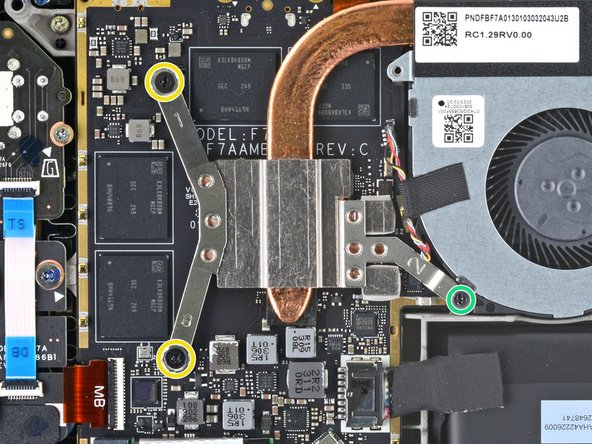
    • For original Steam Decks: Use a Phillips driver to loosen and remove the two screws securing the heatsink to the motherboard:

    • One captive 3.5 mm screw

    • One 3.4 mm screw

    • No, your eyes don't deceive you! The third heatsink screw was removed earlier in the disassembly: it doubles as the hidden board shield screw.

    • For refreshed Steam Decks: Use a Phillips driver to remove the three screws securing the heatsink to the motherboard:

    • Two 2.9 mm screws

    • One 3.7 mm screw

    • During reassembly on both versions, tighten these screws in order (1, 2, 3) as stamped into the heatsink.

  11. Steam Deck Heatsink Replacement, Remove the heatsink: шаг 11, изображение 1 из 3 Steam Deck Heatsink Replacement, Remove the heatsink: шаг 11, изображение 2 из 3 Steam Deck Heatsink Replacement, Remove the heatsink: шаг 11, изображение 3 из 3
    • Lift and remove the heatsink.

    • Before reinstalling the heatsink, follow this guide to clean the heatsink and APU and reapply thermal paste.

Заключение

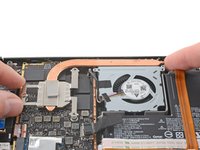
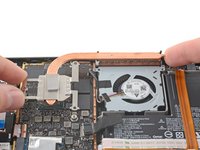
To reassemble your device, follow these instructions in reverse order.

Take your e-waste to an R2 or e-Stewards certified recycler.

Repair didn’t go as planned? Try some basic troubleshooting, or ask our Steam Deck answers community for help.

7 участников успешно повторили данное руководство.

Carsten Frauenheim

Участник с: 03/10/20

112 881 Репутация

Автор 338 руководств

Команда

iFixit Участник iFixit

Staff

135 членов

Автор 16 734 руководств

7 Комментариев

This was incredibly easy. I changed the thermal past for some MX-4 and saw a 3-5 degree decrease and quieter fan speeds!

Josh Schwab - Ответить

When will iFixIt sell the heatsink itself? I want another just in case.

Robert Smith - Ответить

Great guide I used Thermal Grizzly Kryonaut temps drop 8 C

Fan is super quiet

jaybush74 - Ответить

Does anyone know the full marking for the black screw marked with an orange circle. Since the head was damaged when unscrewing it, I would have to order the same one. What is the correct label? Thank you.

Pet Detective - Ответить

Is the heat sink going to be sold? Instructions to replace but no replacement to buy...

beavis5706 - Ответить

Добавить комментарий

Просмотр статистики:

За последние 24часов: 7

За последние 7 дней: 97

За последние 30 дней: 509

За всё время: 24,922