Введение
This guide will help you replace/upgrade the hard drive.
This guide also includes steps to upgrade your iMac's hard drive with a SSD. It describes how to install the SSD's temperature sensor so that the Mac's fans will operate at the correct speed.
Before beginning any work on your iMac: Unplug the computer and press and hold the power button for ten seconds to discharge the power supply's capacitors.
Be very careful not to touch the capacitor leads or any exposed solder joints on the back of the power supply.
Выберете то, что вам нужно
-
Инструмент, используемый на этом этапе:Heavy-Duty Suction Cups (Pair)$16.95
-
Stick a heavy-duty suction cup near each of the two top corners of the glass panel.
-
While lightly holding the suction cup against the glass, raise the movable handle until it is parallel with the other handle (as indicated by the third picture).
-
-
-
Gently lift the glass panel perpendicular to the face of the LCD, enough to clear the steel mounting pins attached along the underside of the top edge of the glass panel.
-
Pull the glass panel away from the lower edge of the iMac and carefully set it aside.
-
-
Инструмент, используемый на этом этапе:Tweezers$3.99
-
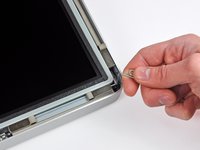
Carefully lay the iMac stand-side down on a flat surface.
-
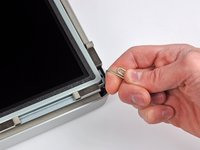
Use a thin hooked tool to lift one side of the top edge of the display by its steel outer frame.
-
Raise and hold the display high enough to access the cables.
-
-
-
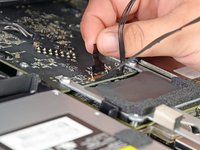
Disconnect the vertical sync cable in the upper left corner of the screen. Use the tip of a spudger to push on the connector's side tabs and gently walk it out of its socket.
-
-
-
Disconnect the LED backlight driver cable with your hand by pressing the tab down and sliding it towards the bottom of the display.
-
-
-
Pull the black tab straight up to disconnect the latch on the display data cable ZIF connector.
-
Continue to pull the black tab up toward the top of the device, to detach the display data cable.
-
-
-
Use the tip of a spudger to disconnect the display power cable next to the display data cable.
-
-
-
-
Carefully pull the display toward the top edge of your iMac and lift it out of the iMac case.
-
-
-
Lay the display face down on a flat, soft surface.
-
If there is a wire or cable underneath adhesive tape, always pull the tape off first. Do not pull on the cable directly.
-
If the cable is glued to the chassis, use a heated iOpener or a hair dryer to soften the adhesive first. You can then slide an opening pick underneath the cable to loosen it. Never pull on the delicate connectors.
-
Slide an opening pick underneath the foam cushion pieces to separate them from the display, and gently pull them off. You may need some double sided tape to re-attach them to the new display.
-
-
-
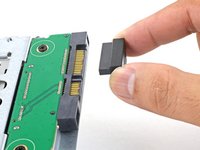
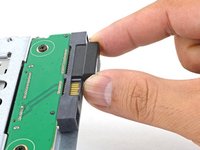
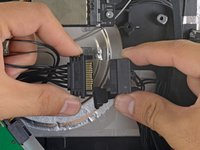
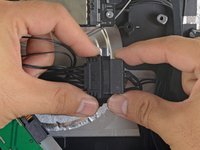
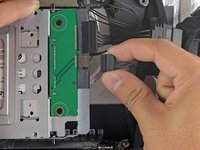
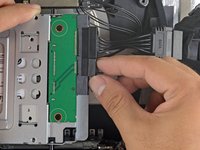
Disconnect the SATA power and data cables from the hard drive by pulling them straight away from the hard drive.
-
-
-
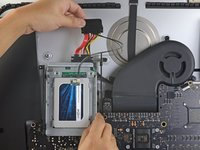
Remove the two T10 Torx screws securing the hard drive to the iMac frame.
-
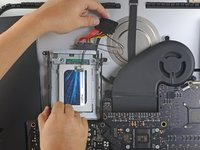
Slightly rotate the top edge of the hard drive away from the outer case.
-
Lift the hard drive off its two lower positioning pins and remove it from the outer case.
-
-
-
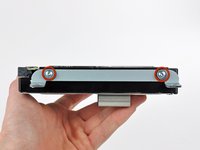
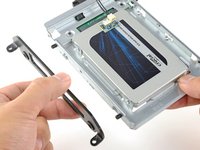
Remove the two T8 Torx screws securing the upper bracket to the hard drive.
-
Remove the upper bracket from the hard drive.
-
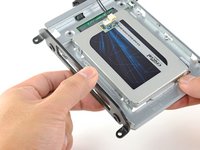
Remove the two T8 Torx pins from the other side of the hard drive.
-
-
-
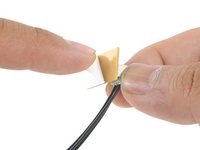
Carefully peel off the piece of EMI foam attached to the front of the hard drive.
-
-
-
Line up the SSD connectors with the metal enclosure's sockets.
-
Press the drive against the enclosure sockets until the SSD is firmly seated.
-
-
-
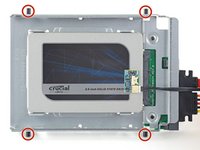
Use a Phillips screwdriver to install the four silver screws (two on each side) along the edges of the SSD to secure it to the enclosure.
-
-
-
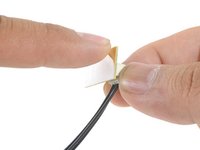
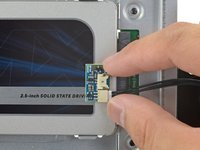
Peel the white liner off the back of the small temperature sensor board in order to expose the adhesive.
-
Adhere the temperature sensor board to an exposed, metal surface of the SSD, close to the SATA connector.
-
Fold the excess temperature sensor wires so that they are out of the way while you install the enclosure.
-
-
-
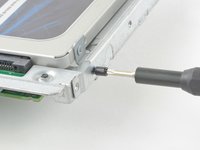
Use a T8 driver to install the mounting pins from the old hard drive onto the sides of the enclosure.
-
-
-
Attach any mounting brackets removed from the old hard drive onto the enclosure.
-
-
-
Connect the iMac's SATA power cable to the other end of the new sensor-enabled SATA cable.
-
-
-
Slide the SSD enclosure into the space previously occupied by the hard drive.
-
Route the SATA cables so that they will not interfere with any other components.
-


To reassemble your device, follow these instructions in reverse order.
Отменить: Я не выполнил это руководство.
354 человек успешно провели ремонт по этому руководству.

64 Комментарии к руководству
Note that if you are replacing the hard drive with a non-Apple hard drive, then you will have problems with the fan running full speed constantly (see http://blog.macsales.com/10206-further-e...). Basically, you'll need to either install a $30 piece of software to control the fans or short out some wires.
You don´t need to short out the wires, just install the free SSD FAN CONTROL app from EXIRION.NET und you´ll be fine :D
remember after the glass, to get the aluminum front off, remove the bay for the memory upgrade on the bottom first before you remove the torx screws ans lift to access the bottom case (Between step 2 and 3)
I'm looking to replace my 3.5" HDD in my iMac (mid-2011) with a 2.5" SSD. Will I need an adapter for this?
Absolutly. You can buy a official one on the Apple Store. I reccommend the dual-drive (HDD & SDD) tho.