Введение
Follow the steps in this guide to replace the rear-facing iSight camera in your iPhone 6s Plus.
Выберете то, что вам нужно
Видео обзор
-
-
Power off your iPhone before beginning disassembly.
-
Remove the two 3.4 mm Pentalobe screws on either side of the Lightning port.
-
-
Инструмент, используемый на этом этапе:Clampy - Anti-Clamp$24.95
-
Pull the blue handle backwards to unlock the Anti-Clamp's arms.
-
Slide the arms over either the left or right edge of your iPhone.
-
Position the suction cups near the bottom edge of the iPhone just above the home button—one on the front, and one on the back.
-
Squeeze the cups together to apply suction to the desired area.
-
-
-
Pull the blue handle forwards to lock the arms.
-
Turn the handle clockwise 360 degrees or until the cups start to stretch.
-
Insert an opening pick under the screen when the Anti-Clamp creates a large enough gap.
-
Skip the next three steps.
-
-
Инструмент, используемый на этом этапе:Clampy - Anti-Clamp$24.95
-
If you don't have an Anti-Clamp, follow the next three steps to use a suction handle.
-
Apply mild heat to the lower edge of the iPhone using an iOpener or hair dryer for about a minute.
-
-
-
Pull up on the suction cup with firm, constant pressure to create a slight gap between the front panel and rear case.
-
-
-
The safest place to pry from is the notch in the front panel above the headphone jack.
-
While still maintaining pressure on the suction cup, insert the flat tip of a spudger into the gap, directly above the headphone jack.
-
-
-
While firmly pulling up on the suction cup, slide the edge of the spudger under the bottom left corner of the display.
-
-
-
Slide the tip of the spudger up the left side of the phone, between the front panel and the rear case.
-
-
-
-
Insert the flat tip of the spudger under the right edge of the display.
-
Slide the spudger up the right side.
-
-
-
Use a plastic opening tool to hold down the rear case while pulling up the suction cup to open the phone.
-
-
-
Gently grasp the display assembly and lift it up to open the phone, using the clips at the top of the front panel as a hinge.
-
Open the display to about a 90º angle, and lean it against something to keep it propped up while you're working on the phone.
-
Add a rubber band to keep the display securely in place while you work. This prevents undue strain on the display cables.
-
-
Инструмент, используемый на этом этапе:Magnetic Project Mat$19.95
-
Remove two Phillips screws securing the battery connector bracket to the logic board, of the following lengths:
-
One 2.9 mm screw
-
One 2.3 mm screw
-
-
-
Use a spudger or a clean fingernail to disconnect the battery connector by prying it straight up off the logic board.
-
-
-
Bend the connector back to ensure it doesn't make contact and power the iPhone on while you're working on it.
-
-
-
Remove the following Phillips screws:
-
Three 1.3 mm screws
-
One 1.6 mm screw
-
One 3.0 mm screw
-
-
-
Use a plastic opening tool to disconnect the front-facing camera and sensor cable connector.
-
-
-
Use a plastic opening tool to disconnect the digitizer cable by prying it straight up from its socket on the logic board.
-
-
-
Disconnect the home button/fingerprint sensor cable by prying it straight up from its socket on the logic board.
-
-
-
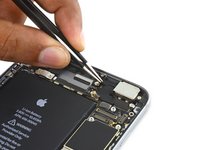
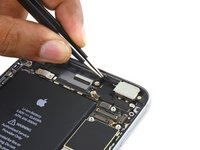
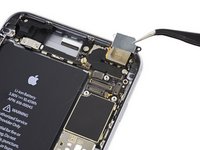
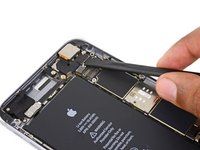
Remove the following Phillips screws over the camera bracket:
-
One 1.9 mm screw
-
One 2.4 mm screw
-
-
-
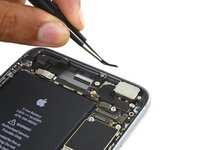
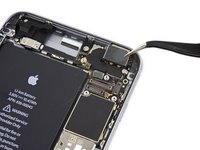
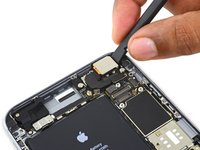
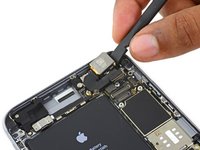
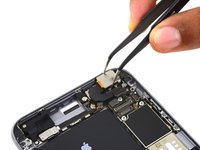
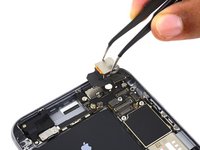
Insert the flat end of the spudger between the iSight camera and rear casing.
-
Gently pry the camera out from its housing.
-


To reassemble your device, follow these instructions in reverse order.
To reassemble your device, follow these instructions in reverse order.
Отменить: Я не выполнил это руководство.
127 человек успешно провели ремонт по этому руководству.

35 Комментариев
really useful.
Great instructional video which saw me through the entire disassembly of my phone, and then clear and concise enough steps on the page to help me put it back together after installing the new camera. Thank you!!!!
I completed this repair at the same time as replacing my battery and headphone/lightening jack assembly. The problem I was experiencing with my camera was jittery video and unusable photos. The stabilization gimbal had died, though I am not sure that is the right word for it. It's more like it had an overdose. Anytime I would come to use the camera you could hear a tiny clicking noise as the lens armature shot itself about within its tolerances. Photos were out of focus and jittery, even when taken with the phone completely stable and untouched. I could most of the time just manage to make it take photos to deposit checks by holding the phone horizontally and in very bright sunlight, sometimes tapping the phone until the clicking noise stopped. Videos would hunt for focus and look as though I was actively shaking the camera, no matter what. Sometimes it was worse than others. Replacing this assembly completely fixed all issues.
Michael, you might have been interested to know that the focusing problems you experienced are chronic in the iPhone 6 Plus and Apple has created a repair program. You might have found this page useful if your serial number was eligible. https://www.apple.com/support/iphone6plu...
Micheal, I am having that same problem as well! Good to know that replacing it fixes it!
Talon, the repair program Apple has is only for the 6 plus not the 6s plus.