
iPhone XS Max Lower Speaker Replacement

Введение
Перейти к шагу 1iPhone XS Max uses both the primary loudspeaker and the earpiece speaker together to produce stereo sound. Use this guide to replace the primary loudspeaker at the bottom of the phone only. Replacing this speaker can help resolve issues such as loss of sound, poor sound quality, and distorted sound.
Выберете то, что вам нужно
Запчасти


Инструменты


Показать больше…
-
-
Power off your iPhone before beginning disassembly.
-
Remove the two 6.9 mm-long pentalobe screws at the bottom edge of the iPhone.
-
Opening the iPhone's display will compromise its waterproof seals. Have replacement seals ready before you proceed past this step, or take care to avoid liquid exposure if you reassemble your iPhone without replacing the seals.
-
-
-
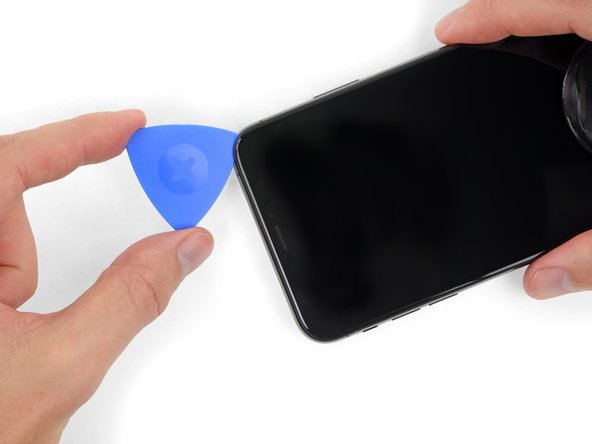
Measure 3 mm from the tip and mark the opening pick with a permanent marker.
-
-
-
Lay overlapping strips of clear packing tape over the iPhone's screen until the whole face is covered.
-
If you can't get the suction cup to stick in the next few steps, fold a strong piece of tape (such as duct tape) into a handle and lift the screen with that instead.
-
-
Инструмент, используемый на этом этапе:Clampy - Anti-Clamp$24.95
-
Pull the blue handle backwards to unlock the Anti-Clamp's arms.
-
Slide the arms over either the left or right edge of your iPhone.
-
Position the suction cups near the bottom edge of the iPhone—one on the front, and one on the back.
-
Squeeze the cups together to apply suction to the desired area.
-
-
-
Pull the blue handle forward to lock the arms.
-
Turn the handle clockwise 360 degrees or until the cups start to stretch.
-
Make sure the suction cups remain aligned with each other. If they begin to slip out of alignment, loosen the suction cups slightly and realign the arms.
-
-
-
Heat an iOpener and thread it through the arms of the Anti-Clamp.
-
Fold the iOpener so it lays on the bottom edge of the iPhone.
-
Wait one minute to give the adhesive a chance to release and present an opening gap.
-
Insert an opening pick into the gap under the screen and the plastic bezel, not the screen itself.
-
Skip the next three steps.
-
-
-
Use a hairdryer or heat gun or prepare an iOpener and apply it to the lower edge of the iPhone for about a minute in order to soften up the adhesive underneath.
-
-
-
If you're using a single suction handle, apply it to the bottom edge of the phone, while avoiding the curved portion of the glass.
-
-
-
Pull up on the suction cup with firm, constant pressure to create a slight gap between the front panel and rear case.
-
Insert an opening pick into the gap under the screen and the plastic bezel, not the screen itself.
-
-
-
Slide the opening pick around the lower left corner and up the left edge of the iPhone, slicing through the adhesive holding the display in place.
-
-
-
Re-insert your pick at the bottom edge of the iPhone, and slide it up the right side to continue separating the adhesive.
-
-
-
Slide the opening pick around the top corner of the display, while gently pulling or wiggling the display down in the direction of the Lightning port.
-
Slide the pick to the opposite corner and cut any remaining adhesive securing the display.
-
-
-
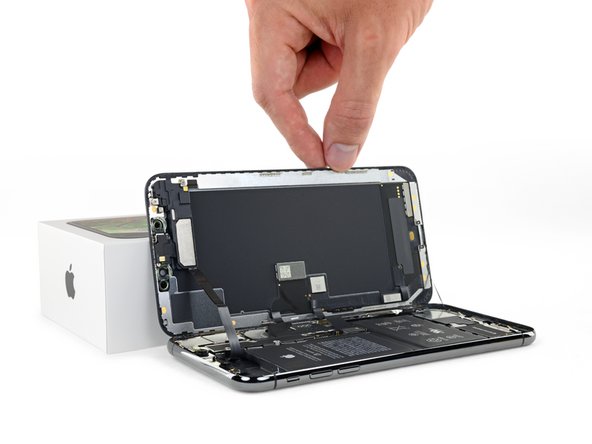
Open the iPhone by swinging the display up from the left side, like the back cover of a book.
-
Lean the display against something to keep it propped up while you're working on the phone.
-
-
Инструмент, используемый на этом этапе:Magnetic Project Mat$19.95
-
Remove four Y000 screws securing the logic board cover bracket, of the following lengths:
-
Two 1.1 mm screws
-
One 1.5 mm screw
-
One 3.7 mm screw
-
-
-
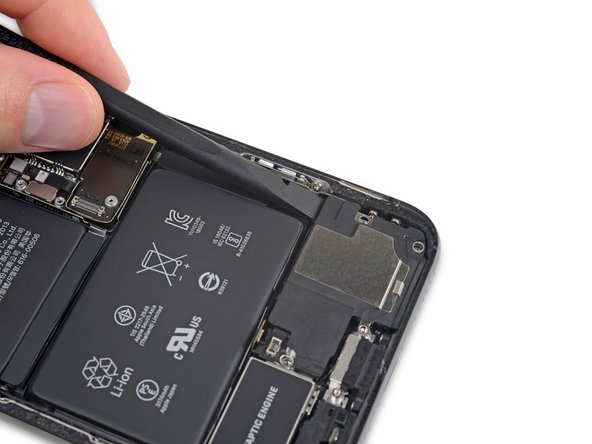
Use a spudger or a clean fingernail to pry the battery connector up from its socket on the logic board.
-
Bend the connector slightly away from the logic board to prevent it from accidentally making contact with the socket and providing power to the phone during your repair.
-
-
-
Remove the three Y000 screws securing the display connector bracket:
-
Two 1.5 mm screws
-
One 1.1 mm screw
-
-
-
Use the point of a spudger or a fingernail to disconnect the front panel sensor assembly connector.
-
-
-
Use a spudger or fingernail to pry the digitizer cable connector up from its socket.
-
-
-
Remove the five 1.4 mm tri-point Y000 screws securing the bracket below the Taptic Engine and main speaker.
-
-
-
Gently lift to unstick and remove the bracket, being careful not to bend it.
-
If necessary, apply a little heat with a hair dryer or heat gun to soften the adhesive. (Putting an iOpener on the bracket is not recommended, as this may bend the spring contacts along the top.)
-
-
-
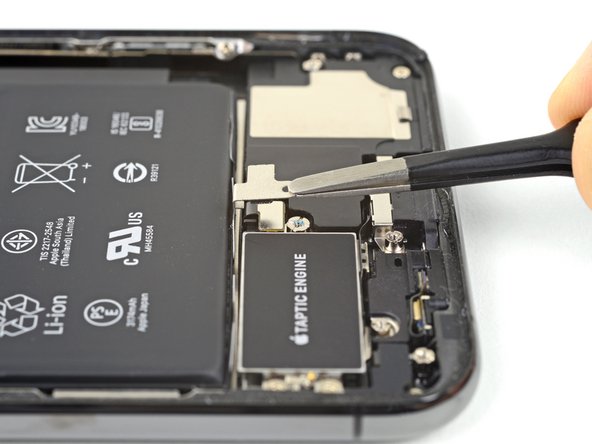
Push the speaker connector cover towards the battery, and then lift to unclip and remove it.
-
-
Инструмент, используемый на этом этапе:iFixit Precision 4 mm Screwdriver Bit$2.99
-
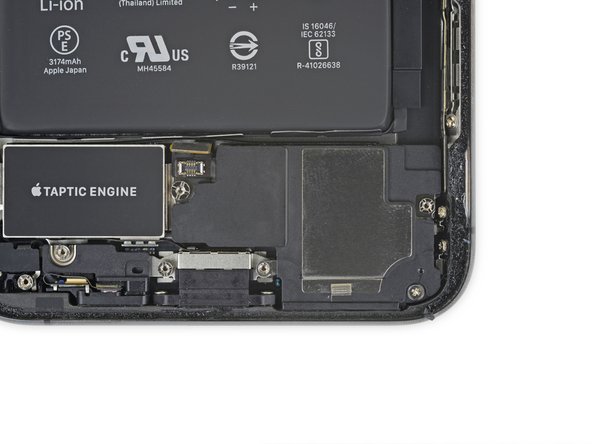
Remove the three screws securing the speaker:
-
One 2.7 mm Phillips screw
-
One 2.9 mm standoff screw
-
One 3.1 mm standoff screw
-
-
-
Insert a spudger under the top edge of the speaker, near the edge of the iPhone's case.
-
Gently pry up and lift the top edge of the speaker slightly.
-
-
Инструмент, используемый на этом этапе:Tweezers$4.99
-
While prying up the speaker, use tweezers to peel away the plastic bumper strip from the top edge of the speaker.
-
-
-
Hold the speaker by its side edges and rock it side-to-side, separating the adhesive securing it to the bottom edge of the iPhone.
-
Pull the speaker away from the bottom edge of the iPhone until the adhesive gasket separates.
-


Compare your new replacement part to the original part—you may need to transfer remaining components or remove adhesive backings from the new part before installing.
To reassemble your device, follow the above steps in reverse order.
Take your e-waste to an R2 or e-Stewards certified recycler.
Repair didn’t go as planned? Check out our Answers community for troubleshooting help.
Отменить: Я не выполнил это руководство.
21 человек успешно провели ремонт по этому руководству.


2 Комментариев
Mijn iphone bodem-speaker maakte af en toe ene krakend geluid of deze viel volledig uit. Ik heb de telefoon naar een reparateur gebracht… maar ook de nieuwe box die is geïnstalleerd doet het alleen als ik druk op het scherm uit-oefen. Het lijkt daardoor dus te komen, doordat de speaker niet of niet goed contact maakt met het punt waar het zijn stroom vandaan haalt. De medewerker van de reparatie-zaak heeft het de hele tijd over kortsluiting? Maar dat lijkt me sterk, daar een beetje druk zowel bij mn oude als de nieuwe speaker resulteert in een werkende box. Echter is dit niet ideaal voor het scherm, en ook niet de ideale oplossing als ik muziek of video’s afspeel. Hebben jullie tips waar het misschien aan kan liggen? Waar de medewerker naar kan kijken? De telefoon is nu al twee dagen bij die winkel met tot op heden nog niet een werkende onderspeaker tot resultaat.
Hopelijk heeft iemand de gouden tip.
Groetjes,
Wes