
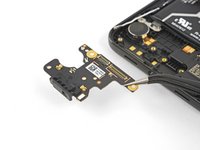
Google Pixel 3a Loudspeaker Replacement

Введение
Перейти к шагу 1This repair guide was authored by the iFixit staff and hasn’t been endorsed by Google. Learn more about our repair guides here.
This guide shows how to remove and replace the loudspeaker for the Pixel 3a. During removal, a loudspeaker corner is pinned under the right squeeze sensor’s support bracket. This guide shows how to loosen the support bracket in order to wiggle the loudspeaker out. Alternatively, you can remove the motherboard and the support bracket first to gain unrestricted access to the loudspeaker.
The Pixel 3a’s unreinforced display panel is fragile. If you are reusing the screen, be sure to pay special attention to the warnings in the opening procedure.
The procedure requires re-attaching the proximity sensor connector, which requires some patience and finesse.
Выберете то, что вам нужно


-
-
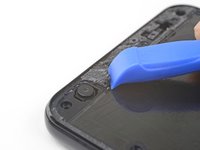
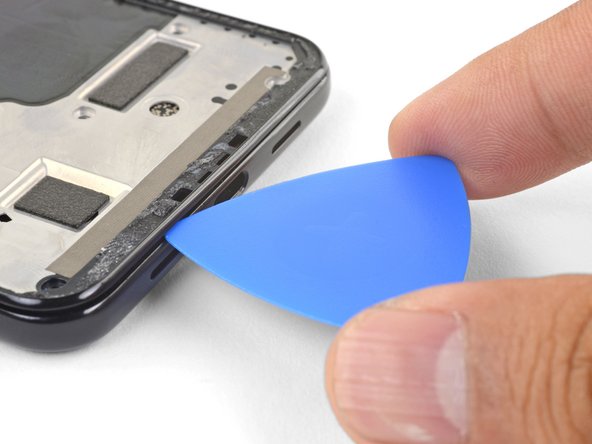
Take note of the two seams on the phone:
-
Screen seam: This seam separates the screen from the rest of the phone. This is where you should pry.
-
Frame seam: This is where the plastic frame meets the back cover. It is held in place by screws. Do not pry at this seam.
-
Before you begin prying, note the following areas on the screen:
-
Screen flex cable: Do not pry deeper than instructed, or you risk damaging this cable.
-
Adhesive perimeter: Prying beyond the narrow perimeter without angling the pick will damage the display panel.
-
-
-
Heat an iOpener and apply it to the right edge of the display for a minute.
My screen was cracked diagonally. Heating with iOpener helped at the top and bottom edges to weaken the adhesive.
-
-
-
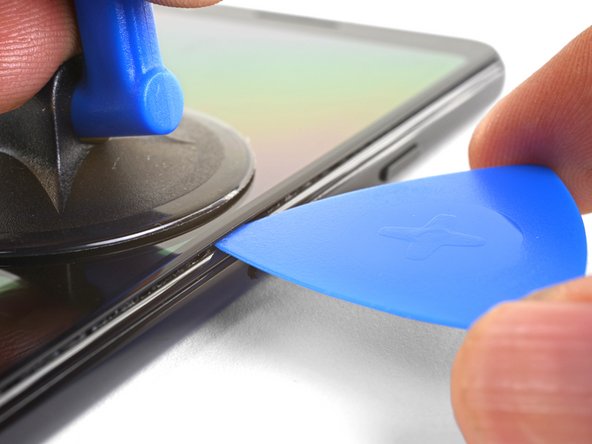
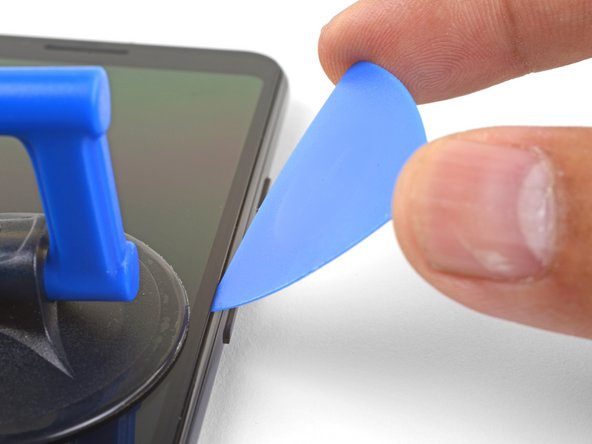
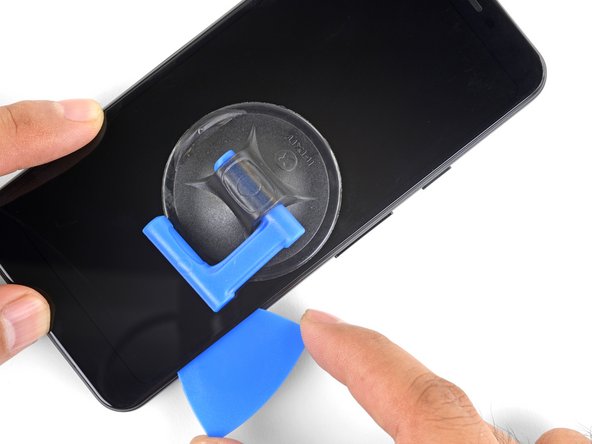
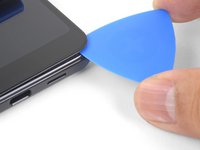
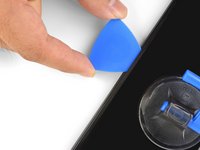
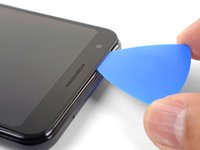
Place a suction cup near the right edge of the screen.
-
Pull on the suction cup with strong steady force.
-
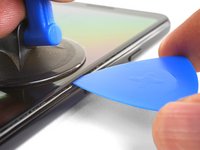
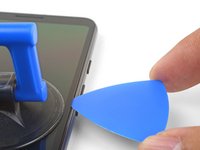
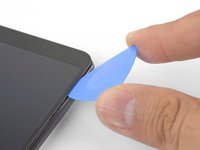
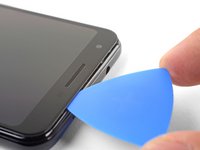
Insert the pick into the gap, no more than 1 mm.
-
-
-
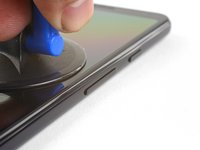
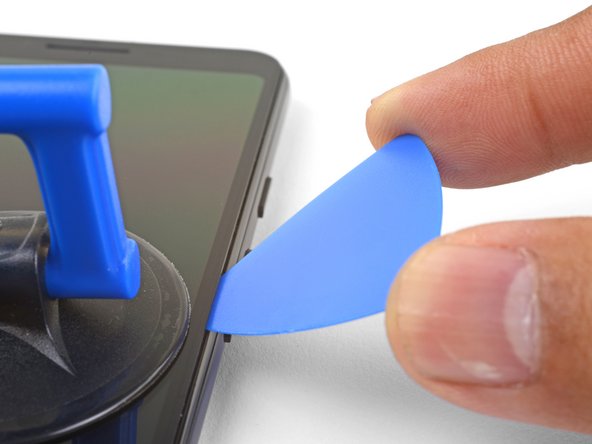
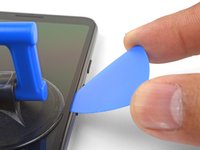
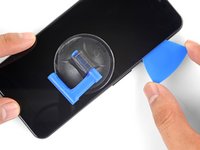
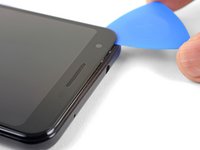
With the pick 1 mm in the gap, pivot the pick upwards to a steep angle.
-
At this angle, carefully push the pick into the gap about 1/4" (6 mm). The pick should slide in below the OLED panel.
-
-
-
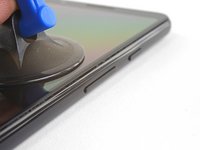
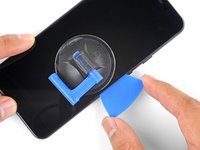
Slide the pick along the right edge, slicing through the adhesive.
-
Leave a pick in place to prevent the adhesive from resealing.
Don’t make my mistake and read ahead. 6mm may be too close for comfort! 8mm is definitely too far and caused me to damage. Also be sure to read the right manual! I have an XL and it notes 5mm.
Fortunately my old screen was beyond repair, But be super careful around the bottom I managed to sever the ribbon cable to the digitizer.
I broke my screen here. The adhesive in my case was quite strong on the top and bottom.
This is by far the hardest part of the entire replacement. I ruined my screen doing this, you might as well buy a new screen at the same time as you buy your battery. I just barely rubbed the edges of my screen and it turned the edge of my screen purple. This eventually migrated to the entire screen causing the whole thing to be purple/black.
I've repaired many iPhones, and never had any issues. The screens always remained intact. But with the Pixel, I completely destroyed the screen. The only thing it showed after booting up was a purple line... The adhesive is very strong and it's nearly impossible to separate the screen without damaging it. You should order a new screen before you attempt to change the battery, just in case.
-
-
-
Slide the pick around the bottom right corner to slice through the adhesive.
-
Continue slicing along the bottom edge of the phone and around the left corner.
My screen was already cracked diagonally, so going around the corners was especially hard. Starting from each side was not so risky as I first thought because side adhesive is really thin. However top and bottom needed some more lifting force from the pick. More heating helped at the top and bottom edges.
-
-
-
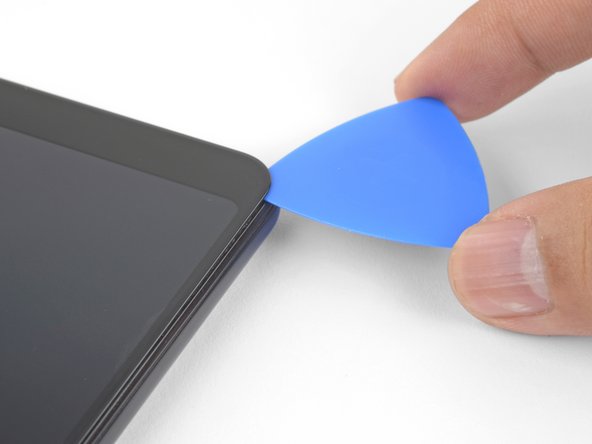
Slice through the left edge of the phone, making sure to properly angle the pick below the OLED panel and insert it in no more than 1/4" (6 mm).
-
To angle the pick below the OLED panel, insert the point of the pick no more than 1 mm in, angle the pick upwards, and then slowly push the pick in 1/4".
-
-
-
Slice along the top edge while keeping the pick no more than 5/16" (8 mm) in.
There is a LOT more adhesive at the top than anywhere else on the phone! It’s like there’s 2 lines of adhesive, one along the edge of the case and one along the edge of the screen, and it’s filled in between them wherever the speaker camera aren’t. I needed to heat and pry several times to get the top loose. Fortunately, there’s little risk of hitting a cable near the top (look ahead to the step where you lift the screen off to see where all the cables go!)
I found that applying the iOpener across the top edge of the glass for about 30 seconds at this step helped soften the adhesive significantly. My front camera was replaced only a few months ago by uBreakiFix and the display adhesive subsequently let go on the entire right edge, bottom, and part of the left side shortly after the new front camera failed. Only the top was still securely stuck.
-
-
-
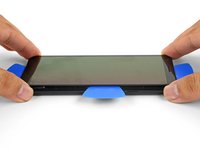
With all of the edges cut, carefully hinge open the right edge of the screen.
-
Use an opening pick to carefully cut through any remaining adhesive.
-
-
-
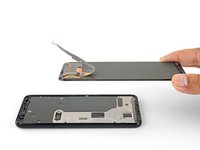
With all of the adhesives cut, flip the attached screen glass side down and rest it on top of the phone. The screen flex cable should be loosely arched.
Hi, could you help me with one clarification?
What does the small “metal patch” in the middle of the display ribbon do?
Does it prevent the phone from starting while disconnected?
Thank you for your time!
Hi Oliver,
I think the patch you’re referring to helps with either EM shielding or heat dissipation. It should not prevent the phone from starting.
-
-
-
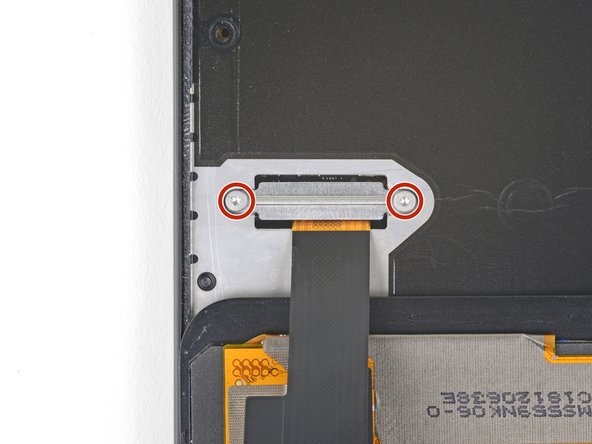
Carefully peel the black tape covering the screen connector bracket.
-
Remove the two 4.4 mm long T3 screws securing the screen connector bracket.
-
Remove the screen connector bracket.
This may be a silly question but how are you able to tell whether the tape is in good condition? Is it based off of how sticky it is after you remove it?
That is a fair question! If the tape is in one piece and is relatively sticky, it can probably be used again.
Oops! I forgot to put any tape back. Does this tape have a critical purpose, in other words should I go to the trouble to pry the screen back off and tape it?
The tape does not serve a critical purpose. If you have already re-sealed your phone, I wouldn’t worry about it.
Les vis sont des T4 et non des T3
Bonjour Gaëtan ! Merci pour la remarque. En fait, il y a toujours une certaine tolérance entre le tournevis et la tête de vis. Donc il se peut que la taille supérieure ou inférieure soit plus “confortable” au cas par cas. Bonne réparation !
Bonjour,
Pouvez-vous me conseiller un bon kit de réparation pour mon Google Pixel 3A?
J'ai peur de me faire arnaquer en achetant un mauvais écran de basse qualité .
Do you sell the 2 4.4mm t3 screws and the screen connector bracket. Or know where I can get it thanks
-
-
-
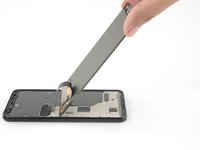
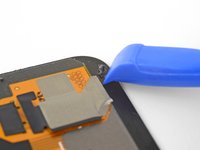
Use the point of a spudger to pry up and disconnect the screen flex cable.
I had accidentally pressed the power button and the phone was on when connecting the new screen and that broke the board! So make sure the phone is off.
hey man think I've just done the same thing :(
how did you fix it? did it need a new motherboard?
is it okay if I forgot to add the black tape on the connector area???
When reassembling, before reattaching the connector for the screen flex cable is the time to align the screen cover adhesive sheet onto the perimeter of the plastic mid-frame. Even if one is using the Tesa tape, I suspect aligning it along the edge of the mid-frame would be simpler without the screen and its flex cable obstructing your efforts.
-
-
-
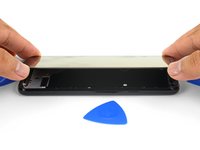
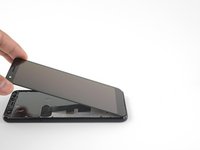
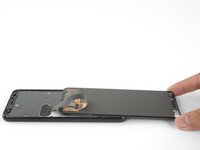
Remove the screen.
-
Carefully compare your replacement screen with your original part. You may need to transfer additional components (such as the speaker mesh) to the new part.
-
Follow this guide if you are using custom-cut adhesives.
-
If you are using double-sided tape such as Tesa tape, follow this guide.
There is a blue plastic tape covering the digitizer and when I try to take it off it rips out something more than just the tape I think it’s pulling the magnet too
i had a little plastic piece around the camera (seems to just be a spacer) that i moved to the new screen. had to pry it up with a pick cuz it was stuck down good.
actually to clarify- i didn’t move the little camera spacer to the new screen- i placed it around the camera on the phone, where there was a little indent for it, and stuck it down with a bit of tesa strip, then applied more tesa strips around the edge of the phone before finally reconnecting and replacing the screen. the little plastic bit i encountered needs to be precisely placed around the camera so would not be a good idea to just stick it to the screen when reinstalling!
elyze -
Thanks team! I was able to replace my broken screen with no issues!
Instead of cutout adhesives or tesa tape, I used B-7000. Painless.
Appreciate the screen and instructions!
Bonjour,
Pouvez-vous me conseiller un bon kit de réparation pour mon Google Pixel 3A?
J'ai peur de me faire arnaquer en achetant un mauvais écran de basse qualité .
Hello . Can you advice me a site where i Can buy a quality screen replacement pack for my Google Pixel 3A?
There's a lot of rip off on internet and id like to get a good pack and a quality screen .
Hello! We currently sell a replacement screen. However, I’m not sure if it is available yet internationally.
I have a quick question, so I haven’t done anything yet because I only just ordered my repair kit, but is it possible to replace the battery without having to replace the display ?
Hi Braeden!
Yes, it is definitely possible to replace the battery without replacing the display. With that said, the initial entry steps can be pretty tricky. Before you begin, look very closely over the display to see if you can see any micro-fractures. If you see any, you will most likely crack the screen when you try to remove it. Take your time and apply a heated iOpener often. Good luck!
I forgot to order the tape when getting my replacement USB port, so I ended up putting the screen back on without any tape and using regular clear tape on the outside of the phone to keep the screen from falling off. It’s less waterproof, but it’ll do the job until the right part arrives.
Speaker mesh appeared to already be in place on my replacement screen, so I did not transfer this over from my old screen. That was a huge mistake, sounds were garbled above about 30% volume. Make sure you do this part!
I tried the replacement after watching this and many other videos. I purchased a working Pixel 3a and removed it to put onto my old Pixel 3a. The screen is not turning on on either devices now, old or new. The device is turning on because I can feel vibrations. What do you think the problem is?
-
-
Инструмент, используемый на этом этапе:Magnetic Project Mat$19.95
-
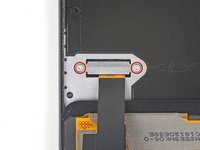
Remove the fourteen T3 screws of the following lengths securing the plastic midframe:
-
Twelve 4.3 mm silver T3 screws
-
Two 4.3 mm black T3 screws
I found that a T3 bit didn’t get purchase on the screws in my Pixel 3a, but the T4 bit worked great. Not sure what’s up with that.
This is definitely possible, depending on which kit’s T3 bit you use, along with potential screw quality variances.
My Pixel 3a has been apart three times for a non-functioning front camera. The first time, it was by a Google authorized repair shop, and the camera stopped functioning again after a few months. When I took it apart the second time, I noted that many of the screws weren't seated before I removed them. The camera module had become disconnected and simply reseating the connector fixed it. I was careful to fully drive all screws and apply an appropriate amount of torque to them, thinking the repair shop failed to do so. After 9 or 10 months, my front camera stopped working again. Again, I'm noticing a lot of the screws have worked themselves loose. I'm going to try to find an appropriate thread compound that I can precisely apply to these tiny screws.
Hey Reid,
I would suggest blue Loctite or threadlocker. Dab a small drop on each screw before you install them.
-
-
-
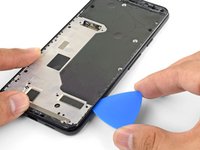
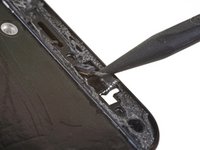
Insert an opening pick into frame seam at the bottom of the phone. This seam sits between the plastic midframe and the back cover.
-
Slide the pick along the seam to release the clips holding the plastic midframe.
To remove the midframe, I was having a lot of trouble until removing the sim card tray. I think this might have to be removed before the midframe
-
-
-
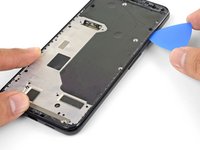
Slide the opening pick along the left and right edges of the phone to release the midframe clips.
-
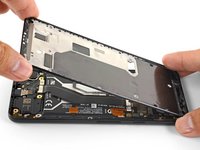
Lift the bottom edge of the plastic midframe up but do not remove the midframe. The midframe is still tethered to the phone by the fragile proximity sensor cable at the top edge.
-
-
-
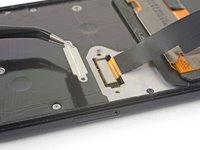
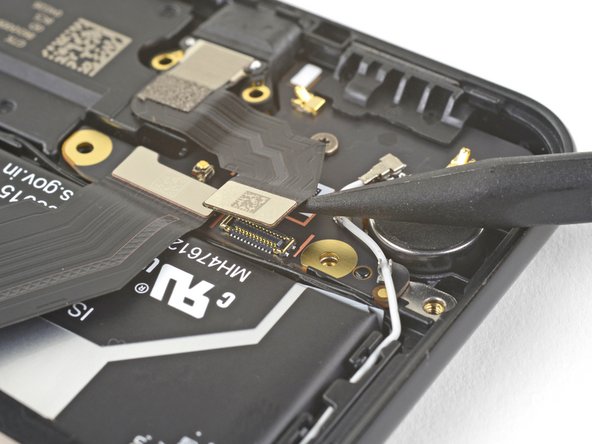
Use the point of a spudger to carefully pry up and disconnect the proximity sensor connector from the motherboard.
-
Remove the plastic midframe.
This connector is f*ckn impossible to reconnect 😭
This is the hardest part of the job. I gave up on connecting the proximity sensor while in the midframe, and found it much easier to remove the proximity sensor from the midframe, attach the connector, then thread the sensor into its home in the midframe.
-
-
-
Align the top edge of the plastic midframe with the phone.
-
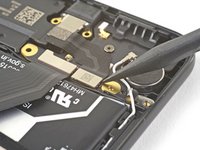
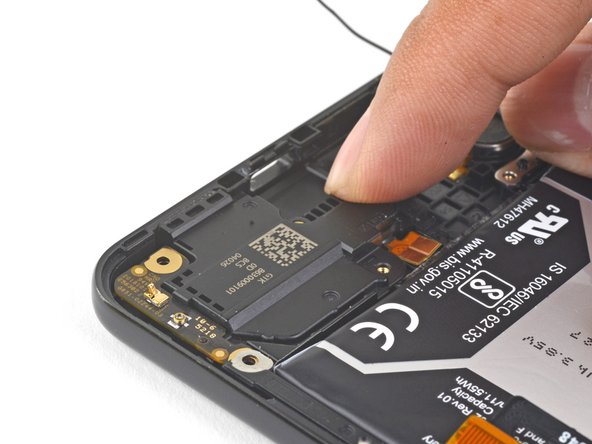
Use the point of a spudger to carefully align and push the proximity sensor connector onto the motherboard socket.
-
This takes a bit of patience and finesse. Once you have the connector in place, you can also use a finger to gently press the connector onto the socket.
-
Use the point of a spudger to carefully pry the proximity sensor out of its recess on the midframe. The sensor is lightly adhered to the midframe.
-
Remove the sensor from the midframe. Attach the sensor connector onto its motherboard socket.
-
Thread the sensor cable through the midframe and reposition the sensor in the recess. Press down with your finger to adhere the sensor back onto the midframe.
I tried to do this for about 15 minutes before I went to the alternative. There is a tiny post to hold the sensor in position on the midframe. I pried the sensor from the midframe from the corner opposite that post and then finished this step in 2 minutes.
Plan B ok for me as well. There is a hole below the sensor in order to push it with a sim card opener.
-
-
-
Use the point of a spudger to pry up and disconnect the battery connector from its motherboard socket.
-
Bend the battery flex cable slightly so that it will not accidentally make contact with the socket.
-
-
-
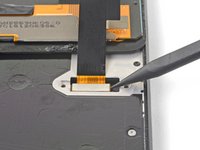
Use the point of a spudger to pry up and disconnect the USB-C port connector from the daughterboard.
-
Remove the USB-C port module.
-
-
-
Use the point of a spudger to pry up and disconnect the interconnect cable from its daughterboard socket.
-
-
-
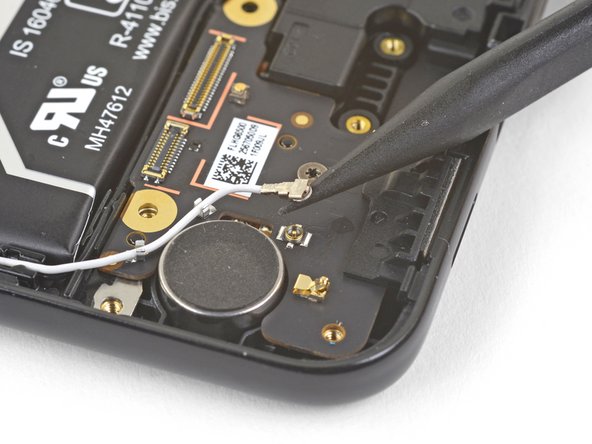
Use the point of a spudger to pry up and disconnect the white antenna cable from its daughterboard socket.
-
Carefully de-route the antenna cable out of its retaining clips.
-
-
-
Remove the single 2.7 mm long T3 screw securing the daughterboard to the frame.
-
Remove the daughterboard.
-
-
-
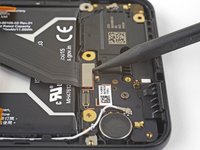
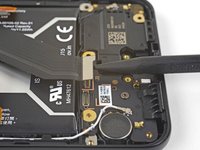
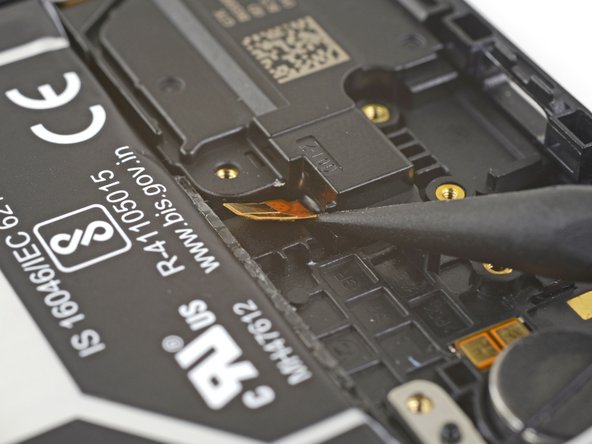
Use the point of a spudger the pry up and disconnect the black antenna cable from its board socket.
-
De-route the black antenna cable from the retaining clips and bend it out of the way.
-
-
-
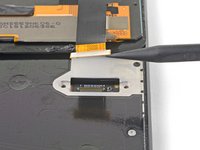
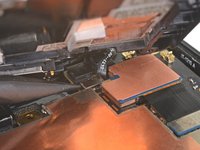
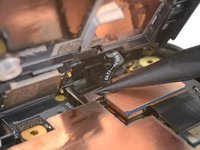
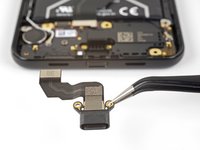
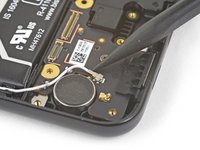
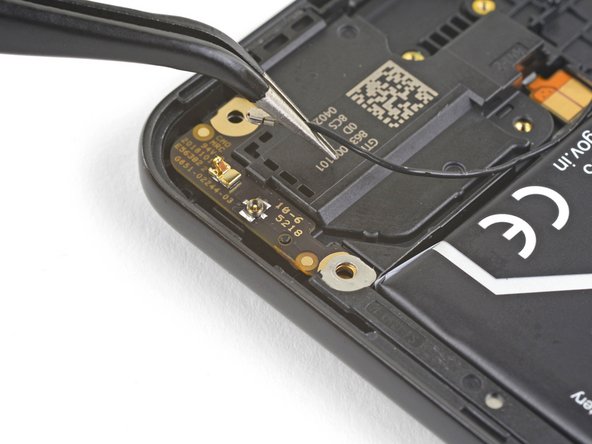
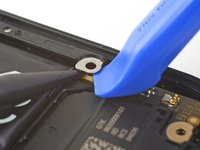
Slide the point of a spudger underneath the loudspeaker's flex contact pad and pry it loose from the phone frame.
-
-
-
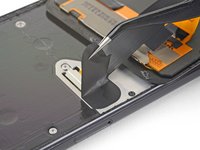
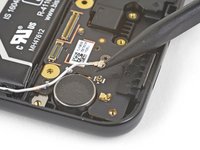
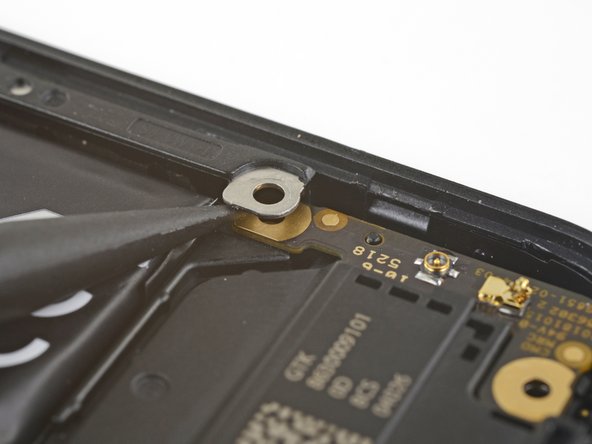
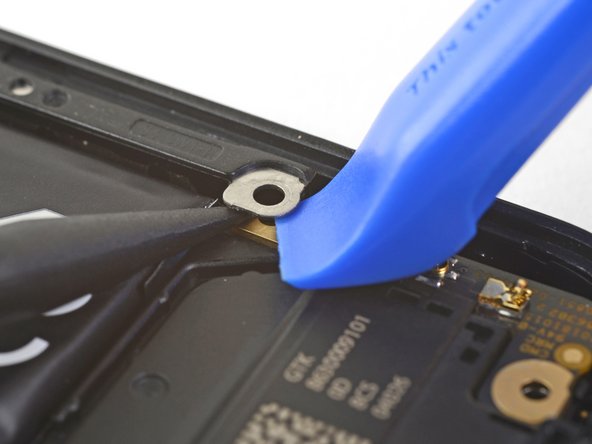
Insert the point of a spudger underneath the right squeeze sensor's lower screw hole. This resides at the loudspeaker's top-right corner.
-
Pry the bracket upwards enough to slide an opening tool underneath the screw hole.
-
-
-
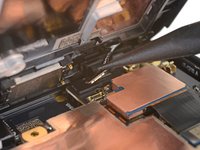
Pry the opening tool upwards to loosen the adhesive holding the right squeeze sensor bracket to the bottom of the phone.
-
-
-
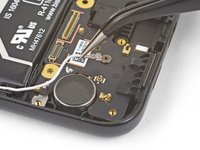
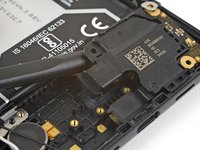
Slide the flat end of a spudger 1/2" (13 mm) underneath the loudspeaker's top-left screw hole and keep it there.
-
-
-
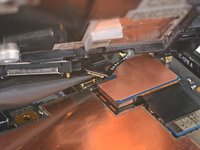
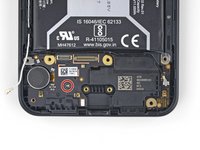
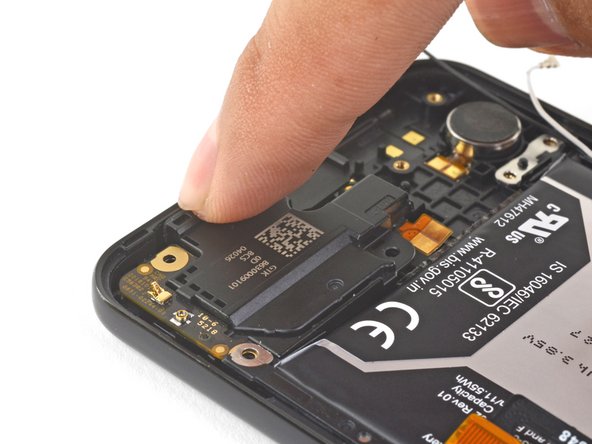
Insert the edge of an opening tool behind the loudspeaker's bottom edge.
-
Pry with the opening tool to loosen the loudspeaker enough to wiggle it out of its recess.
-
Remove the loudspeaker.
-
-
-
Slide the top-right corner of the loudspeaker underneath the right support bracket's screw hole.
-
Use your fingers to push the bottom edge of the loudspeaker in place.
-
Push the remaining edges into place. The loudspeaker should pop into its recess and sit flush against the bottom of the phone.
-
-
-
The antenna board is adhered lightly in place. Gently bend the antenna board's right edge slightly upwards to break the adhesive and clear the alignment peg.
-
Slide the antenna board away from the loudspeaker and transfer it to your replacement.
-


Compare your new replacement part to the original part. You may need to transfer remaining components or remove adhesive backings from the new part before installing.
To reassemble your device, follow these instructions in reverse order.
Repair didn’t go as planned? Check out our Google Pixel 3a Answers community for troubleshooting help.
Отменить: Я не выполнил это руководство.
5 человек успешно провели ремонт по этому руководству.


8 Комментариев
Is there a guide to put everything back in place, because I'm am not confident in working backwards. Also are all the tools used included in the essentials kit that ifixit sells
Hi Jerry,
There is unfortunately no separate guide to put everything back in place. Just take it slow and make note of all the push-pin reminder bullets.
The essentials kit does not include an iOpener or the T3 bit that’s necessary for the repair.
If I am reusing the screen do I need to apply some glue or just heat it up and attach it back to the body.
I reused original screen as well - to attach it I applied several narrow pieces of thin double-sided cello tape along the edges. Then I repeated heating the perimeter and pressed screen against the cover. So it’s a kind of combination between old glue and additional one. So far so good.
The procedure is very similar for the Pixel 3a XL. I would also take a look at the Pixel 3a XL specific guides. The closest to a loudspeaker guide would probably be the USB-C port guide.
Does iFixit sell a Google Pixel 3a Loudspeaker component?
interesting. But in fact the pixel 3a is stereo, so there are TWO loudspeakers. One is on the bottom like shown here, but there is another one on the top of the phone….
Power is off, but does the battery need to be disconnect to safely do this replacement?
mplishka - Ответить
Da ich keinen iopener ( dachte das wäre alles dabei wie auf der bstellvorschau!!!) habe ich eine Wärmflasche auf das Handy gelegt ..behutsam und nicht zu heiß. Besonders an Kopf und fußende war das Display ziemlich fest...befolgt man die Anweisungen genau ist es eigentlich kein Problem das Display vom Rahmen zu lösen, jedoch bin ich der Meinung, dass hier schon ein gewisses Maß an motorischer Vertrautheit mit der Materie bestehen sollte, da wie gesagt oben und unten doch ein tieferes eingreifen in den Rahmen unter das Display nötig ist...
Ralph S. aus Neumünster
Ralph S - Ответить
You definitely want to use the iOpener on all sides as you make your way around the screen. The adhesive on my device was quite strong!
My screen was cracked in the corner and it was a real pain in the neck to get the little bits and pieces out of the corner. I don't know if this step is easier with an intact screen, but it was definitely the most difficult step on the repair for me.
Simon Stone - Ответить