
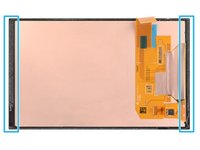
Steam Deck OLED Screen Replacement

Введение
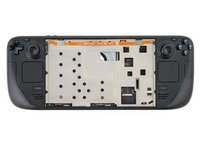
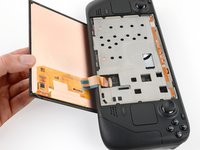
Перейти к шагу 1Use this guide to replace the screen (or display) on your Steam Deck OLED.
Remember to follow general electrostatic discharge (ESD) safety procedures while repairing your device.
You'll need replacement screen adhesive to complete this repair.
Выберете то, что вам нужно
Наборы для ремонта
Эти комплекты содержат все детали и инструменты, используемые в руководстве.


Запчасти


Инструменты


Показать больше…
-
-
Power down your Steam Deck and unplug any cables.
-
-
-
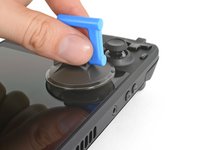
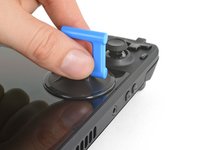
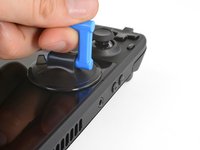
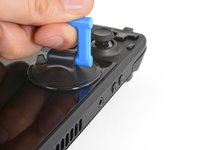
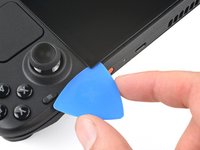
Measure 3 mm from the tip and mark the opening pick with a permanent marker.
Got to step 2 and realized the fix kit doesn't include an opening pick! Looks like a guitar pick, and I have those lying around. Is that expected? Looks like the pick is used in many steps below. There's a little blue crowbar that isn't mentioned in the instructions. Perhaps that replaces the opening pick?
Hi! I can't see which guide you were using when writing this comment. Can you reply here with which guide and fix kit you used?
I see you posted this in Meta. I hope it's resolved soon! In the meantime, a guitar pick may work well enough for your repair.
what fix kit?
My fix kit didn't include an opening pick either
My AliExpress refurbished screen came with a pick that has a coin-like circle that pops out, so no modification was necessary
It's not an Ifixit KIT if it doesn't include everything. You'll need to order the opening pic separately. Or head to Walmart like myself and look for guitar pics. Hopefully, this will work just as well.
No pick in mine as well. It’s really not clear that you have to order this separately when ordering an IPhone SE 202/2022 screen repair kit. Is this the case?
Frustrated, I ordered a compact package where everything was encapsulated. Useless suction tools could not separate the screen. If it is unable to decouple the screen, then why sucking suction tools you have provided.
For my kit the triangle pick was stuck inside the box with the screen not with the other tools maybe it's also there for you
Y’all are getting far, FAR too detailed with some of this stuff…. Measuring and marking the pick that you won’t actually use to open the device?!? lol that’s kinda funny. Just heat it up, grab a spudger, and the back just pops right off! The iFixit tech need to stick to the KISS method more often, you know KEEP IT SIMPLE STUPID!!! Like l, for reals, I’ve been doing this stuff for YEARS and using iFixit guides regularly and this is just ridiculous at this point!
Will the phone still work if the sensor assembly on the back of the screen is damaged?
-
-
-
Prepare an iOpener and apply it to the top edge of the screen for one minute.
-
-
-
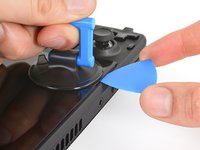
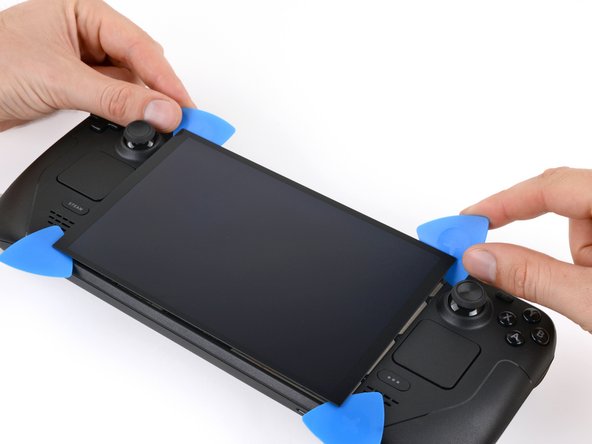
Apply a suction handle to the top left corner of the screen, as close to the top edge as possible.
-
-
-
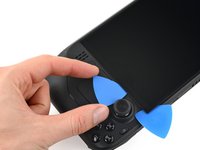
Pull up on the suction handle with a strong, steady force to create a gap between the screen and the frame.
-
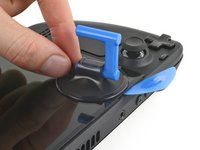
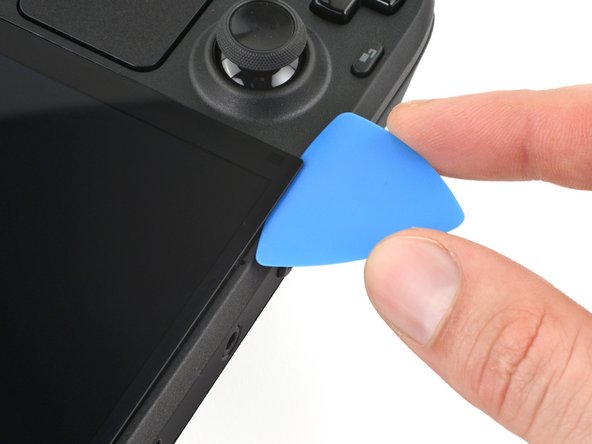
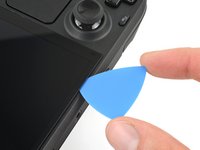
Insert the tip of an opening pick into the gap.
-
-
-
Pull up on the nub on the back of the suction handle to remove it from the screen.
-
-
-
Along the top and bottom edges, don't insert your pick deeper than 3 mm (~1/8 of an inch) to avoid damaging the sensors, sensors cable, or screen cable.
-
Along the left and right edges, don't insert your pick deeper than 5 mm (~1/5 of an inch) to avoid damaging the screen panel.
-
-
-
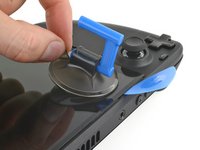
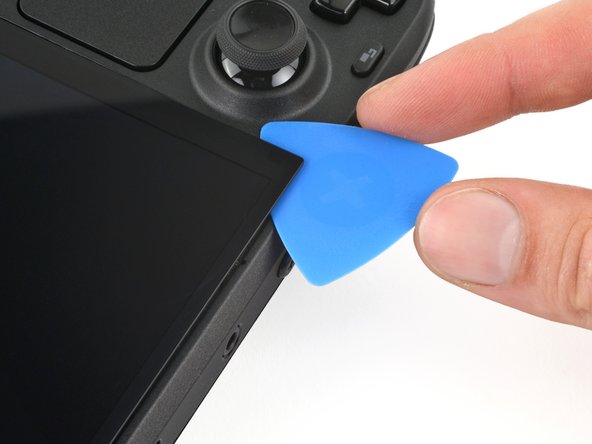
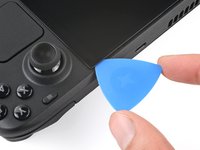
Rotate the pick so its flat edge is between the screen and frame.
-
Leave this pick inserted to prevent the adhesive from resealing.
-
-
-
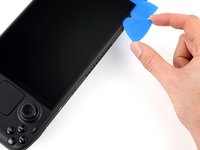
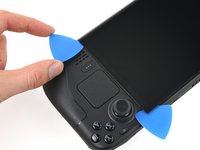
Insert another pick in the top left corner.
-
Slide the pick toward the power button to separate the adhesive securing the top edge of the screen.
-
-
-
Rotate the pick so its flat edge is between the screen and frame.
-
Leave this pick inserted to prevent the adhesive from resealing.
-
-
-
Heat the right edge of the screen for one minute.
-
-
-
Insert another pick just below the right thumbstick.
-
Slide the pick to the bottom right corner to separate the right edge adhesive.
-
Leave the pick inserted to prevent the adhesive from resealing.
-
-
-
Heat the bottom edge of the screen for one minute.
-
-
-
Insert another pick in bottom right corner along the bottom edge.
-
Slide the pick to the bottom left corner to separate the bottom edge adhesive.
-
Leave the pick inserted to prevent the adhesive from resealing.
-
-
-
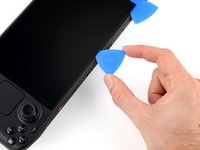
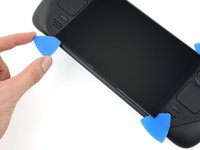
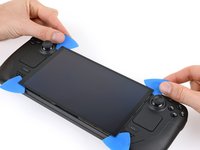
Grip the two picks along the top edge.
-
Pry up to lift the top edge of the screen away from the frame until you can grab it.
-
-
-
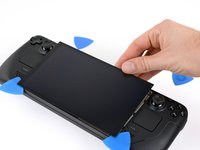
Flip the screen over the bottom edge of the frame.
-
Prop up the screen with a small box or book roughly 2.5 cm (~1 inch) thick.
-
-
-
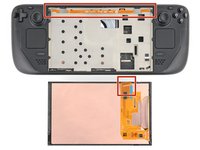
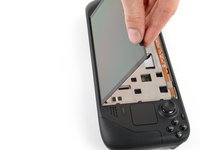
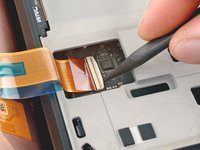
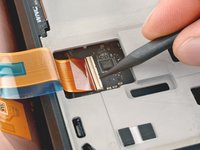
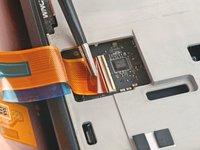
Use the point of a spudger or a clean fingernail to flip up the locking flap on the outside edge of the screen ZIF connector.
-
-
Инструмент, используемый на этом этапе:Tweezers$4.99
-
Use tweezers or your fingers to grip the screen cable pull tab and slide the cable straight out of its socket to disconnect it.
-


To reapply adhesive and install your screen, follow this guide.
Take your e-waste to an R2 or e-Stewards certified recycler.
Repair didn’t go as planned? Try some basic troubleshooting, or ask our Steam Deck OLED answers community for help.
To reapply adhesive and install your screen, follow this guide.
Take your e-waste to an R2 or e-Stewards certified recycler.
Repair didn’t go as planned? Try some basic troubleshooting, or ask our Steam Deck OLED answers community for help.
Отменить: Я не выполнил это руководство.
5 человек успешно провели ремонт по этому руководству.

Команду

6 Комментариев
I successfully swapped matte/glossy OLED model screens this way. First boot after swap had a frazzled screen. Hard reset fixed the problem instantly.
Is this compatible with limited edition?
the steps are the same for both OLED models. However the LE comes stock with a matte screen, standard model with glossy screen
Is it possible to upgrade Steam Deck 512GB LCD model to better matte OLED screen?
As well as upgrade the WiFi card?
No for the screen, i do not know for wifi. i doubt it.
Are connectors for screen same in lcd steam deck and oled screen? And possible to connect both with some alternative?